第1张图片")
Desert Night Tutorial: Part 2
由专筑网李韧,HYC编译
本教程的第二部分将详细说明图像的PS流程,相对于PS软件的复杂性来说,这幅图像在各个层次上都相对容易一些。因此这张图也能很好地说明我们如何通过一些简单常见的步骤来制作一张酷炫的图像。这部分的教程比较长,因为其中的讲解比较详细,这大概是我写过最详细的教程了,我希望它能够将工作流从开始到结束的各个方面表达清楚,展示我的配色与肌理表达。此教程的第一部分讲解的是关于模型和V-Ray渲染的处理【教程:沙漠住宅夜景图像(一)】
Part 2 of this tutorial will break down the Photoshop side of this illustration. In terms of Photoshop complexity, this image is relatively simple and minimal in layers. However, I think it is a good example of how a compelling image can be generated with just a few basic moves. This part of the tutorial is quite long and fully breaks down every aspect of the Photoshop file. It is probably one of the most detailed tutorials that I have ever written in terms of covering the entire process. My hope is that it will give a more complete picture of my entire workflow from start to finish and better show where I choose to emphasize color and texture compared to where I try to tone things down. In case you missed it, Part 1, which discusses modeling and V-Ray settings can be found here.
1、设置基本文件
第2张图片")
1A、我要做的第一件事就是设置基本渲染,当我打开V-Ray软件的RGB渲染模式时,我将其设置为智能对象。我通过右键单击图层,选择“转换为智能对象”,这样的话如果我在后期进行色调的调整那么也不会影响到原始图像,而且如果后期我的渲染图进行了更新,我也能很便捷地将其替换。在这之前,我还专门写过一篇文章来介绍智能对象的优势。
1. Setting Up Base Files
1A. The first thing I want to do is setup the base rendering. When I open the V-Ray RGB rendering, I convert it to a smart object. I do this by right-clicking on the layer and choosing “Convert to Smart Object”. This ensures that I will not cause destruction to the layer if I adjust the tone or levels. It also will allows me to replace the rendering with an updated rendering later if I need to. I also wrote a post a while ago about the advantages of smart objects HERE.
第3张图片")
1B、然后我将背景图像删除,我点击“选项—加载选项”,然后弹出“加载选项”的对话框里。
1B. Next, I want to remove the background. To do this, I choose “Select>Load Selection” which will bring up a “Load Selection” dialogue box.
第4张图片")
1C、在下拉菜单中选择“Alpha 1”,然后点击“确定”即可。
1C. Choose the “Alpha 1” in the Channel drop down menu and then choose “OK”.
第5张图片")
1D、当进行Alpha的加载时,我们将要进行背景的选择,一旦此选项处于激活状态,然后在图层面板中就会形成一个新组,接着我们选择“添加图层蒙版”。我将RGB渲染模式图层拖入新组中,那么天空就被删除了,如果我把其他渲染元素也拖入这个组中,那么其他的天空也会被删除,然后其中产生的折射、反射、光源都会消失不见。这样就不需要为每个元素都添加新蒙版了。
1D. When the Alpha is loaded, it will give a selection of the background. Once this selection is active, create a new group in the Layers Palette and then choose “Add Layer Mask”. When I drag my V-Ray RGB rendering layer inside of the group, the sky will be removed. Any other render elements that I drag into this group will also have the sky removed such as the Reflection, Refraction, and Raw Light elements. This avoids the need to create new masks for each element.
2、添加天空
第6张图片")
2A、首先,我在“基础文件”的组名下又创建了一个新组,名叫“天空”,在这个组中,我创建了一个名叫“柔化天空”的新图层。再使用中等透明度的笔刷工具进行涂抹,我一般习惯从浅蓝色过度渐变到深蓝色,这就为天空奠定了主要基础色调。
2. Adding the Sky
2A. I start the sky by first creating a new group under the “Base Files” group called “SKY”. Within this group, I create a new layer called “Sky Soften”. Using the “Brush Tool” with a soft tip and medium opacity, I slowly paint in a gradient from light to dark blue. The goal of this is to set the main color tones of the sky.
第7张图片")
2B、然后,我拖动天空肌理图层,将它放置在“柔化天空”图层之上。
2B. Next I drag in my sky texture and place it above the “Sky Soften” layer.
第8张图片")
2C、天空肌理有些过于生硬,因此我将这个图层的透明度降低至34%,这样能够保留一点点细节,但又不会让细节喧宾夺主。
2C. The sky texture is too strong so I lower the opacity of the layer to 34% so that the detail is subtle and not grabbing too much attention.
3、背景山峰
第9张图片")
3A、通过谷歌地球,我为沙漠住宅搜索了一些背景图,并将这些图像截图保存。然后我将山峰放置在图像上作为背景。
3. Background Mountains
3A. Using Google Earth, I was able to go to “Street View” at the location of the Desert House and save out a few screenshots. I then cut out the mountains to place into the illustration.
第10张图片")
3B、然后我把山峰图像拖动到画面中,并将其色彩调暗,再添加了一些亮蓝色。我通过阿尔法蒙版将新组“山”放置在“基础文件”组的下方。
3B. Once the mountains are cutout, I can drag them into the illustration. I darkened and colorized them to give them a slight blue tone. I also made sure the “Mountain” group was below my “Base Files” group to take advantage of the alpha mask.
4、大地
第11张图片")
4A、接下来是编辑地面,首先我要创建一个地面选项,我拖动“材质ID”元素(这在第一部分中讲过)将其放置在图层面板的最上方,然后选择“选项—色彩范围”,再弹出的“色彩范围”对话框中选择地面的颜色,一般为咖啡色,这将会让地面部分在“色彩范围”的对话框中突出显示,然后根据需要调整“颜色容差”,最后单击“确定”。在选择地面时,我创建了一个名为“地面”的新组,然后选择“添加图层蒙版”,这样的话我就能随意地添加材质肌理,而不需要为每个肌理层都添加蒙版了。
4. Ground
4A. To start editing the ground, I first need to create a selection of the ground. I did this by dragging in the “Material ID” V-Ray element (discussed in part 1) and placing it at the top of the Layers Palette. Next, choose “Select>Color Range” to bring up the “Color Range” dialogue box. Pick the color of the ground, in this case, the brown color. This will highlight the ground in the “Color Range” dialogue box. Adjust the “Fuzziness” slider to refine the selection as needed. Then click “OK” to load the selection. With the ground selection active, create a new group called “GROUND” and choose “Add Layer Mask” at the bottom of the Layers Palette. I now have a container to add in many textures without needing to create new masks for each texture.
第12张图片")
4B、在“地面”组中,我创建了一个名为“阴影”的新图层,在这一图层中,我使用中等透明度的黑色笔刷让地面涂抹变暗,这样能够更好地与环境氛围相匹配。
4B. In the “GROUND” group, create a new layer called “Shadow”. In this layer, I use the “Brush Tool” with black paint, a soft tip, and medium opacity to darken the ground which better matches the lighting of the scene.
第13张图片")
4C、接下来,拖动地面肌理,我运用了大约5种不同的图像来合成前景、中景,以及背景肌理。
4C. Next, drag in some ground textures. I am using about five different images to make up the foreground, mid-ground, and background textures.
第14张图片")
4D、当所有肌理都调整完毕,我将“地面”组的“图层混合模式”设置为“叠加”,这样地面的肌理能够更好地与整体画面相融合。
4D. Once all of the textures are in place, I set the “Blend Mode” of the entire “GROUND” group to “Overlay”. This sets the textures into the image and picks up the shadows and colors of the ground.
第15张图片")
4E、最后,我想在地面上添加一些光线,于是我在“地面”组中创建了一个名为“光”的新组,然后创建一个新图层,选择低透明度的浅橘黄色笔刷在地面上涂抹出灯光效果,最后将“图层混合模式”设置为“叠加”,这样地面就有了温暖的效果。
4E. Finally, I want some of the glow of the interior to wash across the ground. To do this, create a new group called “LIGHT” inside of the “GROUND” group. Inside the “LIGHT” group, create a new layer. Then select the “Brush Tool” with a light orange paint, a soft brush tip, and low opacity and start painting in the warm colors. Finally, set the “Blend Mode” to “Overlay” to blend the warmth into the ground.
5、屋面肌理
第16张图片")
5A、屋顶肌理的设置于地面相同,我重新创建“屋顶”组,然后添加蒙版,同样地,添加肌理,调整“图层混合模式”为“叠加”。
5. Roof Textures
5A. For the roof textures, the process is the same as the ground textures. I create a group called “ROOF” with a mask applied. In it, I add textures and set the “Blend Mode” of the group to “Overlay”.
6、室内灯光
第17张图片")
6A、我创建了名为“室内灯光”的新组,然后将这个组放在“基础文件”组中,这样我能够直接运用其中的Alpha选项。在“室内灯光”组中,我创建另一个新组,名为“屋顶灯光”,添加蒙版,将绿色区域突出。
6. Interior Light
6A. For the interior lights, I again create a new group and call it “INTERIOR LIGHTS”. I place this group into my “Base Files” group so that I can take advantage of the Alpha selection. Inside the “INTERIOR LIGHT” group, create another group called “CANOPY GLOW” with a mask of the area highlighted in green.
第18张图片")
6B、在“屋顶灯光”组内,创建新图层“暖色光”,然后选择低透明度的浅橘色笔刷,为图层添加部分暖色,最后调整“图层混合模式”为“叠加”,让整个画面具有温暖的气息。
6B. Within the “CANOPY GLOW” group, create another new layer called “Warm Glow”. Then select the “Brush Tool” with a light orange paint, a soft tip, and low opacity. From there, slowly add in the light orange paint. Finally, set the “Blend Mode” to “Overlay” to blend the warmth into the image.
第19张图片")
6C、在建筑的背面还有玻璃材质,这样能够从中透出光线,为屋顶带来一些暖色,于是再创建一个带蒙版的新组来将其设置。
6C. There is also glass on the back side that will be adding warmth to some of the roof. Create a new group with a mask revealing just this section.
第20张图片")
6D、重点是,运用低透明度的浅橘黄色笔刷在这个区域里进行涂抹,最后设置“图层混合模式”为“叠加”。
6D. Again, use a soft brush with a light orange paint, soft tip, and low opacity to paint in warmth in this area. Finally, set the “Blend Mode” to “Overlay”.
7、雾气
第21张图片")
7A、添加雾气只是为了让画面更具景深感,通常我会重新设置一个名为“效果”的图层,然后在其中创建新图层,选择低透明度,边缘柔化的浅蓝色笔刷,重点在在地平面附近进行涂抹,我会设置几个不同的雾气图层,这样能够更好地设置雾气密度,也能更好地控制不同区域的画面透明度。
7. Fog
7A. Some fog is added to give just a hint of depth to the image. I usually do this in a group called “EFFECTS”. To add in fog, create a new layer, select the “Brush Tool” with a light blue paint, a soft tip, and very low opacity. Slowly paint in the haze focusing most of it near the horizon. I have several fog layers to better manage the density of the fog and to better control opacity in different areas.
第22张图片")
7B、雾气图层在黑色背景下的效果如图所示,这看上去非常微妙,主要集中于地平线上下。
7B. This image shows just the fog layer on a black background. You can see it is very subtle and focuses mainly near the horizon.
8、人物
第23张图片")
8A、一般来说,我喜欢把人物方在雾气图层之后,但是在这种情况下,“人物”组应该放置在“效果”组之前,这样能够更好地控制整体色调。首先,我将一个人物拖动进画面,并转化为“智能对象”。
8. People
8A. Normally I like to place people behind the fog layers. However, in this case the “PEOPLE” group is placed on top of the “EFFECTS” group for more control with their toning. To get started, I first drag in one of the cutout people and convert the layer to a “Smart Object”.
第24张图片")
8B、接下来,这个人物需要与整体画面色调相匹配,我选择“图像—调整—色相/饱和度”,在出现的“色相/饱和度”对话框中,将“明度”滑块向左滑动,使人物变暗,然后单击“确定”。
8B. Next, the person needs to be darkened to match the scene. Choose “Image>Adjustments>Hue/Saturation”. In the “Hue/Saturation” dialogue box, move the “Lightness” slider left to darken the person. Then choose “OK” to close out of the box.
第25张图片")
8C、然后,选择“图像—调整—色相/饱和度”,这一次,选择右下角的“着色”选框,然后调整“色相”,将其调整至蓝色,这样能够与整体环境相匹配。最后,将“明度”滑动至右边,这样能够形成雾气蒙蒙的效果。
8C. Next, again choose “Image>Adjustments>Hue/Saturation”. This time, check the “Colorize” box in the lower right, then slide the “Hue” slider to a blue tone that matches the sky and atmosphere. Finally, slide the “Lightness” slider to the right to lighten the cutout and account for some of the haze in the image.
第26张图片")
8D、然后可以为人物添加一些阴影,先创建一个新图层,然后运用中等透明度的黑色笔刷进行涂抹,然后在图像中央形成一个深色投影点。
8D. To help ground the person, a shadow can be added. Create a new layer, then choose the “Brush Tool” with black paint, a soft tip, and medium opacity. Then paint a spot in the middle of the canvas.
第27张图片")
8E、选择“编辑—变幻—缩放”,来缩小阴影的比例,从而与人物相匹配,同时也可以按照需求降低透明度。
8E. Choose “Edit>Transform>Scale” to thin the shadow and scale to match the person. The opacity may need to be lowered as well.
第28张图片")
8F、最后,为剩下的人物重复这些步骤。
8F. Finally, repeat these steps for the rest of the entourage.
9、“Instagram”视角
第29张图片")
9A、因为我需要将这张图像贴在我的Instagram账号中,于是我需要添加一些其他色彩,首先,我通过“Ctrl + Alt + Shift + E”将所有的图层合并,然后也将这个合并图层转化为“智能对象”。
9. That “Instagram” Look
9A. I ended up posting this image on my Instagram page with a little extra color tweak. To create this extra bit of color, first create a copy-merge of all of the layers. This is done by creating a new layer, then typing “ctrl+alt+shift+E”. Then convert it to a smart object by right-clicking on the layer and choosing “Convert to Smart Object”.
第30张图片")
9B、然后选择“图像—调整—色相/饱和度”,来调整图像的饱和度与亮度。
9B. Next, choose “Image>Adjustments>Hue/Saturation” to bring up the dialogue box. Then increase both the Saturation and Lightness.
第31张图片")
9C、再将“图层混合模式”设置为“叠加”,这能够更好地表达画面的颜色,我将透明度降低,同时也将强度也进行降低。
9C. Now, set the “Blend Mode” to “Overlay” . This should significantly enhance the colors of the image. I lowered the opacity to tone down the strength just a little bit.
第32张图片")
9D、再创建一个新图层,填充为蓝色。
9D. Next, create a new layer and fill the new layer with a blue paint using the “Paint Bucket Tool”.
第33张图片")
9E、将这个蓝色图层的“图层混合模式”设置为“颜色减淡”,透明度调整为20%。
9E. Set the “Blend Mode” of the blue color layer to “Color Dodge” and then lower the opacity to about 20%.
第34张图片")
9F、然后添加新图层,运用低透明度的黑色笔刷在画面的顶部和底部稍稍涂抹。
9F. Finally, with the “Brush Tool” set at a low opacity, create a new layer, select a black paint, and darken both the bottom and top to create a vignette effect.
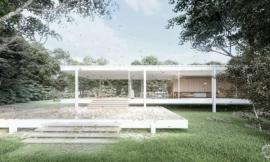
最终成图
第35张图片")
出处:本文译自visualizingarchitecture.com/,转载请注明出处。
|
|