沙漠住宅夜景教程Part 1
Desert Night Tutorial Part 1
由专筑网YX,李韧编译
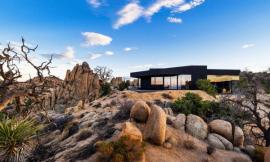
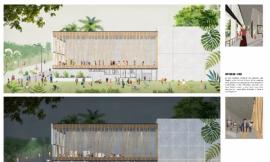
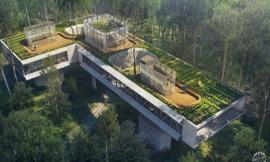
有很多人希望我能更彻底地分析制作图像,而沙漠之家的黄昏镜头则是一个不错的选择。我喜欢这张照片,因为这需要用到基本的Photoshop操作,这个制作的过程并不复杂,我将用最简单的方法来分析这个图像。
在这个教程中,我使用的是稍微老一点的Sketchup(2015)和V-Ray 2。我所描述的设置有些能够通用,在Sketchup和V-Ray的更新版本和旧版本中也有类似的转换。例如,我在办公室时使用的是Sketchup和V-Ray(3)的最新版本,尽管界面不同,但是这些设置在很大程度上仍然一致。本教程表达的重点不在于软件的设置,而是工作流的概念,以及在哪里花时间和节省时间。因此,重点在于图像制作的思路。
I have had a ton of people asking me to create a more thorough breakdown of one of my images and it seems the desert house dusk shot would be a good candidate. I like this image because not a ton of Photoshop is needed for the illustration, but the little Photoshop that was needed had to be spot on. The process for this illustration is not complicated and I am going to try to break this image down into the most simplified way I can.
Some quick notes: I am using a slightly older version of Sketchup (2015) and V-Ray 2 for this tutorial. The settings I am describing are somewhat universal and translate similarly in newer and older versions of both Sketchup and V-Ray. For example, we are using the latest versions of both Sketchup and V-Ray (3) in our office at Design Distill and these settings remain largely the same though the interface is different. The important thing to take away from this tutorial is not the specific settings but the larger ideas of workflow and where to spend and not spend your time. Like I said, I am providing what I think are the most critical ideas that led to the creation of the this image and am not trying to get lost in the weeds of render settings.
1. Sketchup分组
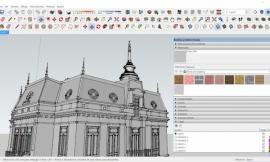
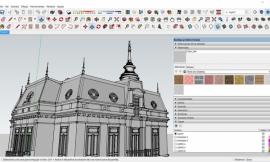
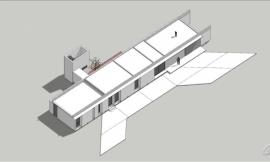
由于这个项目规模很小,我创建3D Sketchup模型的方式与其他模型略有不同。我把它按系统分类,这样地面和台阶是一组,玻璃和室内墙壁是另一组,然后是木隔板、钢结构,最后是屋顶系统。在这些组中还有另外几个图层的组和组件。然而,五个主要的分组让我能够快速地找到每个分类,让模型保持清晰,整洁和干净,并且易于编辑。我在这里展示了之前创建的一个分组图。
1. Sketchup Grouping
Since this project scale is small, the way that I organized the 3D Sketchup model is a little different than some of my other models. I grouped it by system so that the ground and terracing was one group, the glass and interior walls was another, then the wood screen, the steel structure, and finally the roof system. Within these groups are another several levels of groups and components. However, the five main groups allow me to get to each system quickly and really helps me to keep everything neat and clean and also very editable. I created a time lapse a while ago showing me constructing one of my models here.
2. 材质
由于视角非常远,所以材质并不像从内部或近处看时那样重要。我只使用了四种材质,两种木材、一种金属、一种玻璃。并且通过在网站上下载的一些贴图来构建纹理。我不喜欢像铺设瓷砖一样表现材质,所以我倾向于运用较小的纹理来形成整体感。我还调好了颜色,去掉了粗糙的深色节点。木头的色调很重要,因为人们从远处就能看到它,同时,灯光的设置也会影响图像的表达。
2. Textures
Since the view is so far out, the textures are not as important as say a view from inside or really close up. I really only have about four textures that I am using; two woods, a metal, and a glass. I built the wood textures by editing some textures that I found on textures.com. I don’t like textures that show tiling, so I tend to build larger textures from smaller ones that don’t repeat as often. I also toned them and removed the harsh dark joints. The wood tones were important because these would read from far away and would significantly affect the “warmth” of the image as I drop in lights.
3. 夜景设置
现在模型和纹理设置已经完成,我需要开始设置场景的灯光。通常情况下,我会在Photoshop中调整图片的颜色和照明,当我不想花费过多的时间时,便会用3D的方法来完成。如果某些要素在PS中能够调整,那么我就不会在前期花费过多的时间,比如我会将重心放在阴影方向、柔和度以及人工照明之中。这个场景的天空来源于HDRI贴图,这意味着我使用图像来产生光,而不是使用V-Ray的太阳和天空。这可以使场景更加柔和,并更好地控制特定的照明场景。在这种情况下,整个图面更接近夜晚,此时太阳在地平线下,场景色调偏向蓝色。为了做到这一点,我关掉了V-Ray 太阳,并上传了HDRI图像。天空贴图从Vizpeople下载,有很高的分辨率。
为了设置这些,我打开了V-Ray选项编辑器并扩展了“环境”选项卡。在GI全局照明(天窗)下,我选择了带有字母“M”的图标。在V-Ray纹理编辑器对话框中,我将左边的下拉框设置为“TexBitmap”(材质位图贴图),然后将HDRI天空上传到“File”(文件)旁边。最后,我将UVW类型设置为“UVWGenEnvironment”(UVW环境),并将映射类型设置为“球形”。为了调整光源的方向,我将天空水平旋转 “280度”。然后在“环境”选项卡的反射/折射(背景)旁边的字母“M”中重复这个操作。
3. Night Settings
Now that the modeling and texturing is complete, I need to start setting up the lighting of the scene. Typically, I really push the coloring and lighting of the illustration in Photoshop, therefore, I am just trying to get something close in 3D without spending too much time. I am more focused on setting up things that are difficult to adjust in Photoshop such as shadow direction and softness as well as artificial lighting. This scene is lit by an HDRI sky which means I use the image to generate the light instead of using the V-Ray sun and sky. This can give the scene softer shadows and provide more control over specific lighting scenarios. In this case, the scene is close to night with the sun below the horizon and lots of blues throughout. To do this, I turned off V-Ray sun and instead uploaded the HDRI image. The sky was downloaded from Vizpeople and is at a high resolution.
To set all of this up, I opened my V-Ray option editor and expanded the “Environment” tab. Under GI (Skylight), I chose the icon with the letter “M” on it. In the V-Ray Texture Editor dialogue box, I set the left dropdown to “TexBitmap” and then uploaded the HDRI sky next to “File”. Finally, I set the UVW Type to “UVWGenEnvironment”, and set the Mapping Type to “Spherical”. To rotate the sky thus rotating the direction of the light, I edited the Horizontal rotation to “280”. Repeat this for the letter “M” next to Reflection/refraction (background) in the “Environment” tab.
4. 灯光
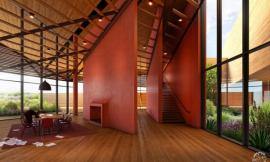
外立面的木百叶窗是设计理念的重要组成部分。我想要有室内光线透过木百叶的感觉,因此,我设置了一盏V-ray聚光灯。由于视野远离建筑物,光源可以往下降,并放置在与视角水平的位置。
当你在设置聚光灯的时候,你可以右键点击它,然后选择“V-Ray for Sketchup>Edit Light(编辑光源)”,这就出现了V-Ray灯光编辑器,你可以在其中调整一些设置。我通常把颜色设置为淡橙色等暖色调。强度数字实际上是基于相机曝光设置和环境照明。然而,在这个案例中,我将强度设置为“150”,并将单位设置为“辐射功率(W)”。对于聚光灯的圆锥角,我将它设置为“1.3”,这会稍微加宽照射范围,然后将半影角设置为“0.75”,这样会使边缘稍微柔和一些。最后,我将衰减设置为“平方反比”,这将使光线在远离光源时能够消失得快一些。
4. Lights
The wood louvers on the exterior facade are an important part of the design concept. I wanted a lot of light inside bouncing around to play up the screen effect, therefore, I dropped in a bunch of V-Ray spot lights. Since the view is far away from the building, the lights were dropped in a little more casually and were placed based on the view angle.
When you drop in a spotlight, you can then right click on it and choose “V-Ray for Sketchup>Edit Light”. This brings up the V-Ray Light Editor where you can adjust some of the settings. I usually set the color to something warm such as light orange. The intensity number is really based on the camera exposure settings as well as the environmental lighting. However, in this case, I set the Intensity to “150” and set the Units to “Radiant Power (W)”. For the Cone Angle, I set it to “1.3” which will widen it slightly and then set the Penumbra Angle to “0.75” which will soften the edge a bit. Finally, I set the Decay to “Inverse Square” which will cause the light to fade much quicker as it moves further from the light source.
5. 其他选项编辑器设置
在V-Ray选项编辑器的“Camera(相机)”选项卡下,调整了两个设置。在白天场景时,我不太需要调整相机,大部分都是默认设置,但是,对于夜间场景,最好降低快门速度和F(光圈)大小,这很有帮助,这样当你在设置V-Ray灯光时,你不需要大幅增加它们的强度。
5. Other Option Editor Settings
Under the “Camera” tab of the V-Ray option editor, two settings were adjusted. For daytime shots, I don’t adjust much with the camera and leave most of the defaults. However, for night shots, it’s good to lower the shutter speed and f-number. This is helpful so that when you are dropping in V-Ray lights, you don’t have to substantially increase their strength.
在“VFB通道”标签下的“V-Ray选项编辑器”中,我选择了更多的通道。在这个例子中,我选择了RGB颜色、Alpha通道、材质ID、原始光源、原始总照明、反射和折射。
Under the “VFB Channels” tab in the “V-Ray Options Editor” I turned on a few more channels. For this illustration, I highlighted RGB Color, Alpha, Material ID, Raw Light, Raw Total Light, Reflection, and Refraction.
最后,在“Output(输出)”选项卡下,设置图像的分辨率和比例。我检查了“Override Viewport(覆盖视窗)”框,然后将宽度设置为“6000”px(像素),将高度设置为“5000”px(像素),这个比例是1.2,是我想要的比例,因为这个尺寸我可以用于制作作品集,所以我选择了“L”按钮来锁定它,否则,我通常使用的比例为1.77,这是常见的16:9的长宽比。
在渲染输出中,我检查了“Save Output(保存输出)”框,并设置了一个渲染完成后保存文件的位置。同时在此处将文件类型设置成.tif。
Finally, under the “Output” tab, I setup the resolution and ratio of the image. I checked the “Override Viewport” box, then set the Width to “6000” px and set the Height to “5000” px. This gave a ratio of 1.2 which is the ratio that I wanted, so I chose the “L” button to lock it. I am going with a 1.2 ratio because it matches the ratio of my next portfolio I am producing. Otherwise, I typically use 1.77 which is the more common 16:9 aspect ratio.
Under Render Output, I checked the “Save Output” box and browsed to a location to save the files when they are finished rendering. This is also where I setup the file type to be saved which I set to .tif.
6. Sketchup的场景设置
最后,在渲染之前,需要在Sketchup中设置一些东西。我用“Position Camera(位置相机)”把场景设置成人视角度。当我选中它时,在模型上的任何地方点击,Sketchup会将相机自动放在视线水平位置上,这确保了我不会意外地把相机设置在3英尺(约0.9米)或10英尺(约3米)的尴尬高度。
6. Setting Up the View in Sketchup
Finally, there are a few things that need to happen in Sketchup before hitting render. I need to setup the camera at eye height which I use the “Position Camera”. When selected, I can click anywhere on the ground in the model and Sketchup will place the camera at that point at eye height. This ensures that I am not accidentally setting the camera at an awkward height of 3ft or 10ft.
接下来,我将使用菜单中的“Camera(相机)>Two-Point Perspective(两点透视)”将视图设置为两点透视,这能够自动矫正画面的垂直线条。
Next, I set the view to Two-Point Perspective by going to “Camera>Two-Point Perspective”. This ensures that all of my verticals are corrected.
最后,选择 “View(视图)>Animation(动画)>Add Scene(添加场景)”,把场景保存在Sketchup中。
Finally, I chose “View>Animation>Add Scene” to save the view in Sketchup.
7. 渲染
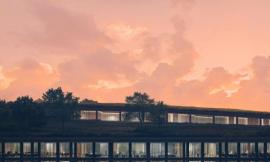
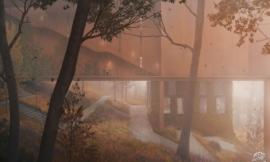
最后,点击“渲染”,让V-Ray生成高分辨率的图像和通道,我花了不到一个小时的时间。最后,输出的所有图像,将用在Photoshop中,添加纹理,调整色调。
我将在第二部分的教程中使用Photoshop进行图像后期处理,并通过分解每一个步骤,讲解如何添加天空、地面纹理、颜色、氛围和人物。
7. Render
Finally, I can hit “Render” and let V-Ray generate the high-res image along with the extra channels. It took V-Ray less than an hour to complete the job on my desktop. The final output gives me a solid base to work from in Photoshop and gives me everything I need to make proper selections, add textures, and tone the image.
I will spend part 2 of this tutorial in Photoshop bringing the rendering to life by breaking down each step and describing how I added the sky, ground textures, color, atmosphere, and entourage. Stay tuned.
出处:本文译自visualizingarchitecture.com/,转载请注明出处。
|
|
第1张图片")
第2张图片")
第3张图片")
第4张图片")
第5张图片")
第6张图片")
第7张图片")
第8张图片")
第9张图片")
第10张图片")
第11张图片")
第12张图片")
第13张图片")
第14张图片")
第15张图片")
第16张图片")
第17张图片")