Making of Griehallen – Memory
由专筑网马邦俊,刘庆新编译
Tamas Mdeve对于挪威卑尔根Griehallen在冷雨天回忆的图片,以极好的合成技巧与氛围的把控令我们如同身临其境一样,就像与他站在这座音乐厅旁,同时这也让他荣获RonenBekerman网站2014年第14周的“最佳表现作品”称号。参与到Tamas的教程中来,文章中他会介绍他如何在过程中使用3dsMax与V-Ray来创作这个场景,以及在最后有一些额外的特写,望大家乐在其中!
Tamas Medve是匈牙利的3d艺术家。他学了5年建筑,在他第4年的学习期间对3DSMax有了更深入的研究,清楚意识到他实际上喜欢做的是ArchVIZ。他离开大学后,得到了一个很好的机会去伦敦,成为一名可视化艺术家,在福斯特建筑事务所工作。一年半后,他把他的作品集发给MIR(国外著名效果图公司),现在他已经是这个天才团队的一员了。
Tamas Medve‘s cold and rainy visual memory of the Grieghallen in Bergen, Norway awarded him Best Visualization of the Week NO. 14/2014 for the great composition and mood he managed to convey, as if we stand there with him next to this concert hall in the rain. Join Tamas in this article, as he describes his process of creating this scene using 3dsmax and V-Ray, with some extra shots at the end. Enjoy!
Tamas Medve is 3d Artist from Hungary. He studied architecture for 5 years, getting more serious about 3dsmax during his 4th year and understanding he actually loves doing ArchVIZ. After he left university he got a great opportunity to move to London and work as a visualization artist at Foster+Partners. A year and a half later he sent his portfolio to MIR, where he is now… part of a great talented team.
项目论坛线程——Grieghallen——“记忆”
介绍
大家好!
感谢你们给我这个机会分享在我最近名为“Grieghallen——记忆”的作品中使用到的方法与技巧。这是一个莫大的荣誉,所以我想给Ronen一个呐喊来感谢他的盛情邀请。
首先,让我们先从项目背后的灵感着手。
为什么我要创作这张图片?
这个问题的答案很简单。我想创造一张3d图片,这张图总能让我想起在挪威卑尔根美好的时光;回忆起雨滴在我的大衣上的感觉和多变的天气使卑尔根如此特别的情景。
在本教程中我不会说太多的技术细节,因为我并不比你们好。你会看到,像我只有基本的造型和变形能力,都能很容易地达到这种图片效果。我试图专注地讲解一些最重要的步骤并用一些小技巧来使之更有趣味,尽我所能地展示我的工作流程。
我希望你在这里能找到一些有用的想法,并且进行有乐趣地阅读!让我们开始吧…
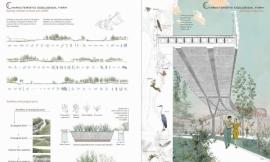
参考图
当有人问我,“我怎么能做到你说的这个或那个…”,我的第一个答案总是“找参考图”!
在你开始一个项目之前总是使用参考图。这些可能是照片或绘画。参考照片,或任何类型的图像,从开始到最后的PS阶段,对你的工作都会有帮助。
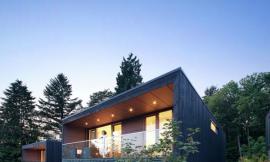
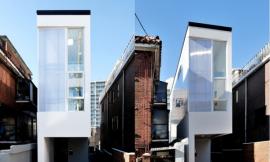
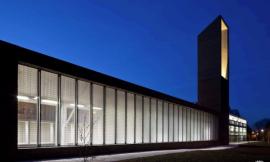
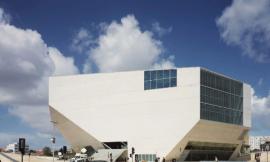
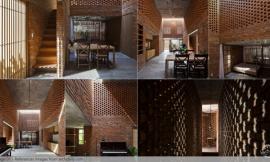
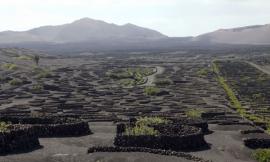
我的案例中很容易发现一些使用参考图的例子,像我总是经过Grieghallen,以我们在卑尔根的经验,等待雨的来临并不是问题。所以我在下雨的时候和一切都是干燥和照明较为阴暗的情况下拍了几张照片,看看两种天气之间的差异。这些照片还会在建模和布光的时候起到帮助的作用。
Project forum thread – Grieghallen – “Memory”
Introduction
Hi Everyone!
Thank you for giving me this opportunity to share my methods used in my recent work entitled “Grieghallen – Memory”. It’s a great honor, and so I would like to give a shout out to Ronen for his kind invitation.
First, let’s start with the inspiration behind the project.
Why did I create this image?
The answer to this is simple. I wanted to make an image in 3d that would always remind me of that great time I spent in Bergen; to remind me of that feeling of the impact of raindrops on my coat and the dynamic weather that makes Bergen so special.
In this tutorial I won’t say too much about the technical details, as I’m not better than you guys (as this article will reveal). You will see how easy it really is to achieve an image like mine with only basic modelling and texturing skills. I have tried to show my workflow in the best way I can, focusing on the most important steps spiced up with some tricks.
I hope that you find some useful ideas here and have fun reading it! Let’s begin.
References
When somebody asks me – “how I did you do this or that…”, my first answer is always“references”!
Always use references before you start a project. These could be photos or a paintings for instance. The reference photo, or any kind of image, is going to help your work from the beginning until applying the final tweaks later in Photoshop.
In my case it was easy to get some references, as I pass by Grieghallen all the time, and waiting for rain isn’t a problem we experience in Bergen. So I took a couple of photos when it was raining and a couple when everything was dry and the lighting was overcast, just to see the differences between the two kinds of weather. These photos also helped a lot in the modelling and lighting part of the project.
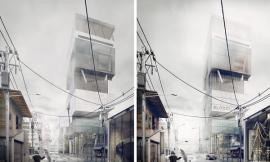
有的人会将设置灯光和相机这个步骤放在整个渲染过程中的较后的部分,但对我来说从这部分开始更有逻辑性。通常我以建一些基本的几何模型(像盒子)作为开始,这样帮助我探索整个场景和去发现令人兴奋的角度(或者只是发现一些最好的和最有吸引力的方式去展示建筑的角度)
Lighting and Camera Setup
Some of you might get to lighting and camera a bit later in the process, but starting with this part is more logical for me. Usually I start my personal projects with modelling some basic geometry (like boxes), which helps me to explore the scene and to find exciting angles (or just find that angle which shows the building in the best and most attractive way)
首先,我用两个盒子建立起我令人惊叹的场景。接下来,我设置照明。
在这个项目中,根据参考图我只使用V-Ray顶灯和一些V-Ray IES灯(高亮显示和照明一楼入口处)。使用的照明设置非常简单。
First, I built up my amazing scene of 2 boxes. Next, I set up the lighting.
In this project I only used a V-Ray Dome Light and a few V-Ray IES lights (highlighting the entrance and lighting the ground floor) following the references. The lighting set-up used is very simple.
我总是喜欢在透视图中看到天空,特别是不是阴天的情况下,有时真的会很有帮助。这个方法我使用HDRI的JPG图像来预览。
I always like to see the sky in the perspective view and this can sometimes be really helpful especially if your sky is not overcast. For this method I use a JPG from an HDRI image to use as a preview in the viewport.
所以我选取这个JPG图像,只需添加圆顶纹理槽。之后我从这里拖(复制)纹理到一个新的材料槽和环境窗口中(复制)。最后,我按alt + b(视窗配置),并将纯色背景更改为“使用环境背景”选项。
我可以在视窗中看到我的天空,这样我可以随时旋转它。然而,对于最后的渲染,确保你使用一个高分辨率纹理(我只是在渲染之前在Photoshop中重新调整原始纹理)。请参阅下面的细节。
So I grab this JPG image and simply add in the dome texture slot. After this I drag (copy instance) that texture from here into a new material slot and I drag it into the environment window too (copy instance) Finally I press alt+b (viewport configuration) and just change the background solid color to the “use environment background” option. That’s it.
I can see my sky in the viewport and I can rotate it easily in real-time. However, for the final render, make sure you use a higher resolution texture (I just re-scale the original texture in Photoshop before rendering). See the details below.
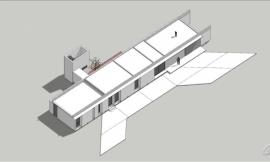
建模
建模绝对不是我的强项,所以我不喜欢去太深入这个话题,就像谈到技术,等等。事实上,开始建模阶段是最难的部分,因为我没有任何平面或剖面图纸,所以我不得不在早些时候制作出来的两个盒子和照片的基础上凭借视觉来建出这栋建筑(见照明和相机设置的部分)。我百分百确定我的模型是不正确的,但只要你的眼睛不能分辨出真假模型是否正确就不重要。
每一个模型我只使用基本的多边形建模工具,我只是用这些元素丰富场景。
Modeling
Modelling is definitely not my strength, so I wouldn’t like to go too deep into this subject like speaking about techniques, etc. Actually, starting the model was the hardest part because I didn’t have any plans or section drawings, so I had to model the building by eyesight based on the photos and the 2 boxes that I had made earlier (see the lighting and camera set-up part). I’m 100% sure that my model is not correct but if your eyes can’t discern a difference between real and fake it really doesn’t matter.
For every model I used only the basic poly modelling tools and I just dressed up the scene with these elements.
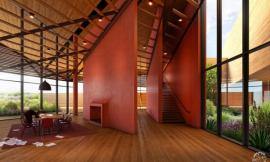
一个小建议:如果您使用的是双层玻璃的窗户你会得到更好的(翻倍)反射。
我会把一些雨滴滴在近景长椅来使这张图片和氛围更逼真。简单的压扁球体着色用3ds max的对象油漆工具。
One small piece of advice : if you are using double glazing in the windows you will get nicer (doubled) reflections.
To make the image and the mood believable I have put some raindrops on the foreground benches. Simple squashed spheres painted with the object painter tool in 3ds max.
此外, 建筑周围还有一些室内家具和几棵树(iTrees)。
In addition, there is some interior furniture and a few trees (iTrees) around the building.
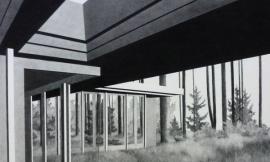
从下图你基本上能看到场景的效果。只差一样重要的东西,稍后让我们具体探讨。
Below you can almost see the result of the scene… just one important thing is missing, so let’s talk about that more.
纹理
在现实生活中,当你正在做一个项目时,你并没有那么多的时间去完成你所需要包含的很多细节或极好阴影和纹理。这就是为什么当我做个人作品时总是尝试像在一个有严格的最后期限的商业环境下去完成它(即使我有很多时间)。我知道这是一个坏习惯。为了节省较多的时间,我没有对所有周围的建筑进行建模,所以我不得不用另一种方式去解决这个问题。
Texturing
In real life, when you are working on a project, you don’t have as much time as you need to include a lot of details or to make stunning shaders and textures. That is why when I do a personal project I always try to finish it as I would in a commercial environment with a tight deadline (even if I have a lot of time). It’s a bad habit I know. To save a lot of time I didn’t model all the surrounding buildings, so I had to solve this issue another way.
当然我不得不在Photoshop中做一些小修饰和绘景修正照片,但是我认为效果很不错。我在V-Ray光材质中使用纹理和不透明地图,并取得不错的、真实的反射和颜色渲染效果。
Of course I had to do some small retouching and matte painting corrections on the photos in Photoshop, but it worked out pretty well I think. I used the textures + opacity maps in a V-Ray Light Material and I achieved nice, real reflections and colors in the render.
地面材质
我在Photoshop中对来自the Arroway Textures Concrete collection的地面石材纹理进行一些微小的修改(对比,颜色)。为了得到更好的效果,我也做了一个特殊位置变化的纹理。基本上,我给地面使用了2套材质。一套是V-RAY处理的石材,另一套是渲染积水。
The Ground Material
The ground stone texture is from the Arroway Textures Concrete collection with some small changes in Photoshop (contrast, color). I also made a specific displacement texture to get a better result. Basically, I used 2 planes for the ground. One is for the stone with V-Ray Displacement and another for the puddles of water.
生锈的窗框材质
我从CGTextures下载纹理,我对4种不同的纹理进行相互混合从而得到最终的漫反射贴图。
The Rusty Window Frame Material
I have downloaded the textures for it from CGTextures and I mixed about 4 different textures with each other to get the final diffuse map.
混凝土墙材质
The Concrete Wall Material.
渲染设置
在创作这张图片时我使用的是V-Ray渲染引擎(这是最常见的引擎)。它具有快速和容易处理的特点!这些是我通常使用的渲染设置。而且我认为是最基本的。
Render Setup
In creating this image I used the V-Ray render engine (which is the most common engine). It is fast and easy to handle! These are my render settings that I usually use. Pretty basic, I think.
我用BOX workstation大约花了3小时完成了4000px高图像渲染图。
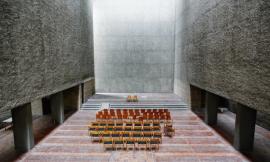
下面是最终的原始渲染图。
The 4000px high image render time took around 3 hours on a BOX workstation.
Below is the final raw render.
我在另一地块用干燥的石材材质进行渲染,并在Photoshop中与第一次渲染成果进行混合。这种方法给予我更多的自由度,因为我可以很容易地对干湿之间的边界进行修改。
I made another region render with a dry stone material that I blended with the first render in Photoshop. This method gave me much more freedom, because I could easily change the borders between the wet and dry parts.
后期制作
开始吧!
这是过程中最有趣的部分之一,你可对图作出最后的微调。我知道相比Photoshop,一些人更倾向于在3D中完成所有操作,但我相信在Photoshop中的操作同样重要。
它给予你太多的自由度。真的很难告诉你所有关于后期制作一般的技巧和方法,因为每张图片都需要不同的微调和调整。主要是,我使用3种不同的渲染元素。照明部分是强调图片亮部,反射部分如果有必要就增强反射效果,最后z-depth部分帮助您添加一些雾或模糊感(你必须使用z-depth作为Photoshop图层蒙版)。最后一点。如果想在图片上添加一些灰尘你可以覆盖一些纹理或只使用环境光遮蔽。
Post Production
Here we go!
This is one of the most interesting parts of the process, where you make the final tweaks and personal touches to your image. I know some people prefer to do everything in 3d and using Photoshop is just secondary, but I believe that working in Photoshop is as important.
It gives you so much freedom… it’s really hard to tell any general tricks and methods about post-production, because every image needs different tweaks and adjustments. Mainly, I use 3 different render elements for it. The lighting pass is to push up the lighter areas on the image, the reflection pass is to make the reflections stronger if necessary, and finally the z-depth pass which helps you to add some fog or mist (with the z-depth pass you have to use it as a layer mask in Photoshop). One more thing. If you want to add some dirt to your image you can overlay some textures or just use the ambient occlusion pass.
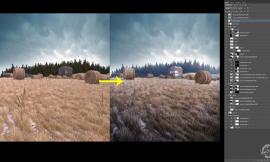
我工作时用的这个PSD文件有大量的图层,很混乱,但我做了一个简短的对主要步骤进行展示的分解视频。
直接从原始照片开始,所以人们可以很轻松地混合图像。
我有另一个小的建议给你:有许多可视化风格存在于我们的行业中,但是如果你在写实地做一个图像,不要把一个有着不同光感的人放进图片中。只找合适的人或者不放,否则它只会毁了这张图。
感谢您阅读本文,我希望你可以在这里发现了一些有趣的和有用的建议!请在下面的评论区提出问题(或在图像或段落旁)。
祝好!
Tamas Medva
The PSD file that I worked in is a big mess with tonnes of layers but I did a short post-production breakdown video showing the main steps. I pasted the people back in from the original photos so it was quite an easy job blending them with the image.
I have another small piece of advice for you : There are many visualization styles existing in our industry but if you are doing an image in a realistic way don’t put people who have different lighting on them. Just find a suitable one or leave it otherwise it will just ruin the image.
Thank you for reading this “making-of” article and I hope you found some interesting and useful advice in it! Feel free to ask question in the comments section below (or next to each image or paragraph).
Best wishes,
Tamas Medva
出处:本文译自www.ronenbekerman.com/,转载请注明出处。
|
|