Making of the weeHouse
由专筑网韩平,刘庆新编译
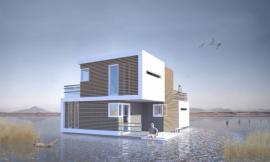
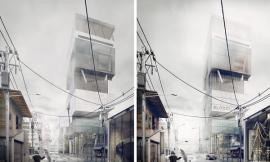
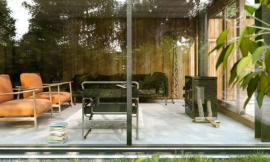
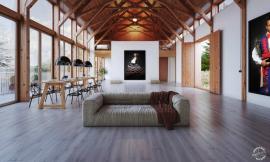
最初我看Mark这个作品时,它还在建造和成型阶段。现在已经完美竣工!他也获得了2015年第48周最佳作品奖,今天我很荣幸与大家分享Mark Staddon制作这些精美效果的教程。因为是预制项目所以它也更有趣。该项目由建筑师Alchemy设计,位于德克萨斯州的Mafra。Mark在该项目中用了一些创造性的手法,利用3ds Max, Corona 渲染器和PS进行后期修饰。一起欣赏吧!
I’ve seen this work by Mark as it was building up and taking shape. What a great finale! awarding him Best of Week 48/2015 and today I’m happy to share the making-of these beautiful visuals by Mark Staddon. Being a Prefab project makes it all the more interesting. Designed by Alchemy Architects and located in Mafra Texas. Mark took some creative license on this one and used 3ds Max, Corona Renderer, and Photoshop to get it done. Enjoy!
前言/Introduction
和大多数人一样,这些年我也从Ronen的教程文章和论坛中获得了大量的灵感和知识。能够完成这个项目对于我来说是一次难忘的经历,我非常感谢Ronen给我这个机会来分享我的工作流程及与大家一起讨论这个项目。
Like many of us, Ronen’s Making Of articles and forum have been a huge source of inspiration and knowledge over the years. Being asked to contribute to it is a humbling experience and I thank Ronen for the opportunity to share my workflow and discuss this project with you.
预制组装/The Prefab Syndrome

我对预制建筑非常感兴趣,它所拥有的灵活度可以对住宅建造地点产生最低的影响。由建筑师Alchemy设计的weeHouse就是最好的例子,它与德克萨斯州西部Mafra的自然环境完美融合。
weeHouse是我这个项目的灵感核心,你们可以在建筑师Alchemy 的网站– Marfa weeHouse欣赏该项目。
I’m often drawn to prefab architecture and the flexibility it can offer in creating low impact housing in amazing locations. The weeHouse by Alchemy Architects is a great example and compliments its surrounds in Mafra West Texas perfectly.
The weeHouse was the core source of inspiration for my project and you can view it at Alchemy Architects Website – Marfa weeHouse.


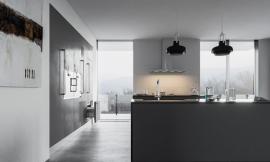
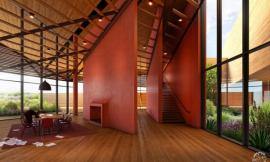
这些就是我这次创建的一些效果图。我的重点更多的是放在了建筑外部效果图上,以及在后期制作中融入景观,这也是我今天要跟大家讨论的内容。
Here are the final images I created for this set. My focus was more towards the external image set and the landscape integration in post which I will now discuss.


3D场景设置/3D Scene Setup
好的作图习惯就是在你开始一个新的场景之前,首先要保证你的伽马和单位(我总是使用毫米)是正确的。这样的话就能保证你在后续的工作中不会出现任何问题。
As a good practice, always make sure your Gamma and Units (I only work with millimeters) are correct before you start a new scene. Doing this at the beginning ensures you don’t have any issues later on in the project.

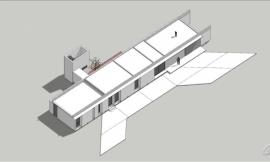
3D建模/3D Modeling
我喜欢研究个人预制住宅项目的另一个原因是建筑结构相对简单。利用网上收集的平面图作为参考,我就可以创建出建筑的结构。有时DWG文件不可用,这时我们导入平面图(设置好正确比例),这样就能获得一个建造的脚本。此外,像地板生成器和切角工具十分有用,也进一步加快了建模过程。
Another reason I enjoy looking into prefab architecture for personal projects is often the simplicity of the architecture to remodel. The structure was created using floorplans available online as well as reference imagery. Importing the plan (and scaling it correctly) will give you a footprint to build from when DWG’s are unavailable. In addition, tools like floor generator and quad chamfer are really helpful and further speed up the modeling process.


3D环境/3D Environment
我真的很喜欢参考图片中野生干燥的植物,所以我使用了我材料库中类似的案例进行重建。我选取了Evermotion, R&D Group和 iToo Software 中的许多模型利用树木插件进行分散。
树木插件非常有用也很常见,所以大家可以在该博客以往相关的许多文章找到很多信息。
但是我有一点建议:一定要在树木插件中对你的植物使用代理。
I really liked the wild, dry vegetation in the reference images so I used similar examples from my library to recreate it. Various models from Evermotion, R&D Group and iToo Software were selected and scattered using iToo’s Forest Pack.
Forest Pack is a great tool which you can find more information on by going over the many articles related to it on this blog.
One point I would suggest however, is to always make proxies of your vegetation to use within forest.


灯光/Lighting
我使用Corona渲染器已经很多年了,因为我发现只用它默认的设置就可以获得出乎意外的灯光效果(Corona渲染器1.4版本本周发布,你可以在Ronen的 ArchVIZ 商店中获取渲染演示样本)。
大多数场景我都没有过多的渲染外部的设置,只是对每个独立的HDRI贴图进行必要地调整。该系列效果图中中午的场景都是从NoEmotion免费网站下载的。
在环境栏中使用选择HDRI,保证它在我的视口中,这样调节高度和方向也更加容易。在这个阶段我使用了V-Ray HDRI加载器,因为我发现这是在场景中旋转和平衡HDRI贴图最简单的方法。另外,我还找到了一个有助于处理灯光过曝的色彩校正修改器。
最后的步骤是在Corona渲染器中平衡曝光设置。
I have used Corona Renderer exclusively for a few years due to the exceptional lighting results I found I could produce with relatively default settings (version 1.4 was released this week and you can get the Corona Renderer demo from Ronen’s ArchVIZ Shop).
Most of my scenes don’t vary much in settings outside the necessary adjustments needed for each individual HDRI. The HDRI for the afternoon shot in this set was taken from a great free website called NoEmotion.
Using the selected HDRI in the environment slot and also enabling it in my viewport makes height and directional adjustments much easier. I use the V-Ray HDRI loader at this stage as I still find its the easiest method of rotating and balancing an HDRI within the scene. In addition to this, I find a color correction modifier is helpful to deal with over saturated lighting results.
The final step is to balance the exposure settings within Corona Renderer.

黄昏场景的设置/The dusk scene settings.

纹理/Textures
该场景中大多数的纹理使用最基础的设置,但是对于一些面我试图增加一些细节。
地面材料非常简单,一个无缝拼贴的纹理,在反射/光泽度调节栏中设置好灰度,再利用位移增加细节。再在表面利用一个位移贴图为景观增加自然的起伏。
Most of the texturing in this scene use pretty basic setups but there were a few surfaces that I tried to make with some added detailing.
The ground material itself is pretty straight forward, a tileable texture and suitable greyscale used within the reflect/glossiness slots and also for displacement of the finer detail. A further displacement map on the surface itself is added for additional natural undulation to the landscape.

建筑砌块纹理相对复杂一点。我使用了复合的材料纹理——底层为砌块纹理,上层为渲染后混凝土效果图,通过mask进行控制,最后使用一个污垢贴图覆盖在物体的边缘。
The block-work was a little more complex. I used a composite material consisting of the underlying block-work and a rendered cement finish controlled with a mask and finally a dirt map for added wear along the objects edges.

我使用了另一种复合材料是建筑外表看起来磨损和风化了,因为我感觉这有助于图片整体的叙事性。
I used another composite material to make the corten cladding look appropriately worn and weathered as I felt it would help the overall narrative of the image.

渲染设置/The Render Setup
我的渲染设置相对标准。就是之前我提到的外部必要的曝光和环境设置。
我发现150 passes足以获得一张清晰的图片,通常我们都希望它能少一点。我所做的唯一改变这个项目的是位移贴图的尺寸。稍稍改变这个设置就能大大增加位移效果,但它也增加你的渲染时间。
My render set-up is pretty standard outside of the necessary exposure and environment settings discussed earlier.
I find 150 passes is more than enough for an image to be clean, often times it can be considerably less. One thing I did change for this project was the displacement screen size. Changing this setting slightly can greatly increase the displacement quality deeper into the image but it will increase your render times.

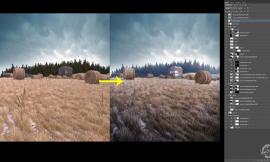
绘景/后期制作Matte Painting / Post Production
我希望在项目中创造一个晴朗的自然环境,因此我需要收集必要的图片来创建背景基调。对于午间场景,我所需的是合适的地平线和天空。通常我会渲染一个只有环境背景的.TIF图片,因为我发现它在后期增加细节的时候是非常有用的色彩参考。
在整合了背景和裸渲图后,我使用PS进行一系列的调整,比如图层和一些插件,尤其是Nik Collection Colour Efex Pro(调色滤镜) 和Alien Skin’s Exposure(模拟胶片调色滤镜)进行对比度和色彩调整。
Having a fair idea of the environment I wanted to portray this project in, I set about finding the necessary imagery to create the back-plate. For the afternoon shot, all I required was a suitable horizon line and sky. Often I will render out a .TIF of just the environment background as I find it a very useful color reference to build further detail upon in post.
After merging the background and raw render I use a series of Photoshop adjustment layers as well as some plugins, particularly Nik Collection Colour Efex Pro and Alien Skin’s Exposure for contrast and color adjustment.


黄昏场景需要在背景上增加一些数字绘景进行完善。
我从环境背景的渲染图片出发,将用来创建理想景观的适当的植物景观利用一系列的PS调整(色阶/色相饱和度/曲线)以匹配渲染环境的强度和温度。
The dusk scene required a little more matte painting to complete the background.
Starting with the rendered image of the environment background I include appropriate vegetation imagery to create the desired landscape and add a series of Photoshop adjustments (levels/hue & saturation/curves) to match them with the intensity and temperature of the rendered environment.


到这里就结束了。
再次感谢Ronen以及对该项目感兴趣的各位。我非常荣幸有这个机会与大家分享我的工作流程的一些心得。
Mark Staddon
That brings it to an end.
Thanks again to Ronen and everyone who took an interest in this project. I’m grateful for the opportunity to share some of my workflow with you.
Mark Staddon
出处:本文译自www.ronenbekerman.com/,转载请注明出处。
|
|
专于设计,筑就未来
无论您身在何方;无论您作品规模大小;无论您是否已在设计等相关领域小有名气;无论您是否已成功求学、步入职业设计师队伍;只要你有想法、有创意、有能力,专筑网都愿为您提供一个展示自己的舞台
投稿邮箱:submit@iarch.cn 如何向专筑投稿?