Making of Swedish Barn House #001
由专筑网李佳琪,刘庆新编译
Victor Larsson最新制作的3D模型瞬间吸引了我的眼球,它是瑞典预制生产 由 Claesson Koivisto Rune的建筑师设计的 Arkitekthus1号住宅。首先,我对任何一个预制的建筑都没有抵抗力,再加上它有完美的光线处理,以及与黄昏的雪景图片恰到好处的组合,都让我对他这样处理的原由以及制作方法产生了好奇。他在这篇文章中亲切地与我们分享了他的制作过程,希望你会喜欢!
Victor Larsson caught my eye right away with his latest 3d recreation of Swedish Pre-Fab manufacturer Arkitekthus House #001 designed by Claesson Koivisto Rune Architects. First of all, I have a soft spot for anything pre-fab and adding to that a set of perfectly lit and well composed visuals with a striking dusk snow image got me curious about why and how he went about making this scene. He kindly shares with us his process in this article which I hope you’ll enjoy!
作者:Victor Larsson
Victor是一位自学成才的3D艺术家和平面设计师,目前在瑞典的哥德堡工作和生活。投身于数字艺术领域多年是希望为生活带来灵感。Victor曾经与斯堪的纳维亚半岛最大的建筑事务所合作。
Author: Victor Larsson
Victor is a self-taught 3d-artist and graphic designer, currently working and living in Gothenburg, Sweden. His desire to bring ideas to life has resulted in many years of experience in the field of digital art. Victor have worked with several of Scandinavia’s biggest architectural offices.
简介
首先,感谢Ronen给我机会在博客中分享制作过程,并且在 Facebook粉丝页面共享我的作品。
这篇文章将描述我是如何使用3dsmax、V-Ray以及Photoshop将这些项组合在一起的。我一直喜欢简约的结构,而这个我于2011年在网上发现的瑞典谷仓就是这样的。
我喜欢这种用硫酸铁涂抹在木头上的处理,这使得它从远处看时,几乎从周围环境中消失。这可能是我把它放在第一位的原因。
我在2011年开始制作这个模型,但由于某些原因,停滞了3年。最近,我在硬盘上偶然发现了它,决定继续完成……就是这样。
Introduction
First, big thanks to Ronen for the opportunity to write a making of for the blog and sharing my work on the blog's Facebook Fan Page.
In this article I’m going to describe how I've put this project together using 3dsmax, V-Ray and Photoshop. I have always been a fan of minimalistic and clean structures, and this Swedish Barn I found online back in 2011 was exactly that.
I liked the approach and the treatment done on the wood by painting it with something called Iron sulfate to get a gray look which almost makes it disappear in this type of environment when you look at it from a distance. That is probably why I gave it a shot in the first place.
I started to model this one back in 2011, but for some reason it went into the freezer for 3 years. I stumbled upon it on my hard-drive recently and thought about giving it one more go… so here we are.


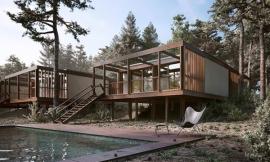
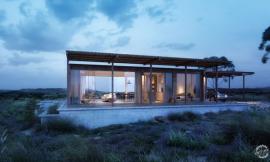
Arkitekthus公司给这个房子起名1号住宅,而我认为第一个这样的住宅建于2006年。他们致力于创造优秀的预制建筑,让他们的客户可以以很好的价格得到高质量的享受。
Claesson Koivisto Rune建筑事务所经Arkitekthus公司委托完善1号住宅。考虑到用户有机会改变一些材质,我进行了自由的发挥,并且改变了原有设计中的一些细节。
The name of this house is #001 by Arkitekthus, and I think the first one was built in 2006. They are into creating great PREFAB architecture their clients can enjoy from, with high quality at a great price.
Claesson Koivisto Rune architecture office was commissioned to develop the House #001 concept for Arkitekthus. Considering the client has the opportunity to change some kind of materials, I took the same liberty and changed some minor things from the original design.
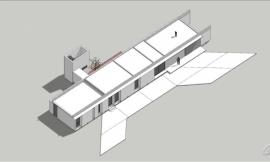
开始(建模)
为了对这个项目的外部和内部进行模型制作,我做的第一件事就是去Arkitekthus的网站上找一些建筑图纸和参考,使根据它制作出的3dsmax模型更容易与其吻合,更容易被认出。
Getting Started
I aimed at making both exterior and interiors for this project, and the first thing I did was visiting Arkitekthus website to get some architectural drawings and references to make the 3dsmax modeling of the base mesh as easy and informed as possible.


在模型立面上外包木板的制作中,我使用了众所周知的地板生成器。我为所有的墙壁板设置了相同的宽度,但在长度上允许其随机变化,为此我设置了不同的最小值和最大值。
For the modeling of the wood cladded facade, I used the well known Floor Generator script. I used the same width for all the wall boards, but did allow for randomness in the length of the boards by setting different min and max values for it.

我亲自做项目时,会关注细节,不管它在最后的成品中能展现多少。当知道我可以随时从每一个角度出发,或从每一个角度看房子的时候,我会很轻松。这里,我做了所有的地板钉,即使我使用的带有雪的冬季图片遮住了这个细节。
I payed attention to the details regardless of visibility in the final output when doing a personal project. I'm relaxed knowing I can always dive in closer or look at the house from every angle possible. Here, I did all the screws for the floorboards even though I went for winter image with snow covering that detail.


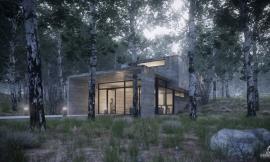
雪
关于雪地的制作,我先创建一个平面,然后用3dsmax界面中的塑形工具对其进行造型。雪有积累在物体旁边的趋势,就像在平台底部的这种情况,所以我在这些地方多刷了一些。
在对自己塑造的地形感到满意之后,我进行了截图保存,然后进入Photoshop界面,用随机散布的画刷在受环境影响较大的雪上进行粉刷处理。
在画面的右侧,有一片草场,因此我几乎脱离了它本身的形象,只是用低透明度的小散射画笔进行处理来得到一些造型。
在左边小道的制作上,我用了2种不同的鞋印。就像是一个成年人和一个孩子可能刚刚走在那里。
对于台阶,我做了特别的处理。把雪置于台阶表面下3mm处,然后移走木头上的雪,而不是使用非透明的贴图。然后我就可以在Photoshop中做任何我想做的事情,制作延伸到门口的脚印以及户外家具下的一些雪。同样的方法也适用于屋顶。在我想要有雪的地方画上白色,其余的地方保留黑色。
石头采用Rock Generator(石头生成器)插件来制作,然后用SnowFlow(雪制作)插件处理顶上的雪。
The Snow
For the snow on the ground I've created a plane and then started to sculpt it with 3dsmax sculpt tool from the ribbon. Snow has this tendency of accumulating next to objects, like in the case of the terrace bottom so I brushed some more at these parts.
When I was happy with the ground shape I took a screenshot and went inside Photoshop and started to paint with some random scatter grunge brushes on these parts where the environment can have made the biggest impact on the snow.
To the right, in my image, there is a grass field so I almost left it like it is, just made some minor scattering strokes with low opacity to get a little structure.
For the little road to the left I used 2 different shoe prints. I've considered something like one adult and one child maybe have been walking there.
For the terrace I did something different. I placed the snow 3mm beneath the terrace surface and then displaced the snow up over the wood instead of using opacity maps. This way I had the control in Photoshop to do whatever I liked, footsteps to the door and minor snow beneath the outdoor furniture. Same technique goes for the roof. Where I want the snow I paint white and leave the rest black.
The rocks were created with Rock Generator and SnowFlow for the snow on top of them.


在这个过程中我得到一个经验,以后会试着实施,这个经验就是尝试将这个场景分散成几个对象,因为我的地面纹理已经达到了20000px的大小。
One thing I learned during the process that I will try to implement in the future is to try and break this field into several objects because my ground texture went up to 20,000px wide.
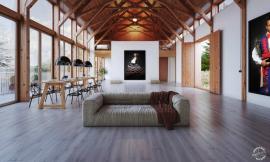
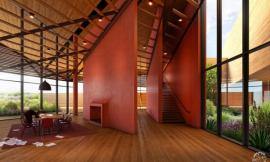
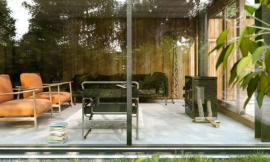
室内道具
大部分室内要素的3dsmax建模只需要使用基本的多边形工具和样条工具,如旋转和扫描命令。
在枕头的制作中,我用了Marvelous Designer来完成它的基本形状,然后用一些布覆盖,以获得更真实的纹理。
Interior Props
Most of the interior elements are modeled with 3dsmax using just basic poly modelling or spline-techniques such as lathe or sweep.
For pillows I used Marvelous Designer with an inner pillow for the basic pillow shape and then draped these with some cloth to get more realistic wrinkles.

地毯是用3dsmax的毛发生成器制作的,我认为平铺一些稻草不是最好的选择,因为地毯往往有形成几簇的趋势,我不认为这是一个分散的解决方案可以控制的。
The Rugs is created with 3dsmax hair and fur, I often think that scattering a few straws isn't the best choice because carpets often tends to create several clumps which I believe is hard to have control over inside a scatter solution.

很久以前我对拼贴画和海报做过一些研究,访问了一个丹麦的叫luxoliving的网站。我在这个场景中使用的非常棒的由丹麦设计师Kristina Krogh设计制作的拼贴画,都来自于这个网站。
有机植物,如厨房中的橄榄树和罗勒,都是用GrowFX(植被模拟插件)制作完成的。我对叶片的大小,面积和纹理做了一些不同的变化。这是得到它的唯一方法。较小的叶片有不同的形状和重量,所以这里要强调,不要对所有的叶子使用相同的纹理和模型。
Way back in time I did some research for prints and poster and visited a site called luxoliving in Denmark. They had all these really nice prints from the Danish designer Kristina Krogh which I used in the scene.
I did the organic vegetation such as olive trees and basil in kitchen with GrowFX. I modeled and made a few different variation of leaf sizes, proportions and veins. This is the only way to get it correct. Smaller leaf have a different shape and weight so it’s very important to not use same textures and models for all the leaves.

我必须承认,相比于其它道具,我花了大部分时间在索尼A7R相机的造型上,因为把多余的时间花在它的身上非常有趣。
I must say that I actually spent most time modelling the Sony A7R camera of all props, just because It was really fun to take some extra time for it.

照明
从一开始我就计划将外部和内部置于”blue hour“中(blue hour,太阳刚落下或者天空完全变黑前的短暂时刻)。因此,这不是做一个艰难的决定,只是坚持计划。
在组织主要光环境的时候,我试着得到一个不错的光场景,这样,调整就会变成一件简单的事情。
对于每张图片中的环境,我都是基于图像的光照,用经过V-Ray Domelight中的HDRI(环境反射贴图)命令对其进行设置,对于室内,我用了IES光以及V-Ray Light Planes对其进行处理。
Lighting
From the beginning I had this plan to make blue hour for the exterior and overcast / blue hour for interiors. So it was never a tough decision to make, just sticking to the plan.
I’m trying to have a pretty lighten scene when doing the setup of the main light situation, it’s just easier to tweak things that way.
I used image based lighting setup with an HDRI inside a V-Ray Domelight for the environment in all images and for the interior light I used IES lights and V-Ray Light Planes.


材质
雪的材质很简单,在我看来它已经很好了,所以为什么要把它复杂化。该材料只是用一种非折射的材质,加上置换贴图的漫反射、一点反射和凹凸贴图上的一些烟雾/晶体效果。
Materials
My snow shader is pretty simple and it worked out fine for me so why complicate it. The material is just a non-refractive material with diffuse from the displacement map and little reflection and some smoke for the fine bump / crystal effect.

为了达到更加真实的效果,这个项目中的很多材质都是我用VRayBlendMtl (VRay混合材质)制作的。小污垢、微划痕和不同反射角度的光泽值都是我想要在材料上达到的效果。就像在现实生活中的一样,但同时,不要做得过于夸张也是很重要的。很多人添加了太多的污垢或者在使用光泽度贴图时设置了过高的对比度,这样最后做出的效果是不可能在现实生活中看到。
I created many of my materials in this project with a VRayBlendMtl for a more realistic approach. Small dirt, micro scratches and different glossy values for the reflective approach angles is some of the things I want to achieve with a material. Just like it works in the real life, but at the same time it’s very important to not overdo it. Many people add too much dirt or use glossiness maps with very high contrast which leads to a result that can’t be seen in the real world.

后期制作
这里没有什么特别或是新鲜的。就是我喜欢怎样做的问题了。
Post Production
Nothing special or ground-breaking here. This is just how I like to work things out.

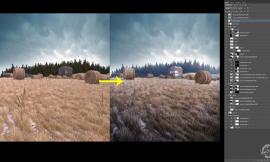
首先,在Photoshop界面下,我试图在一个32bit的图像中让所有元素达到均衡。即使是在一个16bit的图像中,通常我也会加上天空。
对于地平线,我认为能穿过建筑看到它是非常重要的一点。在3dsmax中,相机的放置线过高。但如果不这样,室内就会非常无趣,所以我取了一个较低的地平线。
在Photoshop中的32bit模式还是相当局限的,即使是2014版!所以我用这些工具——曝光、色阶、色调饱和度、笔刷、正片叠底、减淡等,做了我能做的。如果需要调节色调曲线,我就打开magic bullet looks(调色滤镜插件),然后在我想要更改的特定部分调节曲线,因此这不是真正的问题,但我希望可以之后与未处理的进行比较。
First, I try to find a good balance between all elements in a 32 bit comp inside Photoshop. I often add the sky here even though it’s just a 16 bit image.
For the horizon I thought it was very important for the composition to see it through the house. Inside 3dsmax the camera horizon line is a lot higher. But the interior inside would look very boring without it so I went for a lower horizon.
The 32 bit mode in Photoshop is still quite limited even though it is 2014! So I do what I can do with it – exposure, levels, hue saturation, brushing, multiplying, subtracting and so on. If I need curves I just open magic bullet looks and do the curves on that specific part I want to change so it’s never a real issue, but I would like to have a non destructive comp in the future.

下一步是将其转换为16bit,开始根据我的喜好进行更多的调整,例如色彩平衡,选定颜色以及色调曲线。
Next part is to convert it to 16 bit and start to use apply more tweaks that I like such as color balance, selective color and curves.

最后,我用Photoshop中的camera raw进行轻微调整,可能是增大一点对比度,把暗的地方调亮一点等等。
And for the final part, I use camera raw inside Photoshop to make the last minor tweaks, maybe some more contrast, a little brighter blacks and so on.

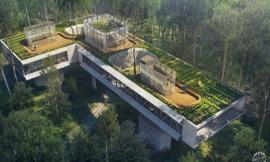
这是最后的效果图:
And this is the final image :

制作内部效果图也是同样的流程。下面的图片是从客厅原渲染图/ 32bit / 16bit /最后成图。由于某些原因,我更喜欢镜像的构图,所以最后的效果图是镜像的。
The same workflow goes for the interior images. See images below for the process from living room raw render / 32bit / 16bit / Final. For some reason I like a mirrored composition better so for the final image it is mirrored.


希望这些都对你有帮助
祝你成功
Hope you find it all somewhat useful
Regards,
Victor.
出处:本文译自www.ronenbekerman.com/,转载请注明出处。
|
|