Making of Termitary House
由专筑网韩平,刘庆新编译
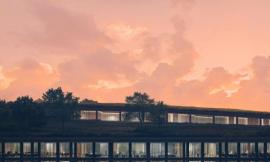
Pixelpark制作的白蚁窝住宅效果图,其灵感来自于 Tropical Space工作室在越南岘港Thanh Khê 地区建造的“白蚁窝住宅”。由于其非凡的CG技术以及精致地表现砖块住宅特征,获得了“2015年第49周最佳可视化效果图”。以下的文章描述了他们利用 3dsmax, GrowFX, V-Ray以及一点后期工作制作这张逼真效果图的过程。请欣赏!
Pixelpark‘s ‘Termitary House’ visuals, inspired by the real ‘Termitary House’ in Thanh Khê District, Da Nang, Vietnam designed by Tropical Space Studio, awarded them Best Visualization of the Week NO. 49/2015 for a remarkable CG remake and level of details they went into remaking the house signature feature – The Bricks. Follow this article as they describe the process of creating these highly photorealistic visuals using 3dsmax, GrowFX, V-Ray and just a bit of postwork. Enjoy!
简介/Introduction
在工作之余,我们会参与到一些住宅项目中,每次我们都能发现一些新的东西。这可以说是一个挑战,我们必需利用从未用过的新的工具或者技术。为了确保它们可控,并使我们满意以及促使我们在知识和经验上成长。
和往常一样,我们在Archdaily网站上收集一些有趣的项目,这次我们发现Tropical Space 工作室的这个美妙的设计。
In the spare time among our works we engage ourselves in some in-house projects, each time trying to realize something new. It’s a challenge and we must face new tools or techniques we’ve never used before. Being able to manage them gives us great satisfaction and allow us to grow in terms of know-how and experience.
As usual, we searched some interesting project on Archdaily.com, and we found this beautiful project from Tropical Space Studio.
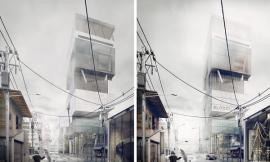
白蚁窝住宅是越南岘港ThanhKhê地区的一栋小建筑。我们真的很喜爱它,也非常欣赏住宅的整体造型。
Termitary House is a small building located in ThanhKhê District, Da Nang, Vietnam. We really loved it, we found it very unusual and we strongly appreciate the global mood of the house.
早期测试/Early Tests
最初,在制作这个项目整个过程中,我们脑海中始终铭记——砖块!
它们遍及整个住宅,从参考的图片上面,我们可以发现砖块扮演了重要的角色。因此,我们意识到在开始这项目之前的第一步是决定怎样创建砖块,以及铭记砖块既是背景也是前景。所以我们应该非常精确地创建它们。
在一些不同类型的调查和测试后,我们决定不适用置换贴图,因为:
我们不想看到任何控制UVs的缩放比例的Tiling(甚至是大的贴图,这些重复的图片都是可见的)。
置换贴图在墙体的顶端和角落不够精确。
我们希望在砖块材质上,自由添加一些污垢或者颜色校正层。
使用位图的话,我们就不能创建砖块之间的缝隙(但砖缝在白蚁窝住宅中有很多)。
因此我们考虑使用单独的砖块3D模型,并按照正确的模式放置它们,同时也会出现一些变化和不完美。当然,我们不会手动放置所有的砖块。我决定使用种植插件,这样我们可以利用“规则分布”来获得预期的效果。对于墙角部分进行一些研究是十分必要的,结果很不错,因此我们开始建造住宅,真的是一块砖一块砖的进行建造。
From the beginning, we had one word in our minds that kept resonating during the entire process of crafting this project – BRICKS!
They were everywhere in this house, and no matter the reference pictures we looked at, they played the main part. Therefore, we realized that the first step before approaching this project was to decide how to create the bricks, keeping in mind that there would have been bricks in the background and also in the very foreground. So we definitely needed to create them with very high levels of detail.
After few types of research and tests we immediately decided not to use textures with displacement because :
1. We didn’t want to see any tiling (and even with large maps, there would have been images where the repetition of the pattern would have been visible).
2. Displacement wouldn’t have worked properly on walls heads and corners.
3. We wanted to be free to add several layers of dirt or color correction on the bricks material.
4. Using bitmaps we wouldn’t have been able to create the walls with gaps among the bricks (and there were lots of these “termitary” walls).
So we started thinking about using 3d models of single bricks and place them with the right pattern, but at the same time including some kind of variations and imperfections.Obviously we didn’t want to manually place all the bricks. We decided on using the Multiscatter plugin, thinking we could use its “regular distribution” option to achieve our goal.A short study process have been necessary for corners areas, but in the end the results were convincing so we started building the house… brick by brick, literally!
3D建模/3D Modeling
结构/Structure
首先是CAD,我们根据Archdaily上的平面图和剖面图等参考图片画出住宅的基本轮廓。这一步非常重要。砖块是整个结构的基础单元,通过CAD我们可以精确地设计墙上的所有开口以及利用正确的砖块三维尺寸确定楼层的高度。
We started from AutoCAD, using plans and sections from Archdaily reference pictures to draw a base version of the house. This step has been very important. Bricks were the base unit of the whole structure, and with AutoCAD, we’ve been able to precisely design all the openings on the walls and the height of the levels with the correct dimensions in relation with the bricks.
我们将DWG文件作为在 3ds max中创建最终模型的蓝图。在这一步,对于墙面,我只简单地建了代表砂浆的盒子,即比最后的砖墙厚度(包括砖块)薄一厘米。
We used the DWG files as a blueprint inside 3ds max to create the final model. At this stage for the walls we simply built boxes representing the mortar, i.e. one centimeter thinner than the final walls thickness that includes the bricks.
砖块/The Bricks
砖块是整个项目的核心,因此,第一步是创建砖块排布网格。
我们基于基础的几何形体利用编辑器(比如噪波或者FFD)或者利用多变形编辑工具手动编辑,形成一些微小的变化,来创建了8种不同的网格形式。
接下来,对于每个网格,我们生成4种变化,只是简单地围绕每个轴线旋转90度(这是因为“种植插件”没有固定增量随机分布)。因此,我们随机分散的墙体可以按照32 种不同的网格。最后,我们将每个网格转成Vary代理物体,这样就可以更好地节约电脑内存(每个砖块网格都有近1000个多边形,而且我们打算分散很多砖块)。
They have really been the heart of this project, with the first step being the creation of single bricks meshes.
We created 8 different versions, with slight variations in the base geometry obtained via modifiers (like noise and FFD) and/or manual editing of the editable poly objects.
Next, from each mesh, we generated 4 variations simply rotating them 90° around each axis (this is because Multiscatter doesn’t allow random rotation with fixed increments). In this way, our Multiscatter walls could rely on 32 different meshes.
Finally, we converted each mesh into a V-Ray Proxy for better RAM usage (every brick mesh had about 1000 polygons, and we were planning to scatter lots of them).
对于每面需要填充砖块的墙体,我们在不变形平面上使用表面分布模式,分散物体,这样的话砖块就可以突出于砂浆网格1cm。为了获得正确的砖块分散形式,我们正确地设置了UVW贴图编辑器并将此应用在了分散平面上。
对于“白蚁窝墙壁”我们采用了相同的操作,简单地修改了需要分散物体表面的UVM贴图编辑器的参数。这个操作扩展到所有的墙壁,包括墙体顶部,当然对于顶部我们应该格外注意,因为这里是两个分散形式相交的地方。
For each wall to populate with bricks we set up a Multiscatter object using the surface distribution mode on a non-renderable plane, disposed so that bricks were protruding 1 cm from the mortar mesh. To obtain the correct brick distribution we properly set up a UVW map modifier applied on the distribution plane.
For the “termitary walls” we followed the same process, simply modifying the parameters of the UVW map modifiers applied to the distribution surfaces of the Multiscatter objects. This process has been extended to all the walls, including the wall heads, taking particular care of corners where two different Multiscatter were intersecting.
最后,我们找到在种植插件使用随机分散和旋转进行砖块分布中的适合的创建缺陷的方法。最终,为了建造所有的墙面,我们使用了19个不同的分散物体,将近27000块砖块进行分布排列形成最后的住宅。
Finally, we have found the right level of imperfection of the bricks distribution using random position and rotation inside Multiscatter. In the end, to build all our walls, we have used 19 different Multiscatter objects, with about 27,000 (!!!) single bricks scattered all around the house.
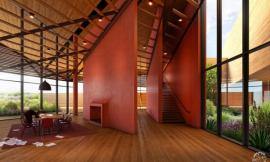
家具&物件/Furniture & Objects
和往常一样,我们试图使用精确的3D模型,甚至离镜头很远的物体都是这样。我们相信这样有助于让最后的效果图更逼真(也许有些曲线型边缘会在远处形成高光,这点我们是无法预知的),当然,我们在家具项目中也会重复使用这些模型,我们不必担心它们不够精细。
大多数的家具比较简单,但也有些家具需要花一些功夫,比如,钢琴。我们从晚上收集了许多参考图片,尽可能地将它的每个细节都表现出来。来自Pixelpark 的 Matteo完成钢琴模型制作。他也是一个音乐家,会弹奏钢琴,而且家里也有一台钢琴...这对建模有很大的帮助。
As usual, we tried to 3d model everything in detail, even for the objects far away from the cameras. We believe this helps the final pictures to look more realistic (maybe there will be some rounded edges that produce a specular highlight in the distance, you never know could be the difference), and we can also re-use the models in future projects, without worrying if they’re detailed enough.
Most of the furniture were very simple while other objects have required some more efforts, for example, the piano. We modeled it from scratch using various reference pictures from the web to design all the small details. Matteo from Pixelpark modeled the piano. He’s also a musician, playing the piano and owns one at home… this really helped a lot!
住宅中还有许多植物,我们希望保留热带植物的特征来呼应建筑的地理位置。我们绝不希望使用外部预制的3d模型(反正,我们也没有找到有原有植物叶子这么大的模型)。所以我们自己创建了植物模型,我们使用了GrowFX插件创建与叶子相同的模型。这样,我们仅需简单操作就能得到相同植物的不同版本。
There were also lots of plants in the house which we wanted to maintain the tropical typology feel to them because of the location of the building. We absolutely didn’t want to use external pre-built 3d models (anyway we couldn’t find anything with such large leaves as the original plants). So we built our own models, using the GrowFX plugin and instanced geometry for the leaves. This allowed us to generate the different versions of the same plant with a few clicks.
靠近钢琴的植物是最难创建的,因为它在图片醒目位置,所以需要有高度的细节。
首先,我们在CGtextures网站上收集寻找合适的叶片纹理,然后再PS中操作得到合适的阴影,去除图片中污垢。在纹理编辑中,我们利用简单的颜色校正创建了漫反射、透明度和反射纹理。
The big plant near the piano has been the most tricky one to create because it was the most visible one in the images and so it required high levels of detail.
First, we searched and found the right leaf texture on CGtextures.com, then we processed in photoshop to get the correct shape and to clean it up from some dirt that was in the picture. From the modified texture, we created diffuse, Opacity and Reflection textures with simple color corrections.
我们将这个纹理作为在3dsmax中建造正确的建造几何体的参考。
首先我们根据叶子的叶脉创建样条曲线。每个样条曲线的顶点数都设置成相同的,这样可以在一个可编辑的多边形中将它们连接起来并形成基础的网格。每个叶脉周围放置三个边缘成环,然后将中间的向下降低,并应用高级平滑。
At this point, we used the texture as a reference in 3dsmax to model the correct geometry.
To do this we started from splines drawn following the single ribs of the leaf. We built each spline with the same number of vertices, in order to properly connect them together in an editable poly to create the base mesh. On each rib we placed three loops of edges, then we lowered the middle one and applied a turbosmooth modifier.
一旦我们创建完了叶片的一半,我们就可以用相同的操作创建另一半(使用参考纹理,这两半不相同)以及中间的叶干。然后,我们将三个网格放在一起并应用一些编辑(波动、噪波、扭曲和弯曲)使其更加自然。
Once we created the first half of the leaf, we then made the second one with the same process (using the texture as a reference, the two halves were not the same!) and the central stem as well. Then we collapsed the three meshes together and applied various modifiers (wave, noise, twist and bend) to create a natural deformation.
最后,我们利用七片叶子创建了最后的植物,而且手动增加一些编辑以获得不错的外观。接着我们增加了花盆和土壤,这样我们就完成了植物模型的制作。
Lastly, we composed the final plant referencing 7 leaves and manually changing some modifiers value to get the desired look. We then added the pot and the soil, and we were done.
相机&灯光布置/Camera & Lighting
我们在做这种项目的时候,目标是创建同一场景的不图片,但是通常它们有不同的光环境或者不同的物品设置。
为了简化工作流并让一切井然有序,我们没有对不同的图片设立不同的相机,而是为所有的图片设立一个独立的相机(实际上,我们使用了两个相机••••••一个是为水平视角的图片设置,一个为垂直视角的图片设置)。
为了使操作更加高效,我们简单地移动了相机的位置,捕捉到每一帧,同时也设置了例如快门速度和垂直移动等参数。
此外,我们也设置其他物品的属性,即灯光强度,太阳位置,我们也对一些物品的位置进行微调以适应我们镜头的设置(我们觉得这个过程就像专业的摄影师一样在拍摄最后的照片之前进行一些室内物品的布置。)
利用这个设置,不同最终图片之间切换只需要简单的滑动 3ds max的时间线以获得理想的图片,我们也不要担心关闭或者打开了一些灯光或者手动隐藏了一些物品。我们觉得这个工作流非常有用,它也让我们一次可以渲染多个图片,并且不必使用批处理(简言之,max渲染了从X到Y的每一帧,我们也可以让它在夜间工作。)
一旦我们将相机移动了,就得设置灯光。我们打算出10张图片,8张自然日光照明,2张人工照明。
对于日光设置,我们使用了V-Ray太阳光和设置在窗户和天窗上的V-Ray区域光。我们将区域光分组成两个不同的设置,分别调节颜色和强度以适应我们每一张图片灯光品质的需求。
对于夜间设置,我们将太阳光和区域光强度设为0,并增加一些V-Ray球形灯,将它们放置在参考图片中家具灯所在的位置。在这个阶段我没有增加这些灯的强度,我希望它们的光照强度低一点,然后再后期进行一些调节(具体请参见后期制作章节)。
When we work on such projects our goal is to create several images from the same scene, but often they could have different light conditions and/or different objects setup.
To simplify the workflow and to keep things well organized, instead of creating one camera for each final picture we prefer to use just one single camera for all the images (well, actually here we used two cameras… one for the horizontal images and one for the vertical ones).
To get the whole process working we simply animate the position of camera and target for each frame, along with other parameters like shutter speed or vertical shift.
In addition, we also animate other objects properties, i.e. lights intensity, sun position, and we also move some objects around to fit what we need to see in camera (we consider this process very similar to what professional photographers do when they prepare an interior set before taking final pictures).
With this setup all we have to do to switch among the different final images is simply slide the 3ds max timeline to the desired frame, without worrying about turning on and off some lights or manually hide certain objects or layers. We find this workflow extremely useful, and it also allows us to launch long rendering process for several images at once, without having to setup any batch process (simply say to max to render the frames from X to Y and let it work during the night.
Once we had the cameras animated, it was time to set up the lighting. We planned to output 10 images, 8 with natural daylight illumination and 2 with artificial lights.
For daylight setup we used a V-Ray Sun along with V-Ray area lights positioned at windows and at ceiling openings. We grouped area lights in two different sets, to be able to adjust color and intensity separately to fit our needs in terms of quantity and color of light per image.
For the night-time setup, we animated the Sun and area lights intensity to 0 and added some V-Ray spherical lights, placing them where the reference pictures showed lamp bulbs. We did not boost these lights at this stage, we wanted to keep them with a lower intensity then the final one to adjust them in post (see post production chapter).
纹理&材质/Texture & Materials
材质的制作决定了图片的写实度。在这个项目中,我们对于每个着色器都没有使用特定的技巧,只是适当地调整了基础纹理的漫反射、反射和光泽度、折射和凹凸贴图等参数。我们遵循的唯一的经验法则是:所有的东西都有反光和污垢。这意味着首先得有漫反射纹理,接着增加一些污垢(基于 masks或者使用VRayDirt纹理),然后是材质反射(为反射和光泽度使用合适的纹理)。一些贴图和渲染测试也非常必要的。
唯一的秘密就是耐心,以及注重一切细节。这个过程非常消耗时间,因为我们需要渲染大量的图片(使用高参数)来达到最后的渲染图效果。
砖块材质/The Bricks Shader
这一步,我们需要关注砖块的材质。在建模之后,我们获得了一个通过种植插件随机分布32个不同网格形成的住宅。我希望尽可能简化每件事,因此我们为所有的砖块设置了一个独特的材质(在基础材质上利用b/w 贴图 VRayDirt 贴图添加一些污垢层)。我们保证贴图足够大能让我们完全覆盖32个单独的砖块网格,这样我们就能获得32个完全不同的砖块。
但是在一些测试后,我们意识到这种重复是无法避免的,所以复制了32个砖块并覆上了另32中UVW 贴图。最终,我们分散了32个网格,但应用了64中不同的材料。
Materials done right are crucial for photorealism. In this project we haven’t used any particular tricks for any shaders, just the right combination of base textures for diffuse, reflection, glossiness, refraction and bump. The only “rule of thumb” we try to follow during the material creation process is that everything must be reflective and have dirt on it. This means starting with a diffuse texture, then add some dirt (based on masks or using VRayDirt texture), then make the shader reflective (using the correct textures for reflection and glossiness). Some bump and lots of rendering test and that’s all.
The only “secret” is to be patient and to take care of the details. It is a time-consuming part of the process because of the number of renderings we had to do (using high parameters) to visualize the final result.
Again, we used great attention for the bricks materials. After the modeling step, we had a house built up with 32 different meshes randomly distributed by multiscatter. Always trying to keep things as simple as possible, we set up a unique material for all the bricks, with a base bare layer and many dirt layers on top of it, driven by b/w maps or VRayDirt maps. We kept the maps large enough to let us move the UVW map gizmo of the 32 single brick meshes, so to obtain 32 totally different bricks.
But after some tests we realized this was not enough to avoid repetitions, so we copied the 32 bricks and applied 32 more UVW to them. At the end of this process, we scattered 32 meshes but with 64 different materials applied.
最关键的是,种植插件可以便捷地进行纹理的随机分布,以及为网格随机分布一些变化。当然这也应用了漫反射贴图,最终,我们的砖墙也建好了。
我们非常满意,但是参考图片的墙真的非常逼真。
我们还需要增加当地的污垢、污垢,更多的污垢!后者必须是反映整个砖墙特征的,而不是单独的一块砖。对于这个,我们使用了 VRayDistanceTex,基于网格的几何形体或者简单的线条应用于污垢,这非常自由而且保持不变形。
On top of it, Multiscatter gives the fantastic opportunity to use a Multiscatter Texture, to apply random variations to the meshes it scatters. This was added in the composite map of the diffuse, and finally, our brick wall was… built!
At this point we were really satisfied, but the walls of the reference pictures were… more real!
We still had to add local dirt, dirt, and more dirt! And this latter had to be something that affects whole groups of bricks, not just single bricks. For this task, we used VRayDistanceTex, to apply dirt based on the geometry of meshes or simple splines we place very freely and keep non-renderable.
混凝土天花板材质/The Concrete Ceiling Shader
当我们复制一个现有建筑时,要做的就是尽可能地表现细节来突出主题的独特性。
在这个项目,天花板纹理也是细节之一。显然,我们不能在网上找一个近似的,我们必须自己来建造。
首先,我们简单地扭曲和裁剪参考图片创建了一个低分辨率的纹理,并赋予适当的比例。然后再AE中结合混凝土层和其他污垢层创建一个高分辨率的纹理。
为了达到目标,我们手绘了符合参考纹理的遮罩。在最后的漫反射层中,我们创建了反射、光泽度和凹凸贴图并增加了颜色校正和曲线调整。最后形成了各种贴图位置恰当的材质。
One thing we try to do when we “copy” an existing architecture is to replicate as best as possible the details that make the subject unique and particular.
In this project, the ceiling texture was definitely one of these details. Obviously, we couldn’t think to find something even close to it on the web, so we built it on our own.
First we created a low-res version of the texture simply cropping and distorting the reference pictures, and giving it the correct aspect ratio. Then we created the whole hi-res texture in After Effects combining layers of bare concrete with other layers of dirt.
For this purpose, we manually painted masks conformed to the reference texture. From the final diffuse layer, we created the reflection, glossiness and bump maps adding some color correction and curves adjustment layers. The final shader was a V-Ray material with all the maps in the right slots.
更多材质/More Shaders
所有的其他材质都创建成V-Ray材质,都使用了漫反射、反射、和贴图。除了漫反射通道,我们通常还使用b/w贴图;它们都需要进行颜色校正,我们直接在 3ds max 导出或者颜色校正贴图。
这非常有用,因为我们可以实时反馈而不需要通过其他的应用,我们也能对于反射、光泽度和贴图使用单独的贴图,通过不同的色彩关联不同的材质。
我们利用相同的操作给漫反射通道一些变化。整个贴图组是:第一层为基础纹理,然后是一层或者两层额外的进行颜色校正的相同贴图,并通过b/w 遮罩或者梯度进行混合。在下面的图片中,你可以看到这个技术的一些案例,尤其是对于木材质。
All the other shaders have been created as V-Ray materials, using maps for diffuse, reflection, glossiness and bump. Except for the diffuse channels, we normally use b/w maps; they always need color correction to get the needed aspect, and we did it directly inside 3ds max using output or color correction maps.
This is very useful because we can have real time feedback without having to pass through other application, and we can also use one single map for reflection, glossiness and maybe bump, with different color correction in relation to different material slots.
We use the same trick to give some variations to the diffuse channel. A composite map with a base texture on the first layer, then one or two additional layers using the same texture with color correction, blended over the previous layers with a b/w masks or gradients. Some examples of this technique can be seen in the following picture, especially on the wood material.
渲染/Rendering
除了所有分散的砖块外,在最后的场景中共有10,700,000 个多边形。它们都是V-Ray代理物体,它们共有54,000,000个多边形。所以最终,场景中有64,700,000 个多边形。
我们最后渲染的图片为2400x1600像素,我们在 Intel i7-3770K 3.50GHz CPU, NVidia GeForce GTX 570 graphic card 以及内存16GB RAM的工作站进行渲染。
我们使用了Vray 3.20.渲染器,这是一个非常艰难的任务。我们的目标是获得高清图片,所以我们的参数非常高。由于模型非常复杂(砖墙有很多细微的细节)以及很多玻璃和反射面,所以每张图片的渲染时间都需要16至30小时。
我们最后的图片保存为.exr文件格式,这可以帮助我们单独保存很多通道图,这些通道在后期制作中也是非常有用的。
The complete scene counted about 10,700,000 polygons, excluding all the scattered bricks. They all were V-Ray Proxies and counted about 54,000,000 polygons by themselves. So, in the end, there were about 64,700,000 polygons in the scene.
We rendered the final images at 2400x1600px, on a workstation with an Intel i7-3770K 3.50GHz CPU, NVidia GeForce GTX 570 graphic card and 16GB RAM.
We used Vray 3.20. Renderings has been a very hard task. Our goal was to obtain very high defined images, so we used very high render parameters. Render times took from 16 to 30 hours per image to complete, due to the complexity of the models (bricks walls generated lots of tiny details) and the presence of lots of glasses and other reflective surfaces.
We chose to output the final renderings as open .exr format file; this allowed us to save as many channels as we want in a single file, and this was pretty useful in the post-production phase.
后期制作/Post-production
我们标准的工作流中,渲染图片与最后的效果图差别很大。我们也希望这样,因此我们渲染图片能够比较正常(既不会过曝也不会太暗),这样我们就可以为每个像素的有效的颜色信息,在后期制作过程中使用不破坏的形式调整各个方面(曝光过度和不足的地方在后期制作中是无法修复的)。因此我们使用了AE和之前导出的所有通道图。
尤其是我们使用了:
· 黑色和白色遮罩有助于选择砖块和砂浆。
· ”灯光选择”渲染元素加强人工照明灯。
· 反射通道可以增强物体让我们觉得过于“扁平化”。
In our standard workflow, raw renders are quite different from the final images. And we do want this, because we strongly prefer to have flat images to start with (without extra-bright or extra-dark areas) so we can have useful color information for each pixel, and adjust every aspect in post production using a non-destructive approach (totally burned or underexposed areas in raw render are quite impossible to fix later). For this purpose we use AE and all the channels we exported from the render elements.
In particular, we used :
· Black and white masks to do selective color correction on bricks and mortar.
· The “light select” render element to boost artificial lights.
· The reflection pass to enhance them on the objects we feel too “flat”.
最后,为了消除CG效果图的虚假感,我们为所有图片增加一些色差,一些细微的装饰图案,以及光源上的一些光点和耀斑。
我们已经将后期的制作过程作了分解步骤。你可以在这里找到。
As final touches, aimed to eliminate some “fake CG looks”, we added to all the images some chromatic aberration, a very subtle vignette, a few glows and some flare effects on the light source.
We have resumed the main post production passes on a short breakdown, you can find it here.
总结/Conclusion
以上就是全部了。感谢你花时间阅读这篇文章,我希望你们能够喜欢它。对于这个项目的主要方面,我们没有使用简单的操作过程也没有应用之前众所周知的技术。如果你们找到一些感兴趣的地方,我们也非常开心,如果大家有什么信息需要让我们知道,请在下面评论。
That’s all! Thanks for your time spent reading this article, we hope you liked it. We tried to focus on the main aspects of this project without telling about very simple processes and other well known techniques we obviously used. If you have found something interesting we’ll be glad to know and if someone wants to have additional information just let us know in the comment section below!
出处:本文译自www.ronenbekerman.com/,转载请注明出处。
|
|