由专筑网刘庆新,vigo编译
MarcinJastrzebski在7月座谈归来中展示出了他漂亮的“O House”项目,在微博上也重点突出了该博文。今天,我很高兴来分享Marcin的渲染过程,整个过程到了用MODO 701,Cinema 4d和Maxwell Render 3作为主要工具。
MarcinJastrzebski posted his beautiful “O House” project on the forums back in July and was Highlighted on the blog too. Today I’m happy to share Marcin’smaking-if this remarkable piece of work, which was done using MODO 701, Cinema 4d and Maxwell Render 3 as his main tools. Enjoy!

作者:Marcin Jastrzebski
MarcinJastrzebski致力于建筑表现的研究,他是NEBULA-GRAFIKA的创始人,在他经营的这几年里已经与来自全球公司有了合作。他学的是哲学,但是他却对3D制图和摄影尤为钟爱。他出生并居住在波兰卢布林。
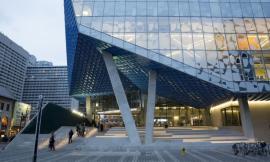
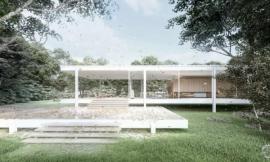
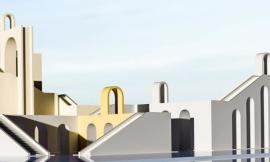
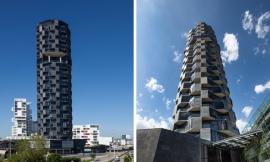
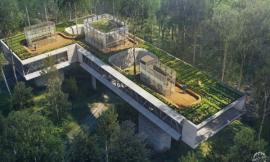
我很荣幸介绍我最近完成的个人项目——Jun Igarashi Architects事务所设计的House O住宅渲染。我决定坚持以前的设想,以Kenichi Otani Architects事务所设计的在松原的住宅作为起点。
Author : Marcin Jastrzebski
MarcinJastrzebski works in the field of architectural visualization, he is the founder of NEBULA-GRAFIKA, which he runs for several years and cooperate with companies from all over the world. He studied philosophy, but his passion is 3D graphics and photography. He was born and lives in Lublin, Poland.
I would like to introduce my recently finished personal project visualization of House O by Jun Igarashi Architects. I’ve decided to keep previous assumptions started by the House in Matsubara by – Kenichi Otani Architects.
我的主要目的是再次检查Next Limit Maxwell Render新版本的整体可行性。我试图用简洁但有趣的现代日式住宅风格获得写实的氛围。我在场景中运用了灯光、氛围、天气和季节展示,这些所有细节都是在3D中创建的。
最后一些渲染,如颜色修正、对比、最后的色调,我是在2D中完成的。我用3个月完成该项目(原来好的效果图要花这么长时间啊,跟我们的2天一张相去甚远啊),当然期间有一些停顿。所有场景渲染都出自一到四台电脑。后期制作很简单,但是就如我以前所说,我想在纯净的3D场景中制作出所有的效果。
My main goal was to check again the entire range of possibilities with the new version of Next Limit’s Maxwell Render. I was trying to achieve realistic mood with simple but interesting modern Japanese house. I was playing with light, mood, weather and season. All details in the scene were created in 3D.
I’ve done final touch ups in 2D like color corrections, contrast, final color mood. I worked on that project about three months with a few pauses. All scenes were rendered from one to four PC machines. I know that many effects like steam, fog motion blur falling leaves, for example, it’s simple to make with post-production but as I said before I wanted to make all of those effects in pure 3d scene.
下面是一些工作流的细节:
• 大部分地形材质位置有所变化——地面、柏油路、边石、人行道。
• 衍射、雾、蒸汽和体积光效果是用Maxwell Render渲染的。
• 景深由Maxwell Render完成。
• 大部分模型来自Evermotion、Viz People和CGAxis 3D收藏。
There are a few workflow details below :
• Most of the terrain materials have a displacement – Ground / Tarmac / Curbs / Pavement.
• Diffraction, fog, steam and volumetrics were rendered by Maxwell Render.
• DOF by Maxwell Render.
• Most models taken from Evermotion, Viz People and CGAxis 3D collections.
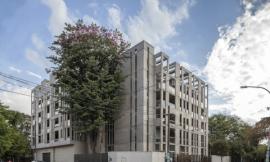
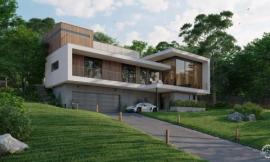
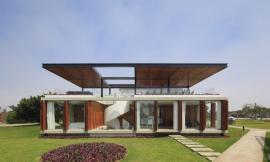
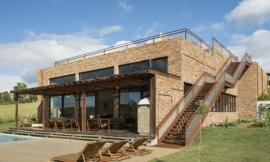
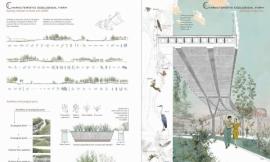
House O的灵感照片和一些细节:
House O inspiration photographs and few details :


我从网站上下载了尽可能多的蓝图,用MODO完成了基础的建筑形状。
I downloaded as many blueprints as possible from the internet and outlined the basic building shape. Doing this with MODO.


我决定深挖细节的3D模型,比如每个立面的凹凸不平的条纹。过程开始,我并不知道最终效果会是什么样的。所以我只是让其呈现在模型中。那时我正在考虑一两个主要的视野,也考虑了关闭视野。而有了一个详细的3D模型给我提供了机会,让我在后面可以做出灵活的决定。
I decided that I would dive deep into 3d modeling of details, such as the bumpy stripes on each facade. At the beginning of the process I did not have a precise decisions about the final views, so I just wanted it all to be in the model for later. At that time I was thinking about one or two main views and also about close-up views. Having a detailed 3d model gives an opportunity to make flexible decisions about that later.


我继续对房子的基部、道路和场地建模,这些都是在Cinema 4D中完成的,主要组织结构很快就制作完成了,避免了看不到的细节。我在Cinema 4D中创建了电缆。
I continued with modeling the base of the house, road and ground. After I was done it was all exported to Cinema 4D to make a main composition quickly and avoid work on invisible details. I made the electric cables in Cinema 4D.

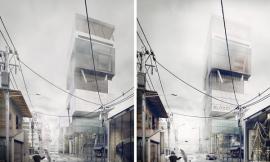
这是第一张渲染图:
Here is a first draft screen from my main view :

选定了最终相机角度后,我在场景中增加了一些细节,有来自Evermotion,CG Axis和Viz People 图书馆的现成模型,尤其添加了人行道和边石的地面模型。我用自己方式创建的天线、电线杆和电缆也给人一种真实的街道感觉。
After the decision about the final camera angle, I added details to fill my scene. I added a few ready-made models from Evermotion, CG Axis and Viz People libraries and especially ground models like pavement and curbs. Also the antenna and electric pole and cables which I made on my own to give it all a real street feel.


接下来的渲染过程比较简单,我将准备好的小细节模型散布到场景中使最终渲染效果看上去更真实。我喜欢这个过程。这里我经常使用Paint On Surface和SurfaceSpread两个Cinema 4D插件,创建和平铺时都非常快,这样我的场景中会增加许多有用的物体。
Next came a very impotent stage in the process in which I prepared models to act as the small and medium details to be spread all around my scene to achieve a realistic look in the final render. I like this stage of my work a lot. To do that I usually use two Cinema 4D plugins – Paint On Surface and SurfaceSpread to paint and spread very fast and effectively a huge number of objects in my scenes.


上面是物体分布完成后从Cinema 4D中的截图。在柏油路的狭缝里有单个的草叶,一些小石子散落在柏油路、人行道和建筑物前面的场地上。
Above you can see screenshots directly from Cinema 4D with the finished stage of objects distributing. There are single grass blades to be used in painting on tarmac slits, small stones lying also on tarmac and pavement, also on the ground in front of the building.

为了创建我提到的这些大量的物体,我使用了一个权重贴图。这种情况下这一解决方案给我提供了一个机会,每次我需要纠正的时候,我可以编辑每组物体的位置。请看下图House O场景中展示的我使用的权重贴图。前两个图展示了柏油路上小石子的两个分层。我需要两个图层是为了精确地控制两个范围小石子的分布——从边石到远距离和第二个从逐渐增加的石子密度到边石。
To manage this huge number of objects, as I mentioned, I use a weight maps. In this case this solution gives me an opportunity to edit positions of the groups of objects every time I need to correct that. Please look at the images below which show my weight maps for the House O scene. First two images show the tarmac two distributing layers for small stones. I needed two layers to precisely control small stones distributing with two ranges – from curbs to distance and the second to increase density of stones close to the curbs.


因为房子前面的地面上有草地和大的石块,为了达到这一效果我使用了同样的权重贴图。我努力在它们之间保持平滑的散落,最后画出平滑的权重贴图边界。这种方法是在同样的权重贴图的使用基础上。通常情况下,权重贴图用于进行石子渲染,但是我也用来渲染草地,只需在逆映射选项中进行。当渲染中石子淡出,青草开始长出的时候,渲染效果确实不错。下面的第一张图展示一个权重贴图,第二张展示了在同样的权重贴图控制下的地面上石子和草地的最终效果。
For grass and bigger stones lying on the ground in front of the house I painted and used the same weight map for both groups of objects. I was trying to keep a smooth dissolve between them, paint smooth weight maps borders for the final trick. The trick was based on the use of the same weight map for both spread groups of objects. Generally this weight map was created for stones but I used it also for grass with invert map option. It gives me a nice effect when the stones fade out and the grass starts growing. The first image below shows a weight map and the second final result for stones and grass on the ground controlled by the same weight map.


这里是一个SurfaceSpread设置的例子。通常我用规模和旋转随机选项来进行自然分布。
Here is an example of SurfaceSpread settings. Generally I use scale and rotation randomize options for natural look distributing.

这两张图是柏油路和地面区域的最终渲染。平铺的物体在最终渲染图中看上去效果很好。请看第二张图,对光线进行设置后产生长长的阴影的办法不错。这样小的物体也能被看的很清楚。
These two images are final renders from tarmac and ground areas. Spreaded objects looks very well at the final images. Please look at the second image. It’s a good idea to set light which generates long shadows. It makes small forms are very well visible.


下面的截图展示了有着各种物体的最终的相机视野。正如你所看到的,有Evermotion创建的树木和灌木丛。我创建了最终组织结构和材质后,将它们移到两个单独的场景中。一个用于树木、一个灌木丛和邻家小房子建筑。我将二者创建成为一个mxs Maxwell Render文件,作为xRef Maxwell物体放进主要的场景中。这一操作很快,所以我也向大家推荐这个方法。
The Screenshot below shows the final camera view with all objects. As you can see there are trees and bushes by Evermotion. After I made the final composition and materials, I moved them to two separated scenes. One for the trees and one for bushes and small neighborhood houses. I created for both of them amxs Maxwell Render file and put them into the main scene as xRef Maxwell objects. It always makes exporting time faster this way and I recommend this solution.

下图是xRef树木场景和树叶材质的样例。
Below – xRef trees scene and sample leaf tree material.


下图是xRef灌木丛和邻家建筑场景和灌木丛叶子材质样例。在一些灌木模型中我使用了一个相机FFDmodifier,通过改变形状获得我需要的效果。
Below – xRef bushes and neighborhood scene and samples leaves bush materials. For a few bushes models I used a Cinema FFDmodifierto deform their shapes as I need.


现在我来展示一下地面和道路材质的样例。
正如我开始提到的一样,我在场景中使用一些了一些移置材质。我想使用Maxwell移置,这样做出的特色很明显。移置中建议至少使用16位像素,甚至32位。在这种情况下我道路的位图是14 000 x 8600 p。地面上的草地中我使用了cg textures网站中的草地材质。移置操作使我渲染的地面看上去非常平滑。
从下图可以看出每一张图使用的纹理和材质。
Now I would like to show examples of the ground and road materials.
As I mentioned at the start I used a few displacement materials in my scene. I like to work with Maxwell displacements. It’s a powerful feature. It’s good advice to use 16 bit images at least for displacements or even 32-bit. The resolutions of these bitmaps should be also suitable. In this case my road bitmaps have 14 000 x 8600 pix. For the ground grass I use grass texture taken from cg textures site and with displacement it gave me a nice smooth ground look.
Please look at images below which shows used textures and created materials for them.


其中最难找的材质就是立面材质。
经过开始的一些尝试后,我叠加了一个不带纹理且非常黑的基础图层,第二个带纹理的基础图层中在立面上添加一些污垢。通过改变它们之间的透明度和蒙版来得到清晰的效果。接下来,我叠加了两个光泽和反射层,这样图看上去会更真实。
这个材质中,我在需要的地方使用颜色纹理和通道遮罩。在场景中渲染秋季景色时,这些图层是很重要的。这对立面使用更潮湿的材质的创建很有帮助。
One of the most difficult materials was the facade material.
After some first tests I added a very dark base layer without textures and the second base layer with textures to add some dirt on the facades. I control how strong they are visible by changing opacity / mask value between them. Next I added two glossiness and reflection layers for realistic final look.
For this material I used textures for color and mask channel where it was necessary. These layers were very important when I created an autumn version of my scene, They were helpful to make a more wet material for facades.


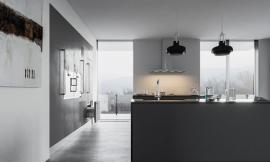
这是一个接近立面的渲染。
Here is a close up render to facade.

我喜欢使用Maxwell中的灯光。我常常在mage Based HDR位图中将Sun和Sky Maxwell特色混在一起使用。主灯光中我设置Sun&Sky,并在反射和背景通道中叠加了额外的HDR图。有时也包括折射。
我使用vol 1包里Dutch Skies HDR位图,这样除了标准的太阳和天空,在Maxwell Multilightmixer中有了一个额外的灯光设置通道。
I like to play with light in Maxwell. Very often I mix the Sun and Sky Maxwell feature with Image Based HDR bitmaps. For the main light I set the Sun&Sky and I add additional HDR images for reflections and background channel. Sometimes refraction too.
I used the great Dutch Skies HDR bitmap from vol 1 package. It gives me an additional light setup channel in Maxwell Multilight mixer except the standard Sun and Sky.


渲染完成后,我开始进入后期制作阶段。首先,整个后期制作过程我我不会真的修复的很全面,因为我喜欢到最后的渲染图中再进行即兴创作。
通常,当我在Photoshop中操作图层时,我将我的图放到Lightroom或 Red Giant Photo Looks中,添加一些效果,然后转回来继续进行PS编辑。有时当我感觉累或感觉我不知道该如何继续的时候,我会改天再继续。
当后期制作到达一个差不多的程度,就可以对自己说“足够了”,这是一个不错的办法,因为在自然中真的是无穷无尽的,最后的效果会有几百种方式。大多情况下我会准备一点不那么强反差的图进行最后有效的编辑。
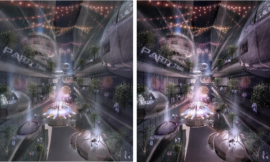
关于我的渲染设置,我使用一个孔径和障碍位图来达到有趣的衍射和阳光普照的效果。最后图的渲染大小是6000px x 4500px,即使细节部分的质量也很高。低热值呈现出衍射耀斑可见效果。
After rendering, I started the post production stage. You should first know that I can’t really reconstruct very thoroughly the entire post production process because I like to improvise as I go towards the final image.
Very often when I work on layers in Photoshop I export my image to Lightroom or Red Giant Photo Looks and add some effects and then come back to continue with the Photoshop editing. Sometimes when I feel tired or feel that I miss my idea for a final look, I take a rest and come back to work next day.
I think it’s good idea to reach a point and say “enough” for the post production process which is really endless in nature and can be taken hundreds of ways towards a final result. In most cases I prepare a little bit less contrasty images for effective editing.
As for my rendering settings, I used an aperture and obstacle maps for interesting diffraction and bloom effects. The final image was rendered at 6000px x 4500px to achieve good quality for details. Low burn value gave me a diffraction flare visible.

原始渲染
The raw render.

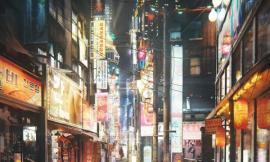
接着,我尝试找到一个有意思的基调。
Next, I was making a few attempts to find an interesting mood.

我渲染了三个额外的通道: Material ID, Z-Depth Fresnel用到了后期制作中。
I rendered three additional channels :Material ID, Z-Depth and Fresnel for use in post-production.

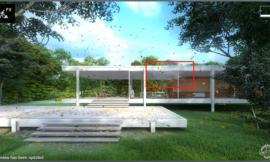
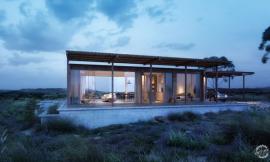
这是一张几乎完成的渲染,是我喜欢的基调,也是我需要的白天景象。
右边你可以看到我的PS的图层,其中一些不同类型的混合模式,比如正片叠底、叠加或柔光效应。通常情况下,我会提升整张图的一部分,比如建筑立面、树冠或柏油路。
Here is an almost ready render with the final mood as I like and needed for my day version view.
On the right you can see my Photoshop layers. A few of them have a different types of blending mode like multiply, overlay or soft light for example. Generally, I improve some parts of the whole image like the building facades, tree crowns or tarmac.

这是带有一些Lightroom润色的最后渲染图。
And the final render with some last Lightroomtouch-ups.

这就是全部的日景渲染。
That’s all for the day scene.
出处:本文译自www.ronenbekerman.com/,转载请注明出处。
|
|