由专筑网刘庆新,杨帆编译
今天我很高兴和大家分享Architectural ID事务所的设计师Dusan Stevic的作品,该事务所是2011年成立的一个塞尔维亚的可视化工作室。“山海小屋”是一个商业项目,展示了客户的小屋。遵循Dusan的设计思路,他将小屋木质材料设计过程深入地展示出来,以3dsmax和V-Ray作为主要工具,还使用了一些地板生成器。
Today I’m happy to share with you this making of by Dusan Stevic from Architectural ID, a Serbian based visualization studio founded in 2011. The “Sea and Mountain Cabins” is a commercial project for showcasing their client’s cabins. Follow Dusan as he dives into the process of showcasing a wooden dominant design using 3dsmax and V-Ray is his main tools with lots of Floor Generator on the way. Enjoy!
Introduction/简介
首先,很高兴能有机会在Ronen微博上分享我们的作品。
在这个教程中,我们将尝试在商业项目上使用一个特定主题开展对一些主题的研究,下面进入正题。
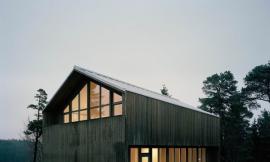
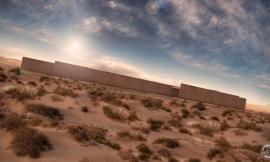
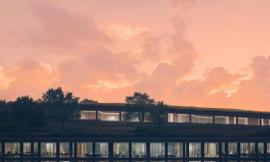
现在我们来开始一些室内外渲染。一些展示在Evermotion 的首页和iToo software的画廊区,所以也谢谢他们。
First, I would like to thank for this opportunity to share some of our work here on Ronen’s blog.
In this tutorial we will try to go over a few topics while working on commercial project with a specific thematic. So without any further ado let’s dive into it.
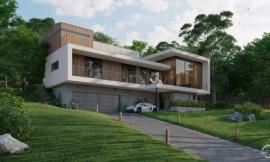
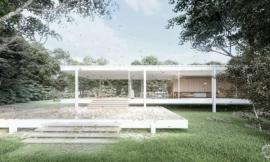
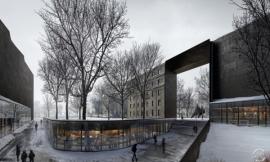
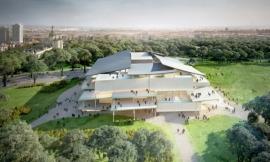
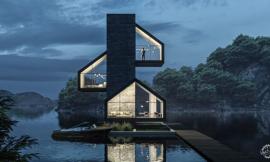
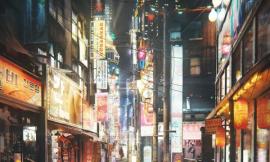
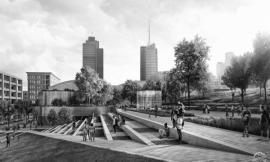
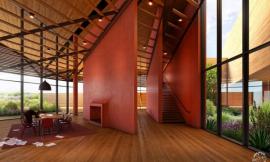
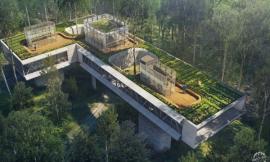
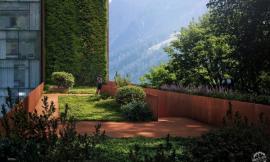
Here are a couple of exterior and interior renders to get us started. Some of them were showcased on Evermotion front page and iToo software gallery so quick thanks to them as well.


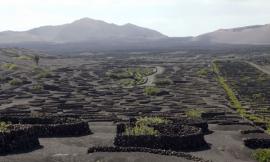
客户要求我们为挪威的小屋厂商创建一整套效果图。尽管已经说过好多次了,但是我们还是要强调找到好的参考图片的重要性。
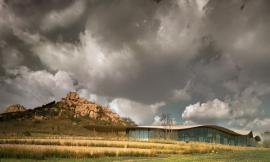
所以我们开始在网上搜索,努力找到各种不同的风景图、光线图和植被图,这样为我们的创作获得了不同的情景。设计理念就是试图在山与海两个不同的环境中捕捉挪威的自然风景,小屋以后的买主可以从中选择他们喜欢的景观,并将其打造出来。
The client approached us, requesting to create a full set of visuals for a cabin manufacturer from Norway. Even though it’s been said so many times, we also must emphasize importance of finding good reference images!
Right away we began searching and scrubbing through the internet looking for all kinds of different landscapes, light moods and vegetation in order to get various types of scenarios that might work in our advantage. The idea was to try to capture Norwegian nature in two different surroundings (Sea and Mountains) in a manner that potential buyers will find appropriate to the actual landscapes.

Modeling/建模
参考图搜索完成后,我们就开始了建模过程。
客户提供给我们的是来自Revit的obj.文件,一些可操作,而另一些则需要花大量时间来修正。对于小屋来说,由于几何输出较困难,所以重新建模比修正旧几何图形更方便。建模的过程还是很顺利的,因为小屋模型很容易创建。
Once we were happy with our reference base (which really wasn’t too difficult considering we had to look at the beautiful Norwegian scenery) we jumped into the modeling process.
The client provided us with obj. files from Revit which in some cases were manageable and in some a big nightmare to correct. Geometry was poorly exported so for couple of cabins it was easier to model them from scratch instead of correcting old geometry. Other than that modeling process was pretty straightforward as lodges were fairly easy to create.

开始我们按照客户的期望完成了一些小屋的建模,期间,我们必须依靠地板生成器来弥补一些坏的几何图形。这当然不是一个关于如何在项目上更快地工作的提示,除非你时间紧迫,也没有办法加快进度。
地板生成器在整个项目中用到了很多次,因为室内外地板和墙壁的渲染都需要用到。在该项目中,地板、墙壁、屋顶都采用木板,不用说,这个地板生成器无疑加快了建模的过程。
你可以在Bertrand Benoit的文章中对“怎样使用地板生成器”进行深入了解。
除了地板生成器,我们还使用了屋顶设计布瓦插件来设计屋顶覆盖物。这个插件很容易使用,设置起来也很快。另一个内置插件是冬季场景中的雪插件。这个插件能创建很漂亮的网孔结构,并带有多边形编辑器,所以很好操作,可以创建额外的碰撞、痕迹和不规则效果等。
小屋建模完成后,接下来我们将设计移到建筑所处的地理环境中。
就像我之前提到的一样,时间是这个项目的基础,所以我们必须用多边形编辑器循环修正地形来使用新的小屋建筑。
接下来开始建模。
关于树木、灌木和草模型,大部分来自Evermotion 和R&D group。
Only a few cabins were modeled from the beginning as the client expected weekly updates and so we had to rely on Floor Generator to cover bad geometry on some of them. This is certainly not a tip on how to work faster on a project but when you’re on tight deadlines and it works… You see where I’m heading with this.
Floor Generator was used quite a bit throughout the whole project as it was used for floor and wall coverings both in exteriors and interiors. Needless to say it was a life saver to speed up modeling process as wooden boards were everywhere – Floors, Walls, Ceilings, You name it.
You should check out Bertrand Benoit’s article about How to use Floor Generator for in-depth understanding.
Besides Floor Generator, we used Batzal Roof Designer for roof coverings. It’s quite easy to use and fast to setup. One more used plug-in is Snow flow for couple of winter scenes. Snow flow produces nice mesh and works well with edit poly modifiers in case you want to add additional bumps, trails, irregularities, etc.
Once the cabins were completed we moved onto terrains.
Like I mentioned earlier, time was of the essence on this project so we had to “recycle” terrains or terrain with corrections made to last two edit poly modifiers to adjust geometry to fit new cabin. This of course couldn’t be applied everywhere but we took advantage of this whenever possible.
That should be it as far as modeling goes.
For trees, bushes and grass models from Evermotion and R&D group were in use mostly.
Lighting and V-Ray Camera Settings/灯光和V-Ray相机设置
接下来就是灯光渲染。我们想走捷径,遇到灯光时,我们需要表现其差异性。所以我们决定对VRaySun、Sky和HDRIlight进行设置。
通过设置,每一个插件都表现出其优势。VRaySun/Sky主要用在有着大面积日光的情景,而在冬景中缺少这些。我们使用的是来自VizPeople (Vol 02)和Peter Guthrie中的HDRI贴图。
两种情况下的设置都是很标准的。HDRI贴图被嵌入进VRayDomes中,复制环境位置,VRaySun/Sky倍数有所增加后得到了柔和的阴影,即使分化出来的阴影质量也很高。
在添加材质之前,我们要先制作一些大地镜头,因为我们发现这是确定物体相对太阳所处位置的最好的办法,而且渲染速度也很快。在大地材质上也很容易看到整个画面反射了多少太阳光,使明暗区域形成鲜明的对比。
Next up was lighting. As much as we like to cut corners here and there we needed to show diversity when it comes to lighting. So we decided to go both with VRaySun and Sky and HDRI light setups.
Each with their advantages… VRaySun/Sky was mostly used in broad daylight scenarios while HDRI maps were in charge of overcast/sundown scenes because of their richer colors for afternoon scenes and lack of them in winter ones. We used HDRI maps from VizPeople (Vol 02) and Peter Guthrie.
Setups in both cases were pretty standard. HDRI maps were inserted into VRayDomes and copied in environment slot and for VRaySun/Sky size multiplier is increased to get softer shadows and shadow subdivisions are raised for better quality.
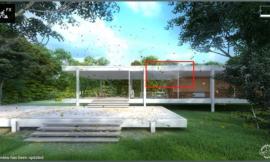
Before adding materials we tend to do a couple of clay shots as we found this to be a great way to best assess sun position in relation to object while keeping render times fast. On clay material it’s also easier to see how much shadows will affect whole image and to get a better grip on contrast between bright and dark areas.

这里是一些带相机装置的不同灯光设置图:
Here are a couple of different light setups with camera settings snapshots:


Materials/材质
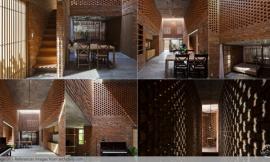
做这个项目最重要的事情就是木条板的使用要正确,因为木质材料是整个项目室内外的主要特征。
里面有两种主要的木材质(涂漆板和风化板),在每个场景中都不同。地板和垂直覆盖层的渲染使用了相同的设置,我们可以一起来看一下其中一种渲染方式。
基础材质包括内嵌在多重纹理插件中的漫散射、反射和凹凸贴图。
下面是基础材质的设置和预览。
One of most important things while working on this project was getting the wooden shaders right as they were one of the key features of the whole project both in interiors and exteriors.
There were two main wood materials (lacquered and weathered boards) both with variations from scene to scene. Similar setup was used both for flooring and vertical cladding and we will go over creation for one of these wood materials.
The base material is consisted of diffuse, reflection and bump maps attached to Multi Texture plug-in (as mentioned above, floors were mostly done with Floor generator).
Here is a setup and preview of base material

模糊值降低到0.5形成散射,0.8的话用于更清晰的反射效果。bump slot中的贴图通过颜色对比也形成反射。我们使用Color correct颜色校正插件,而没有使用Max里自带的color correction插件,因为前者相对更自由一些。基础材质最后一件事就是添加VRayDirt,在未封闭的地方添加散射贴图。这里没有进行设置,因为封闭颜色从黑到深褐色只有稍微的校正,来和木材颜色匹配。
基础材质看上去已经很坚固但是需要一些瑕疵、变化、碰撞、抓痕等,使其看上去更真实。接下来就是复制基础材质,用它作为V-Ray混合材质中的涂层材料。光泽度和菲涅尔在涂层材料上有所增加,表现出了平滑效果。但是对于上面的光泽度和反射层没有做任何调整,以免给人不真实感。
Blur value is lowered to 0.5 for diffuse and 0.8 for reflection for slightly sharper result. Maps in bump slot are also used for reflection with slight color altercation. We used Color correct instead of max color correction as it gives more freedom with adjustments. One last thing for the base material is adding VRayDirt to diffuse map in unoccluded slot. Settings are left as they are with only slight adjustment to occluded color from black to dark brown to match wood color.
The base material looks solid already but needs some imperfections, variation, bumps, scratches, etc. to make it more realistic. Next up was copying our base and using it as a coat material inside a V-Ray blend material. Glossiness and Fresnel are increased on our coat material in order to give that glossy effect. But without any adjustment to glossiness and reflection level our coat will look too uniform and unrealistic.

所以接下来就是制作一些抓痕或污垢效果。
第一张贴图采用的是r.光泽度,在镶木地板漆中产生了些许变化。这经常用带有颜色变化的黑白贴图,避免转变过快。如果贴图对比太明显的话,你可以使用色彩输出降低色调。色彩校正器也能达到这个效果。
接下来就是bump slot,这里你可以使用任何适合你场景的抓痕贴图,使木板之间产生很漂亮的对比效果。
在合适的位置进行光泽和凹凸设置后,现在我们调节反射设置,使地板产生一些差异性,所以在最后的地板渲染中你会看到地板随着时间流逝有一点磨损,因经常踩踏、移动家具或其他原因有一点损坏。在这种特殊情况下,我们将两种贴图混合在一起得到想要的效果。
这是一个实验和犯错的过程,所以得到想要的效果之前你可能必须要尝试很多次。
So the next step is to get some scratch or dirt maps in order to fix this.
First map is added in r. glossiness to make subtle changes in the parquet lacquer. This should usually be black and white map with little color variations to avoid drastic transitions. If your map has too much contrast you can tone it down using color output like we did in this example. Color correct can also be used to achieve this.
Next up is the bump slot where you can use whatever scratches map works best for your scene and gives nice contrast to wood bump.
With the glossiness and bump in place we now need to adjust reflection in order to get some more diversity to our floor and achieve that final look of floor that is little worn out by time and slightly damaged from constant use, moving furniture or what not. In this particular case we mixed two maps to get what we wanted.
This is a process of trial and error so you will probably have to do couple of tests before getting desired result.

同时也不要忘记分配贴图通道,以便使用UVW修正器进行正确贴图。
Also, don’t forget to assign map channel to your masks so you could properly map them using UVW modifier.


这是最后的设置和木材质的最终效果。
And this is the end setup and final result of our wooden material.


室内地板材料设置完成,接下来就来看一下室外的涂饰木材。
CGTextures中的纹理用在了室外涂层。一些板材用到了所有的三种通道(散射、反射和凹凸),在多材质中用到不同的减饱和设置。散射槽和色彩修正器也捆绑在一起,来显亮板材,形成更强烈的对比。一旦散射槽减饱和到合适程度,就可以将其和RGB多层连接在一起,得到想要的木板色彩。
下图是基础材质设置和渲染。
Now that we got the interior flooring material setup covered let’s go over exterior painted wood.
Textures from CGTextures were used for the exterior cladding. Same boards were used for all three channels (diffuse, reflection and bump) with different desaturation settings in multi texture. Diffuse slot is also attached to color correct to brighten boards and get some more contrast. Once we have our diffuse slot desaturated properly it’s time to connect it to an RGB multiplayer so we could change boards to desired color.
Here is base material setup and render.

墙板看上去完成了,但是显得有点平整和统一,需要一些凹凸渲染使木材产生一些年轮、裂缝等。所以我们再一次复制基础材质,创建一个V-Ray混合材质,给我们的材质增加更多深度和真实感。
室外材质渲染和地板材质的创建过程是相似的。需要关注的是天气条件对木板的影响,这部分需要重新创建新的材质。但是一定程度上不会影响到很多涂层,因为客户打算将小屋作为新建筑出售。
像以前一样,VRayDirt的添加是为了在边缘获得更多的深度,设置中不带有adj.。我们的复制材料提高了反射度,在反射和光泽贴图中有两种贴图结合在一起。对于光泽渲染来说,相同的贴图使用时只旋转90度,然后和之前的混合在一起,避免光泽重复。反射渲染有两种不同的贴图混合在一起,颜色亮度上稍微有差别。凹凸所起的作用不大,否则就太突出了。
The siding looks OK but a bit plane, flat and uniform. It needs more bump to bring out wooden rings and cracks and reflection needs more work. So let’s again copy our base material and create a V-Ray blend material to add more depth and realism to our material.
The procedure is similar to floor material we created just now for an outside material. Focus should be on recreating how weather conditions are impacting wooden boards. But in a manner that won’t affect cladding too much considering client is supposed to sell them as new cabins.
Like before, VRayDirt is added to get some more depth on edges with no adj. to its settings. Our copied material (coat material) had increased reflection and in reflection and glossiness map there are two mixed maps combined together. For glossiness, same map is used only rotated for 90 degrees and then mixed with the original to avoid glossiness repetition. Reflection has two different maps slightly brightened in color correction and then mixed together. Bump value is pretty low as on higher values becomes too obvious.

这就是调整后的材质效果。
This is how material looks after adjustments.

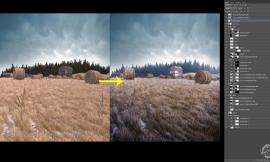
这里是室内外材质前后的对比。
And here is comparison between start and final result for exterior wood material.

其他材质的设置非常简单,只需要散射、反射和凹凸贴图即可,不用做拉伸和移动操作。
Other materials had fairly simple setup with diffuse, reflection and bump maps applied so let’s not drag along too much with materials and move to next stage.
Render Setup/渲染设置
这里你将发现室外镜头所用的Adaptive DMC图像采样和区域过滤的常用设置。室内我们经常在Catmul-Romm、Lanczos和Sinc filter三者之间转换使用,因为每一种都比区域产生的效果强烈。这仅是个人爱好,你也许会发现后期的区域过滤更适合较软的原始图像。
在色彩贴图类型中我们使用了Reinhard,将燃烧值范围设置为0.3到0.6之间,这取决于亮度。
在GI中,光照贴图被用在了“一次反弹”和用于二次反弹的“灯光缓存”中,因为在一个合理的有效时间内,保持渲染几次,这两种渲染会获得干净、漂亮的效果。这个项目使用的是2.4 V-Ray版本,在新的3.2 V-Ray版本中,你可以尝试使用提升了很多的Brute force插件,但是对于Irr+LC仍然需要提高。
Here you will find commonly used settings with Adaptive DMC image sampler and Area filter for exterior shots. For interiors we often switch between Catmul-Romm, Lanczos and Sinc filter as each of them gives sharper results than Area. This is just a personal preference, you may find Area filter most suitable for softer raw image which has its benefits later in post.
For color mapping type we use Reinhard and burn value ranging from 0.3 to 0.6 depending on lighting.
In GI, Irradiance map is used for primary bounces and Light cache for secondary as this two will get you clean and nice result while keeping render times within a reasonable time-frame. This project was done with 2.4 V-Ray. In new 3.2 V-Ray you may try and play around with Brute force as it is improved greatly but for fast production Irr+LC still proves as winning combination for us.

除了图象过滤器,室外渲染设置也一样。
Exterior render setup is pretty much the same apart from image filter (Area).
Post Production/后期制作
我们认为,在ArchVIZ中,你可以两种方式变换着用。从原始渲染图中获得最多,然后在PS中润饰,或者自由发挥,获得基础渲染图。
作为CG realism的忠实粉丝我们喜欢在max上花更多的时间完成最多的工作。
下图是保存大小为16 bit的室内原始渲染位图,有着漂亮、坚实的效果,而且并没有过分明亮的区域。
In our opinion you can swing one of two ways when comes to ArchVIZ. Get the most from the raw render and polish it later in Photoshop or just let your creativity run free in post with minimum effort getting the base image.
As great fans of CG realism we like to spend more time in max and try to get most work done there.
Here is an interior raw render saved as 16 bit tiff image. As you can see nice, solid result with no over bright areas.

我们需要修正的第一个问题就是层次、曲线和色彩。可以添加一些颜色、调整对比度等。下图就是做一些基础调整后的效果。
First thing we like to correct (if needed) are levels, curves and colors. Nothing major, just to bring up colors, adjust contrast, etc. You can see how the image looks after basic adjustments.

接下来就是路径问题。
虽然我们并不很依赖后期制作,但是仍喜欢将所有路径呈现出来,以防不时之需。
此外,标准路径中我们用快速路径版本呈现出额外的闭塞路径,这是我们用到的第一个强调对比阴影的路径。
稍后我会提到用到的其他路径。
Next up are passes.
Even though we don’t rely on post production as much we still like to render out all passes just in case we might need any of them.
Besides the standard passes we render out additional ambient occlusion pass with quick passes script and this is the first pass we use to accentuate contact shadows.
In order to keep this short I will just mention what other passes we like to use (Raw Lighting for more depth, Light select to emphasize bright areas, Reflection and Refraction for reflective surfaces and glass).

路径完成后,接下来就是总是提到的内嵌Color Efex插件。
有时为了赶工期,我们会忽视一些细节。现在就可以进行一些对比、添加细节、软化和装饰图案等细节渲染。
With passes done, next up is Color Efex plug-in which we highly recommend.
Sometimes it can be a real life saver when you are up against some ridiculous deadline and don’t have enough time to dedicate to your image. Here it’s used to get a bit more contrast, bring some of details back, add a bit of soft glow and some vignette to round it up.

最后,我们又增加了色差,采用了我们都钟爱的旧相机溢色。处理过程中经常很难达到合适的效果,需要多尝试几次。
Finally, chromatic aberration is added bring back that color bleed from old cameras we all love so much. It’s always tricky to get the right amount so try a couple of times to get it as you want or you might end up overdoing it which can take focus from all hard work you’ve done thus far.

最后一步是用高通滤波器得到干脆锋利的渲染图,这时透明度降到50%。
And last step is to get crisp sharp render using high pass filter in overlay mode with opacity lowered to about 50%.

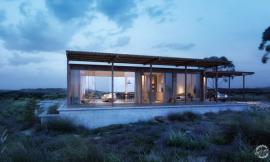
下图就是最终效果图。
With that image is complete and here is final result.

Conclusion/结论
感谢大家花时间读这篇文章,希望对大家能有所帮助。也感谢A+ studio事务所帮助我完成这个项目。
这儿还有一些更多的渲染图...
And to slowly wrap up, thanks to anyone who took their time to read this article, I hope it was helpful in any way. Also I would like to thank A+ studio for helping us out on this project!
For the very end here are a couple more renders…


出处:本文译自www.ronenbekerman.com/,转载请注明出处。
|
|