Winter Special #7
由专筑网李韧,邢子编译
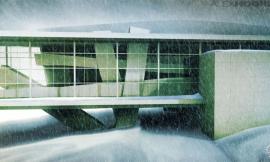
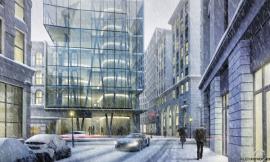
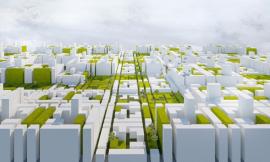
对于今年的冬日场景效果图,我希望制作一系列的图像,一部分是因为我无法决定某个视角,同时也是因为想要测试一下不同角度的雨雪对于画面的影响。相比于建筑图像的清晰度,我更比较看重空气的深度和光线色彩在雪中的呈现效果。因此我希望自己少花一些时间在这些图面上,这样才能不会被细节所影响,把更多的时间放在真正应该注意部分之中。
我将步骤分解如下,这样能够更清晰地表达结合在图面之中的色彩与雾面,最为重要的步骤是将光线分隔出来,然后添加在雾面之上,因为这样能够表达出光线穿过雾气的效果,同时其他部分也会结合雾气的色彩来呈现。
For this year’s Winter Special illustration, I decided to create a series of images partly because I couldn’t decide on one view, but also to experiment with the effects of thick snow at different view angles. I was less interested in the architectural clarity of the images and more interested in the atmospheric depth and how light and color react in a thick snow storm. I also forced myself to spend less time on these images than I normally would so that I would get less distracted by the details and focus more on the big moves.
I am breaking down one of the images below to show the layers of color and fog inserted into the image throughout the process. One of the most important steps was to separate out the light and move it above the fog because of how light seems to cut through the haze whereas everything else softens and absorbs the tones of the fog.
01. 基本渲染

V-Ray的基础渲染中我应用了简单的光线和一些室内灯光。雾气或雪会把光线进行扩散,整体看起来太阳光就不会那么刺眼,因为在后期图像会进行PS处理,因此前期的渲染细节就不需要那么精致。
01. Base Rendering
The V-Ray Base rendering used a simple overcast light and some minor interior lights. The fog/snow diffuses the light so much that there are no sharp shadows from the sun. I also knew going into this that the image would be heavily Photoshopped, so the details and quality of the rendering were less important.
02. 暗化场景

我将图像色彩调暗。先是在图像上叠加一些深蓝色,然后将图层混合模式调整为“叠加”,这样做的目的是减少一些图像中的细节,让场景整个看起来会多一些蓝色,帮助在之后的步骤中形成更明显的对比。
02. Darken The Scene
Next, I darkened the image. I did this by painting a dark blue color over the image and setting the Layer Blend Mode to “Multiply”. This was done to further remove some detail from the geometry, give the scene more of a blue overtone, and help create more contrast between the shadow and light coming in the next step.
03. 室内

与此同时,我强调了室内灯光。在这里我会去除一些上一个步骤之中的暗色,然后再添加一些肌理,接着在顶部增加一些暖色。因为之后会添加雾气,因此我同样忽略细部。
03. Interiors
Here, I amplified the interior lights. This was done by first masking away the dark overlay from the previous step. Next, some textures were added in and some warm overlays applied on top. Because of the layers of fog coming next, I again ignored the details and just focused on getting things close.
04. 第一层雾气

第一层雾气有着一定的颗粒,但是在之后的雾气添加中,这层雾气便不会显得那么锐利。
04. Fog Round 1
The first layer of fog was created with grainy textures that have a movement and energy to them. This layer of fog will be softened by other fog layers coming next.
05. 第二层雾气

我通过笔刷设置第二层雾气,在左上角,我用深蓝色笔刷添加了一些蓝色调,这样能够形成有层次感的图面,从而减少人们对建筑的关注,而把注意力放在场景之中。
05. Fog Round 2
The next layer of fog was applied using the Brush Tool. In the top left corner, I layered in a light blue paint with a darker blue paint in the bottom right corner. I was trying to create a gradient over the image as well as fade out the architecture as it goes higher in the sky.
06. 色彩

我通过蓝色将画面中的不同色调结合在一起。操作步骤是在图像上涂抹蓝色,然后将图层混合模式已调整为“颜色”。
06. Color
Applying a blue overlay brought together all of the different tones in the image. This was done by painting a blue paint over the entire image and setting the Layer Blend Mode to “Color”.
07. 背景细节

远处信息不多,因此我只是添加了一些树木轮廓和地面肌理。
07. Background Details
Not much will be seen in the distance, but I still took this time to insert some subtle tree silhouettes and ground textures.
08. 再次强调灯光

这是整个图像的重点所在,我已经添加了好几层雾气,室内的灯光同样也被遮盖了许多。因此我要将室内灯光的组复制出来,放置在雾气的图层之上,然后将图层混合模式调整为“柔光”,这会强调某些部分的灯光,而其他部分仍然是弱化。当光线来到雾气较为浓密的区域时,我会增加一层柔和的光晕,表达光线扩散的效果。
08. Light Amplification Again
This is where the image gets some of its energy back. Now that I have applied several layers of fog, the interior light is largely covered up. Therefore, I went and grabbed my interiors group, copied it, and brought it above the fog layers. Finally, I set the group’s Layer Blend Mode to “Soften”. This increased the light in some areas, but left others still muted. Also, as the light moves further up into the denser areas of the fog, I painted in a soft glow to spread the light out more.
09. 前景元素

为了增加景深,我放置了一些前景阴影元素。前景元素的清晰度也能对比显示出雾气柔和的感觉。
09. Foreground Elements
In order to increase depth, I placed in some shadowing foreground elements. The sharpness of the foreground elements also helps to increase the sense of softness in the fog beyond.
10. 模糊

对于雾气场景,我会将所有图层合并之后,再增加一个模糊图层。然后这个图层的透明度大约为50%,这让图像看起来柔和一些,同时也能强调光线在图面中的效果。
10. Blur
For the really foggy scenes, I often do a copy merge of all of the layers at the top of the layer stack, then give the new layer a slight blur. Then I lower the opacity of that blurred layer to around 50 percent. This adds just a little more softness to the image and really plays up the idea of light bouncing around the atmospheric molecules.
11. 雪花肌理

最后,我添加了一些雪花肌理,让雾气的场景更加偏向雪景一些,我之前有做过雪花肌理,当然也可以直接应用成图。
11. Snow Texture
Finally, I added some snow textures to convert the foggy scene to a snow storm. I used to generate my own snow texture, but there are actually some good textures you can get if you simply do an image search for snow textures.
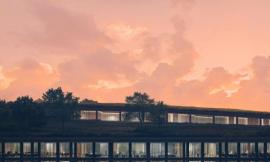
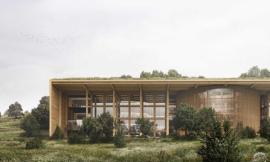
最后系列成图
The Final Series of Images


|
|
专于设计,筑就未来
无论您身在何方;无论您作品规模大小;无论您是否已在设计等相关领域小有名气;无论您是否已成功求学、步入职业设计师队伍;只要你有想法、有创意、有能力,专筑网都愿为您提供一个展示自己的舞台
投稿邮箱:submit@iarch.cn 如何向专筑投稿?