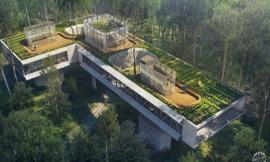
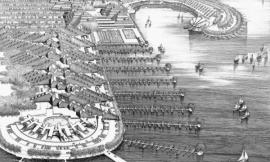
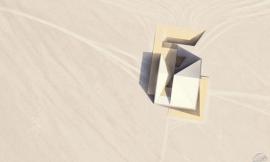
费城鸟瞰图步骤分解
Philly Aerial Break Down
由专筑网李韧,曹逸希编译
城市鸟瞰图的制作并不容易,因为鸟瞰图涉及到大量的城市周边环境,这也让整个画面看上去非常丰富。最理想的制作方法是无人机航拍,或者是直接建造一个完美的城市模型。然而,对于一般的项目来说并没有那么多的时间与精力,城市鸟瞰图的另一个难点便是设计师需要很精准地抓住图面所表达的内容,并且让整个画面具有层次感,因为如果图面中的每个元素都制作得过于精致,那画面看上去反而缺乏焦点。下面是城市鸟瞰图的制作步骤,希望对大家有所帮助。
Aerial architectural renderings in a city environment are some of the toughest images to create. For one, you are dealing with a ton of texture, geometry, and complexity when it comes to the context. The ideal way to manage this is to hire a photographer to take photos with a drone at the precise view angle. Another option is to build (or purchase) an elaborate model of the city. However for this personal project of mine, I don’t have either the time or the money for either of these options. Other difficulties with city aerials include creating proper hierarchy and focal points. With all of the texture and complexity of a city, everything is competing for attention and it can become difficult to draw the eye to the places you want it to go. Below is a break down of the Philly Bridge aerial illustration with an attempt at tackling some of these issues.
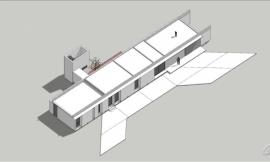
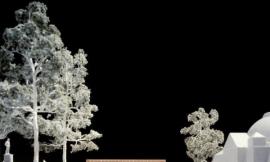
1、模型
SU模型是图面的基础,我们可以将模型导出线稿模式,再导入PS进行后期处理,你并不需要把所有的信息全部导出,只需要远处的一些建筑即可。但是,如果画面中的体量元素较多,那么在后期选择视角时也更加容易。另外,由于鸟瞰图的视点较远,因此对于图面中的细节并不需要花费太多时间去整理,重要的是材质的运用和小物件的添加。
1. 3D Model
The Sketchup model had the basic massing of the city inserted so that I could properly line up the context imagery in Photoshop. Obviously, you don’t need to have the entire context and can get away with just a few buildings in the distance. However, having as much massing as possible makes it easier to setup the view and composition. Because the view is pulled so far out, not much time was needed to cleanup the bridge design area of the model. Essentially, some materials were adjusted and proxy cars dropped in.
2、V-Ray渲染
V-Ray渲染出的图像有着稍高的分辨率,约7000像素。一般来说,人们喜欢将视角拉近,这样让图像看上去更加清晰,另外,高分辨率也可以更加准确地表达图面细节。
2. V-Ray Base Rendering
The base images were rendered in V-Ray at a slightly higher resolution than normal, 7000 px wide. People tend to zoom in closer on aerials so going with a higher resolution keeps the image looking sharp even up close. Also, the higher resolution allows for more accuracy when Photoshopping in details and creating masks.
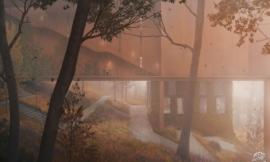
3、背景
我一开始就说过,鸟瞰图需要大量的城市背景信息,可是我并没有那么精确的模型,此时,我们可以在一些网站上查找所需的信息。有的网站有城市3D效果,我们便可以充分地利用它,但同时也会有这样的问题,那便是这些网站上的图像分辨率可能会不尽如人意,这些图像来源于航拍,因此有的城市的航拍效果会好一些。虽然这些城市背景图像的质量无法得到保证,我还是会选择运用这些图像而不是大面积冷灰色调的留白。
我将图像分为三个层次,即前景、中景和远景。通过这样的划分,在后期匹配图像,抑或是增加大气效果等步骤的操作时,我能够更好地把控这些步骤。
3. Context
Like I mentioned at the beginning, I don’t have any aerial photography or detailed models of the city at this exact view angle. Therefore I looked to one of the many free mapping websites for help. Most of these websites provide 3D navigation where really any angle is available of the city. The problem is the quality and resolution of these images is so low. The 3D imagery is generated from the aerial photography itself, so some cities are better quality than others. While the quality isn’t great, I still prefer this over the coldness of grey massing with half the city missing.
For this image, I patched in the imagery into three groups: foreground, mid-ground, and background. This gives me a little more control when matching the context images to the 3D model, but also for masking in atmosphere and effects later on.
其中最重要的是要让照片上的阴影与模型相匹配,因为两个分辨率不同的图像结合在一起已经相当困难,如果阴影再不匹配,整个画面便是妥妥的“车祸现场”。
It is important to ensure shadows match up when combing 3D with context imagery like this. The combination of high res 3D with low quality context imagery is already harsh enough, but not matching shadows just makes it that much harder to blend the two.
4、通过PS进行模型清理
我将模型部分处理得柔和一些,让它们与背景图像更加匹配,另外为桥体增加了一些色彩。
4、3D cleanup in Photoshop
I toned parts of the 3D base rendering to better match the context that was Photoshopped in and to dial in the colors of the materials on the bridge.
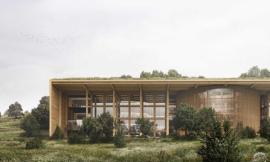
5、植被与组件
接下来是植物和各项组件的添加。由于人的体量非常小,人物的添加会让画面更具形象感,另外,植物非常重要,它们能够让图面变得更加生动。在空间中的不同区域里,我都添加了许多植物,这样可以与城市的背景环境形成对比。所有的植物都是直接在PS中添加,并不是在模型中载入,因此我不太喜欢在模型中处理植物信息。
5. Vegetation and Entourage
Next came people and entourage. The people are so small that they are essentially acting as another layer of texture to the image. However, the vegetation was a way to draw attention to the project. I played up the strong green tones to connect the different parts of the design and to contrast the intense texture of the city context. All trees were added in Photoshop vs baking them into 3D because I wasn’t quite set on the design and layout of them.
6、阴影
接下来的一个重要步骤便是添加阴影。由于天空中的云朵也会产生阴影效果,因此我将城市的后部空间都放置在阴影之中,这样人们便能更加快速地注意到前景中的桥梁设计。我先将城市背景划分成不同的组,这样我能够更加快速地将远景建筑部分打上阴影,同时让远处的背景仍然保持亮度。云朵的阴影可以直接通过深蓝色的笔刷来完成,然后将图层混合模式设置为叠加即可。
6. Shadows
One way to insert hierarchy in the composition is to play with shadows. In this case, shadows created by clouds. I, therefore, placed the skyline in shadow, shifting the viewer’s attention to the bridge design in the foreground. By dividing the context imagery into the different groups earlier, I was able to quickly select the skyline to put into shadow while keeping the distant context in light. The cloud shadows were created by simply brushing in a dark blue paint and setting the blend mode to multiply.
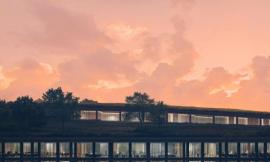
7、调色
最后,我用插件Topaz完成了最后的调色工作,将桥梁和绿化空间等重点表达部分提亮。
虽然无人机所拍摄的画面效果非常理想,在没有这些元素的情况下,我们可以后期通过线稿叠加、图层混合,以及一些PS中神奇的操作步骤达到这种完美的效果,在我尽量弱化背景元素之后,一张鸟瞰图便已完成,此时的我们可以开始下一个图像的制作。
其他教程敬请期待。
7. Color Tweaks
Finally, I tweaked the tones using the Topaz plugin, and punched up points of interest with bright color overlays such as around the bridge and green space throughout the image.
While drone photos or even detailed city models are ideal, a decent aerial illustration can still be achieved without these elements through a mixture of online maps, patience, and some Photoshop magic. Now that I have this aerial out of the way, it is time to take a break from all of these perspectives and get back to some diagrams or possibly a new project. Stay tuned!
出处:本文译自visualizingarchitecture.com/,转载请注明出处。
|
|