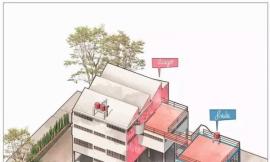
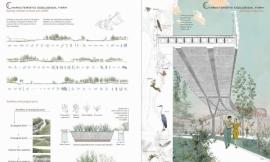
With this tutorial, I wanted to show the workflow that I use to develop a clean looking architectural site plan. This tutorial, like many of my tutorials, doesn’t use a rendering engine, only Sketchup image exports and Photoshop. Although I don’t use a rendering engine, a rendered roof plan of a building could easily replace the Sketchup images used in this explanation.
1)你可以用一张分辨率尽可能高的基地航拍图像作为开始,我更喜欢将空中卫星图像用于总平面,因为它增加了 3D 模型很难获得的细节和纹理。
1) Start with an aerial image of the site at as high of a resolution as you can get it. I prefer to use aerial satellite images for site plans because it adds detail and texture that is hard to get with a 3d model.
2)总平面在 Photoshop 里打开后,开始进行“图像>调整>去色”操作。
2) Once the site plan is opened in Photoshop, go to “Image>Adjustments>Desaturate”.
3) I have topography line work but I want to remove the white background and I also want the line work to be white, not black. To do this, first invert the topography image. Go to “Image>Adjustments>Invert”.
4)现在图片被反相了,调整图层的混合模式,在下拉菜单中,选择变亮模式。
4) Now that the image is inverted, go to the layer blend mode drop down menu in the layers pallet and choose “Lighten”.
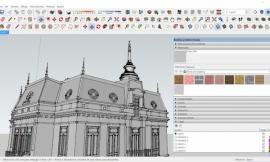
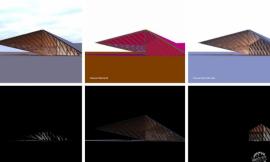
5) Next, 3 images of the building design need to be exported from Sketchup. Basically, one image will be the color, one will be the line work, and one will be the shadows. It’s important to export each image individually so that each can be edited separately. Also double check that the shadows in the Sketchup model are going in the same direction as the shadows in the aerial photo.
6) Open the “Shaded with textures” SU export in Photoshop and scale it to the correct site. Some time will need to be spent editing out the background so that just the building is visible.
7) Open the “Line work” SU export in Photoshop. Set the layer blend mode to “Multiply” to remove the white background. Lower the opacity so that the line work isn’t too strong. The only reason I am using the line work is to add a little detail to the roof plan.
8)在 Photoshop 中打开“有阴影”的SU渲染图,选择“图像>调整>色阶”。
8) Open the “Shadows” SU export in Photoshop. Choose “Image>Adjustments>Levels”.
9)移动左边的滑块到右边,直到阴影完全变黑。
9) Move the left slider to the right until the shadows are completely black.
10)将“阴影”的图层的混合模式设置为“正片叠底模式“来移除白色背景。
10) Set the layer blend mode of the shadows layer to “Multiply” to remove the white background.
11)选择“涂抹”工具,设置强度为 92%,轻轻涂抹阴影的边缘,注意不要触及到建筑。
11) Select the “Smudge” tool and set the strength to 92%. Slightly smudge the edge of the shadows not touching the building.
12) Select the “Eraser” tool and give the eraser a soft brush with 25% opacity. Begin slowly erasing the edge of the shadow not touching the building. The corner where the shadow meets the building should be the darkest.
13)创建一个新的图层,并将其移至建筑的图层的下面,接下来要在背景上添加一点颜色。
13) Create a new layer and move it below the building layers. A little color will be added to the background.
14) Select the “Paint” brush and give it a soft brush with 50% opacity. Paint in the color radiating from the building. I do this so that the design becomes the focal point and the color stays somewhat consistent.
15)选择图层的混合模式为“叠加模式”,将颜色融入到图片里。
15) Set the layer blend mode to “Overlay” to set the color into the image.
I have used this technique to create many of my site plans in school. It’s quick and looks like it took more time than it really did which is always a good thing.