由专筑网刘庆新,vigo编译
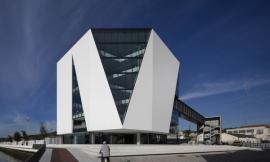
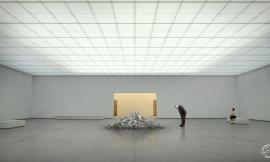
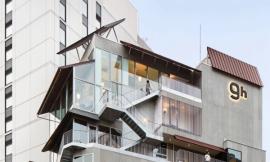
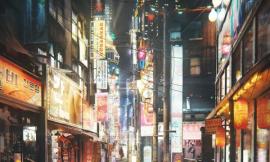
Slashcube事务所的设计师Thomas Vournazos发表了酷炫的 Hotel 114设计图。这是他在法国Oberkampf区设计的一个旅馆小项目。这张渲染图的目的就是展示一个充满生机的夜生活情景,并达到了完美的效果。Thomas在渲染中使用Maxon’s Cinema 4D和Corona for C4D渲染器,描述的工作流值得大家学习。
大家好
首先,感谢Ronen给我提供机会给大家分享我的作品。
Thomas Vournazos, from Slashcube, posted on the forums a super cool looking visual of Hotel 114 – A small project he did for a hotel design in Oberkampf area in Paris. Showcasing a vibrant, night life scenario, was the main goal for this image and nicely done. Using Maxon’s Cinema 4D along with Corona for C4D, Thomas describes his workflow in this article for all to learn from. Enjoy!
Hi guys,
First of all, a big thanks to Ronen for giving me the opportunity to share some stuff with all you guys. I was always a fan of this forum and got inspired a lot from all the people here through the years.
Introduction/简介
Hotel 114项目是我在五月份左右做的项目。这是受Herault Arnod Architectes事务所委托,在Oberkampf是一个新的旅馆和餐馆,在法国成为众所周知的夜生活区。该事务所喜欢概念图,所以这对于我来说是一个全新的挑战。整个渲染图用一周时间完成。
Hotel 114 is a project I did around May. This was a commissioned image for Herault Arnod Architectes and it is a about a new Hotel and Restaurant in Oberkampf, a well-known nightlife area in Paris. The mood was chosen to be night-time, to amplify the vibrant mood of the area. The Architects love to have conceptual images, so this one was a nice challenge for me. The whole process for this one image was a week. So things had to be structured.
Concept & References/设计理念和参考信息
开始一个项目的时候,Slashcube的重点是收集参考信息,这一点并不新鲜。参考信息可以帮助我了解地理环境,也试图为渲染本身打下坚实的基础。
下面是我用过的用于情绪板的一些图,从这里还有后面的渲染中,颜色值、对比和成分都可以以搜集的参考信息作为基础。
When starting a project, the main focus in Slashcube is collecting references. This is not news to you I’m sure, reading previous making-of’s on the blog. Usually, references help me to both understand the site and also try to make a solid base for the image itself.
Here are some of the images I used as a mood board. From here and afterwards, color values, contrast and composition can be based on the references I have collected.

我会对渲染过程稍微做解释说明,因为重点是在后期阶段。
I will spend some lines explaining a bit about the render process. Just a bit, since the main focus is on the post process stage.
3D Modeling/3D建模
大部分模型是设计团队给我的。一些材质,如街道、人行道、室内地面和建筑立面上一些曲面是我唯一需要注意的部分。
Most of the model was given to me by the design team. Stuff like the street, the sidewalks, the ground floor interior and some tweaking on the facade were the only things I had to take care of.
Nothing special though. All modeling was done in Maxon Cinema 4D. Here you see the viewport from the model itself.

Shading – Texture & Materials/Shading——纹理和材质
Asphalt Shader/沥青材质
从渲染本身来说,我想在渲染图中,路面能反射出建筑的影子,所有灯光尽量保持自然。所以我须制作看上去湿润的路面。在3D中操作比较容易。最后渲染中,我使用Corona Renderer作为4D渲染。虽然处于原始的沥青状态,但是我确实对这个效果很满意。
PS中许多自定义刷子工具和15K的纹理对于渲染整个街道来说足够了。基础贴图是倒影贴图,大部分纹理来自CG Textures。
材质没有什么特别的。一个简单的带有菲涅耳的参考贴图的shader编程来控制shader的特殊反射。
The only thing I wanted to have in the image from the render itself, was the road reflecting the building and all its lights as natural as possible. So, I had to make a wet looking road. Doing this in 3d was a lot easier. For the final render I used Corona Renderer for C4D. Still in early alpha, but I am really happy with what I am capable to do with it.
A lot of custom brushing in PS and a 15K texture for the whole street was more than enough. Again, the basic map was the reflection map. Most of the textures came from CG Textures.
The material was nothing to special. A simple shader with just a reflectance map with a bit of a fresnel map to control the specular reflection of the shader.


Lighting/灯光
Street Lights/路灯
该渲染中最重要的就是灯光!
我将区域灯结合起来作为路灯、区域灯和聚光灯作为餐馆照明灯,一些自定义的JPG店外立面作为照亮建筑周围地面的光源,店面被映射到地面上。这些情景都是通过反射看到的。
总之,我喜欢使光源呈散射分布,这样看上去比较自然,光的传播感觉也更好。
下图你可以看到人造光源的设置。我使用温度值将其扭曲,而不是简单的拾色器。这种情景中,街道灯光的温度值为1950K,人行道灯光的温度值为3000K。
Most important of all, the lighting!
I played with a combination of area lights for road lights, area & spot lights for the restaurant lights and some custom JPG shop facades for lighting the ground floors of the surround buildings, simulating the shops on the ground floors. I just kept them hidden from camera, but visible on reflections.
In general, I like to have a more random / chaotic placement for the light sources, so it works like a natural “noise”. The light propagation feels better in the end due to this.
Here you can see the light setup for the artificial lights. I tweaked them using temperature values and not with the simple color picker. So with this scene, temperatures were from 1950K for the street lights and 3000K for the sidewalk lights.


The Sky/天空渲染
对于主光源我用HDRi skies润饰了一下,通过Peter Guthrie的2009HDRi skies,日冕光强度和天空色彩之间找到了最好的平衡点。
我常常试图将天空的整个饱和度降低一点,这样可以将最初夜晚天空的色调调低一些。
For the main light source I played a bit with HDRi skies. The perfect balance between corona light intensities and sky color balance was with Peter Guthrie’s 2009 HDRi sky.
Usually, I also try to lower down a bit the overall saturation of the sky. This way I can tone down what is initially too vibrant of an evening sky for my taste.

RENDERING/渲染
日冕很容易设置,我只需保持默认设置即可。
我需要控制的唯一一件事就是全部显示和加亮。但是这个项目关系到后果,所以它满足每一个不同项目的需求。
Corona is quite easy on settings. I just keep the default settings.
The only thing I had to control was overall exposures and the highlight compression. But this is a project related issue, so it fits the needs of each project differently.

一些比较好的值得提的事情就是你可以在Corona Renderer里面的C4D通道。从简单的原始散射到间接反射,我发现Corona可以让我在后期处理有多种选择,这些是我在PS中想要的。下一个章节,我会展示我的一系列我用到的通道。
Something great, worthy of mention, are the channels you can have from Corona Renderer for C4D. From simple Raw diffuse to Indirect Reflection, I found that Corona has lots of choices for me to post process things I want in PS. On the next chapter, I will show my series of channels I like working with. So lets move!
POST PROCESS/后期处理
Basic Value / Color Scheme 基础数值/色彩方案
这一步中最重要的是数值,其次是色彩。我经常使用参考信息来比较我的数值和确切的色彩形式。
有时只需使用一张参照图,有时需要两到三张。通过一个黑白调整图层,我可以一直检查我的清晰度。
所以我使用一个参考图或早期的一个草图,为我的清晰度建立一个基础。这样我知道我设立的数值会很准确。
It all comes to this now. Most important is values and then colors. I always use a reference to compare my values and extract my colors from.
Sometimes it can be only one image as reference, other times it can be 2-3 images (like in this project). Using a black & white adjustment layer, I can check where my contrast is all the time.
So… I build a base for my contrast, using a reference and sometimes an early sketch. This way I know that my values will be exactly where I want them to be.

在后期处理中色彩占据第二位。如果数值是固定不变的,色彩就可以控制。再一次以参考图为基础,并关注色彩,这样最后就不会失去我想要的情景效果。
建立一个基本的色彩方案经常很重要。再次强调一下参考图确实很重要,所以搜集的越多越好。
Color can come second inside the post process. If the values are solid, color can be controlled. Again, based on references, I can keep an eye on my colors, so that I don’t lose the sense I want to have in the end.
Constructing a basic color scheme is always important. Again, references are really important. So gather as much as possible!

PSD File Layout PSD/文件层
这是我自己组织PSD文件的方式。我曾为此努力了很长时间,所以现在确实不能做大的改变。这种方式我认为很有帮助,能帮助你整理很大的文件。
Now, this is my personal way of organising a PSD file. I managed to work for a long time like this so now I cannot really change it much. It is helpful, well organised and it can help you out in really big files.

The Process/过程
渲染图的分辨率为5000,同时还使用了一些常用的渲染通道。这是原始渲染和我用到的所有通道。
下图是我附上的原始渲染图和我用到的全部渲染通道。
The image was rendered at 5K resolution, along with channels I always use (Mat ID, Alpha, Reflection, Diffuse etc.). Here is the Raw render and all the channels I used for this one.
Below I’m attaching the Raw Render and a couple of channels I use almost 100% of the times.


Correcting Render Elements/矫正渲染元素
项目开始后,我须将想要的建筑立面和街道渲染出来。
检查清晰度和数值是第一个基本步骤。根据需要我将建筑砖立面渲染的具有反射效果,颜色也更发白。
参考图中须有街道,并且看起来能协调。
Starting from the render, I had to bring the facade and the street on the level I wanted it.
Checking contrast and values is just one basic first step. I had to make the brick facade more reflective due to demand and also bring it to a more whitish color.
Also, as in the reference image, the street had to be fixed too… Just a bit to match my reference image.

Constructing 2D/3D Elements – 创建2D/3D元素
接下来就开始重要元素的渲染。
So, Starting from the most important…
The Sky/天空
天空渲染是我试图解决的第一件事。地面和天空渲染是每个项目的基础。
在这里,天空呈现的效果是有点阴沉且明亮,而没有采用明媚的蓝天。
Skies are the first thing I try to solve. A solid ground/sky pairing is essential to every project.
In this case, a slight moody bright sky, not to vibrant or blue, was the key.

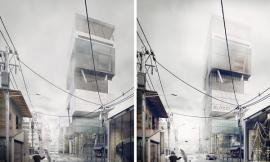
Hotel 114是一个新的设计项目,所以我必须将其置身于实际环境中,这里就是你看到的现在的建筑地形环境。
The Hotel 114 is a new design, so I had to place it in the real environment as it is now. Here you can see the site as it is now.

我须将2D建筑信息转换成三层,因为这样对引进尺寸和校正位置很容易。我使用了Architect事务所团队提供的各种不同照片,从分辨率中获益很多,避免了出现模糊渲染图。
Also, I had to break the 2d buildings information in three levels, cause it seemed a lot easier to bring scale and correct positioning. I used a variety of photos the Architect’s team provided me with, to benefit as much as possible from resolution and avoid blurry or low-res images.

Finally, 2D-people/2D人物
对于我来说,在渲染中搜寻和放置人物是最耗时的。但是,人物能帮助创造情节,带来动态的感觉,同时还会有一些清晰度和色彩的运用。
如果运用得好,能给画面添彩,但是运用不好,会毁掉一幅画面。
至于人物在路面上反射的倒影的渲染并不难,将所有人物去掉光泽,用旋转图刷工具涂刷原人物图,当然因为水波和沥青路面,要使其模糊一些。
Finding and placing people is the most time-consuming thing for me. But, they help create the scenario and bring dynamic feel, along with contrast and color to the scene.
Essential to the image, making it great if done right… or ruin it otherwise!
Reflections on the wet road were done by flattening all people in the end, stamping them with a rotated stamp brush and smudging a bit to give noise from the water waves and the asphalt noisy surface.

Light Enhancements/突显灯光元素
2D蒙太奇照片完成后,在渲染图的最后突显灯光设置会给整体带来真实效果。我经常在画面模式中使用图层结合方式,给现在的光源添加了氛围。
这里无需采用夸大表现,我会将刷子的透明度最多设置为20%,颜色设置也不会太活泼。如果你一直使用轻图刷,最后灯光会更自然。所以避免这个操作持续5到10分钟。
这个项目中,我给路灯增添了一点红色氛围,室内空间多了一些橘色灯光。
我也给建筑顶部进行了一点蓝色渲染,就像是天空颜色反射到光滑的面砖上。
After all the 2D Montages, the light enhancement always brings the final image a lot closer to being realistic. Usually, working with a combination of layers on screen mode, I add ambience on my existing light sources.
You dont have to exaggerate. Usually i keep my brush opacity to 20% max and keep my colors not too vibrant. If you keep light brushes…the light in the end will be a lot more natural. So avoid doing this step in 5-10 minutes!
In this case, I added a bit more red ambiance on the street lights, along with some more yellow / orange light in the interior spaces.
I also brought a bit of blue towards the top of the building, simulating the sky reflection on the glossy bricks.

Final Adjustments/最终校正
我在最后的润饰中并没有进行过多操作。整体颜色的蓝色调浅了一点,增添了一些加亮曲线使渲染图更真实,又增添了一些小图案将渲染图前景的较低部分变暗。
这里有一些需要注意的问题。我尽量不使用太多的色彩,避免使用低饱和度,而是通过改变色调来达到效果。这样渲染看上去更自然。也许最后图看上去缺少生机,但也只是局部如此。
下面就是最终的渲染图。
For this one, there weren’t much to do as a finish polishing touch. I tweaked a bit the general color to be less blue. Added a bit more highlight curve to make it more “punchy” and added a light vignette to darken a bit the lower foreground part of the image.
Some notice here… I try not to take color out too much. I avoid using desaturation and prefer to change hues instead. This way the image feels more natural and it is not looking flat. Maybe in the end I can work with a bit less vibrancy, but only locally.
And here it is the final image with all the above put together.

出处:本文译自www.ronenbekerman.com/,转载请注明出处。
|
|