I spend a lot of my time going onto Google Earth/Bing maps studying sites and grabbing screen shots. However, I find these sources equally useful for textures and finding site plan elements. For example, in my last post, I uploaded an image of a site plan through which I was experimenting with different styles and looks. I needed some trees and grass textures for part of the image. I noticed a nearby golf course in Google Earth had exactly what I was looking for.
这些树木的图特别能满足我的要求,因为树木周围的草地比树木和阴影更亮,使其更容易从背景元素中扣出来。
我用“减淡”工具将范围设置为“亮点”,并开始把草地变亮,这样我只留下了树木和阴影的细节。
These images of the trees worked particularly well for my needs because the grass around the trees was much lighter than the trees and shadows making it much easier to extract the elements from the background.
With the “Dodge” tool, I set the range to “Highlights” and began lightening the grass even more so that I was left with just the detail of the trees and shadows.
With the “Polygonal” tool, I roughly windowed the trees and dragged them into my site plan Photoshop file. To remove the white part of the cutout trees, I set the layer blend mode to “Multiply”. Using this blend mode removes the light areas of the layer and keeps the darkest sections of the layer, hence why I lightened the grass to almost white.
Using this method saves a lot of time and looks better compared to trying to selectively cut out around the trees and shadows using the eraser tool or magic wand tool.
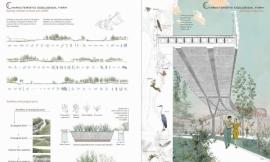
PHOTOSHOP LAYERS: Below, I have also uploaded the different layers I used to compile the final look of the site plan. I will try to add links to the different areas of this site showing how I achieved each layer.
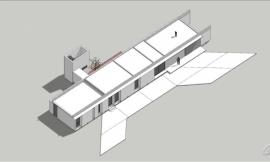
1. 上图中,第一个图层,是一个 SU 模型导出的简单图片,面样式设置为“隐藏边线”和“X光透视”。我也打开了“辅助线”。关于解释怎样增加和打开“辅助线”的步骤可以看我的3D 蓝图教程。
1. Above, the first layer is simply an exported image of my Sketchup model with the face style set to both “Hidden Line” and “X-Ray”. I also have “Guides” turned on. Steps explaining how to add and turn on guides can be see in my 3D BLUEPRINT tutorial.
2. Next I created a clay rendering of the Sketchup model to get the shadow information. To set up and render a clay model, check out my CLAY MODEL RENDERING tutorial.
3. The shadows in the rendering are still reading a little flat, so I also rendered a second clay model that will act as an “ambient occlusion” layer. I have two ways that allow you to get this effect. The first is the faster route and uses Kerkythea. I explain how to do this at about the 1:46 mark of the SOFT SHADOWS VIDEO tutorial. This step can also be accomplished manually if you are more comfortable in Photoshop rather than using a rendering engine. Visit my AMBIENT OCCLUSION tutorial to see how to manually create this layer in Photoshop.
4. 我也使用了 SU 模型导出了另一张图,面样式为“阴影纹理” 赋予了一些基础颜色信息,并且可以方便地识别步行道和其他建筑元素。
4. I also used an exported image of my Sketchup model with the face style set to “Shaded with Textures” to give some basic color info as well as allow me to more easily locate the sidewalks and other architectural elements.
5. Finally, I compiled the above layers together along with some grunge textures and Google Earth elements mentioned earlier in this post. Some of you may ask why so many layers? Many of these layers could have been combined together such as rendering the Kerkythea clay model with textures turned on, or combining the x-ray and color Sketchup exported images. The reason why I keep these separate is so that I can adjust the opacity/blend modes individually of each layer allowing for more flexibility towards reaching the best final look. Every rendering I do is slightly different than the others and thus requires different adjustments accordingly. Plus, setting up the many different layers allows for more experimentation when looking for that unique look.