由专筑网刘庆新,杨帆编译
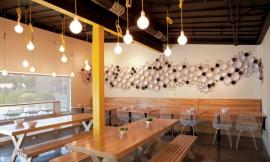
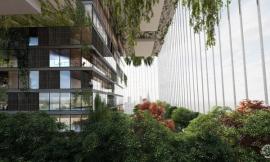
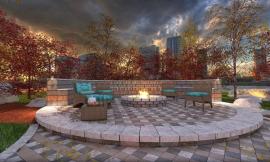
前不久我偶然发现了Paulina Kochanowicz设计的一个项目,觉得以此作为开始会是一个不错的选择。首先,它看上去很棒,我喜欢垂直绿墙的设计,它被执行得很好。其次,渲染过程都是在Blender软件中进行的,并内置Cycles渲染器。这里你看到的所有渲染图都是在有着免费开放资源的平台进行的。
It’s time for some blender render to be featured here on the blog! I stumbled upon this beautiful work by Paulina Kochanowicz not long ago and thought this would be a perfect one to start with. First, because it looks great… I love vertical green walls and this one is beautifully executed. Second, it is all done inside Blender and rendered with the built-in Cycles render engine. Keep in mind all you see here is done with a freely available open-source platform. Enjoy!
简介
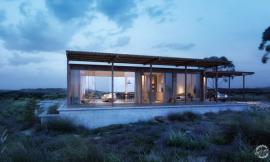
首先,非常感谢Ronen Bekerman 邀请我写并分享这篇制作垂直花园渲染的文章。为客户完成了许多项目后,我决定做一个属于我自己的项目。在这个项目中我可以探索和学习新技巧。所以我很高兴能有时间来做这个,不用急匆匆地赶商业项目了。
这意味着该过程会简单、快速且充满乐趣。所以这个项目是在探索创造垂直花园内部的创意,尝试用不寻常的方法渲染青草。这些图是一个更大项目的一部分,但是现在是这四个渲染中的一组。
Introduction
First of all, a big thanks to Ronen Bekerman for inviting me to write and share with you this article about the making-of my Vertical Garden project. After many commissioned projects for clients, I decided it was time to make a personal project. A project in which I can explore and learn new tricks. So I was happy to find some time to make something without all that rush associated with commercial projects.
It was meant to be simple, quick and fun. So this project was made to test an idea of vertical gardens in interior and to give The Grass Essentials a try in an unusual way. These pictures are a part of a larger project but for now it’s a set of these four renders. With additional renders made for this making-of.


使用软件
Blender 2.74 – 一个用于3D程序的开源软件。
Cycles – 渲染器(内置渲染)。
Photoshop CS6 – 用于较小的后期制作。
Software Used
Blender 2.74 – An open source 3d program.
Cycles – Blender rendering engine (built-in Blender).
Photoshop CS6 – For minor post-production.
Blender简介
我认为Blender是一款最好的开源的跨平台全能三维动画制作软件。我已经使用此软件两年了,我不能想象假如没有这个软件我将如何工作。
该软件提供从建模、动画、材质、渲染到音频处理、视频剪辑等一系列动画短片制作的解决方案。这是一个很有用的软件,可是并没有得到广泛应用。
Blender最大的优点就是它确实适合这个软件的发展,它们分享知识、经验,创建了一个多样的附件,使生活和工作更加便捷。
以Blender开始
第一步——下载Blender软件
你可以点击这里下载软件。如果你不想搞乱你的项目文件,可以下载压缩文件或安装包。
第二步——安装过程
从Blender Foundation地址中下载的安装包里安装Blender软件。安装过程结束,你应该能在你电脑的桌面上看到Blender图标。如果看不到,就在你电脑的程序文件夹里找到Blender。
第三步——第一次打开Blender软件
通过点击图标打开Blender文件,打开的窗口包含一个跳出的屏幕,上面会出现你要安装的Blender版本。
Introduction to Blender
Blender is, in my opinion, the best open-source 3D program suitable for professional use by studios like mine. I have been using Blender for about two years now and I cannot imagine at this time functioning without this program.
I use it not only for creating visualizations of interiors and architecture, but also for presenting visual identifications, product mockups and advertisements created by our studio. This is an invaluable tool for us and unfortunately still not appreciated enough by the wider public, which I hope to be changed soon.
The great advantage of Blender is its community that really serves the development of this software, they share their knowledge, experience and create a variety of add-ons for it which make life and work much easier.
Getting Started with Blender
Step 1 – Download Blender.
Get Blender from here. You can download it as a .zip or as Installer pack if you don’t want to mess with your program files.
Step 2 – Installation Process.
Install Blender from the pack downloaded from Blender Foundation’s site. When the installation process is done you should be able to see the Blender icon on your desktop. If not, find Blender in the Program Files folder on your computer.
Step 3 – Opening Blender for the First Time.
Open a Blender file by clicking on its icon. An opening window contains a splash screen which shows which version of Blender you’ve just installed.

隐藏这个屏幕,点击主要3D窗口。现在你可以设置你的启动文件了。(每一个新打开的文件都会有这些设置,你可以根据你的喜好和需要改变任何设置,但下面我会给你展示我的设置。)
第四步——设置3D窗口
每个新文件都有默认设置和主窗口,如图所示。
To hide this splash and go to the main 3d window simply click on it. Now you can set your startup file (every new opened file will have those settings. You can change whatever you like or need but I will show you below what are my settings.)
Step 4 – Setting up your 3d windows.
Each new file has default setting and main window that looks basically like this.

你能在这里看到基本的网格结构——立方体、普通照相机和普通灯光。我总是删除这些结构,而从数字小键盘上通过组合键将透视转变成一个直角模式:
1 – 前视图
3 – 右视图
5 – 正交视图
7 – 顶视图
9 –底视图
0 –相机视图
我将我的启动文件设置为顶视图和正交视图,删除了屏幕上的所有基础网格结构。现在都设置成我需要的窗口,方便我进行建模和渲染。
You can see here a basic mesh – cube, basic camera and basic lamp. I always delete all of those assets and change perspective to an orthographic mode by combination of keys from numeric Keypad :
1 – Front View
3 – Right View
5 – Ortho View (next click will take you back to the Perspective view)
7 – Top View
9 – Bottom View
0 – Camera View
I set my startup file to top, ortho view (5,7) and delete all the basic meshes in the scene.
Now I set up all windows I need for modelling and texturing my scene.

主窗口是三维窗口,你可以在里面建模。
窗口左底部是节点编辑器——这里你可以制作你所有的渲染材料。
窗口右底部是图像编辑器,你可以在这里预览所有材质,展开模型。
基本上这些就是我工作的窗口。通过拖拉每个窗口的上下或边缘可以很容易地改变你的窗口。你甚至可以将你的视点设置成大家熟知的3ds max,如果你更喜欢在这个体系下工作的话。这完全取决于你自己的爱好。
Main window is the 3d window in which you can model your stuff.
Left bottom window is the Node editor – a place where you can make all your materials.
Right bottom window is the Image Editor where you can preview all the textures loaded into .blend file and uv unwrap your models.
So basically those are my windows to work in. You can easily change yours by dragging right corner of each window up, down or sideways. You can even set your view to one known from 3ds max if you prefer to work with that scheme. It all depends on your own preferences.

你可以将光标放置在连接不同窗口的线上,这样就把窗口界面分开了。旁边的箭头还将会展示出来,询问你是想分开还是结合区域。
第五步—— 渲染引擎和规模。在主菜单上部你会看到可使用的渲染引擎下拉菜单。
You can split your window by placing the cursor over the line connecting the various windows. It will show you both sided arrow and ask you if you want to split or join areas.
Step 5 – Rendering Engine and Scale. On the upper main menu you can see drop down menu with available render engines.

从菜单中选择Cycles。Cycles是Blender中最好的内置渲染引擎,可以在相同的窗口中做任何操作,而不必将场景引入到另一个程序。
剩下的事情只需设置规模。
也许是因为我职业的缘故,我喜欢使用真实尺寸工作。在我们国家主要以米为单位,所以我总是确保这是我的设置。
完成这步设置,在窗口右边找到属性面板,设置你的场景单位为米。
Select Cycles from that list. Cycles is the best built-in render engine for Blender which allows you to make everything in the same window. You don’t have to export your scene to another program.
The one thing left is setting up the scale.
Maybe this is because of my profession, but I like to work with real scale. In my country it’s metric so I always make sure that this are my settings.
So to make this, go to Properties Panel on your right side and set up your scene units to metric.

第六步——保存启动文件。从上部菜单面板的下拉菜单中选择文件,然后保存启动文件。
Step 6 – Save your startup file. Simply choose from File drop down menu on your upper menu panel – Save Startup file.

你做的第一步就是创建你自己的建筑场景,并更好地了解Blender软件。
And that’s it. You’ve just made your first step into creating your own architecture scene and to know Blender better.
垂直花园最初设计理念
制作垂直花园的最初想法在几个月之前就已经在我脑海里形成了,起初这种想法和垂直花园联系并不大。只是想渲染由紧绷绳索固定混凝土楼梯的彩色扶手。这就是我最初的想法。
接下来我开始寻找一些东西,作为扶手所在的环境。恰好那时我收到同事的一封邮件,邮件内容是关于垂直花园的,我突然就有了这个想法。
The Initial Idea of the Vertical Garden
The very first idea of making the Vertical Garden striked me a few months ago and wasn’t connected to vertical gardens at all. I had in my mind this idea of colourful handrail made of tensioned rope along with the ascetic, concrete stairs. This was my basic object to focus on.
And then I started to look for something that would be a nice entourage for this handrail. At that time I received an email from my colleague about those vertical gardens idea and then I knew that this was it.

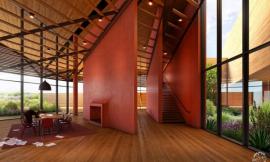
所以我开始画草图,因为在工作流中我比较守旧,所以决定只尝试渲染门厅来展示垂直花园。
So I started to sketch as I am a bit old-fashioned in my workflow. And basically decided that for a test I will render only a house foyer to showcase the vertical garden.
建模
Walls/墙壁
首先,我建了墙壁的基本框架。以一个简单的立方体作为开始,而没有将其拉伸到合适的尺寸,在立方体上做了一些打孔设计作为窗户,允许自然光进入室内。
Modeling
First of all, I modelled basic mesh of the walls. I started from a simple cube and than stretched it out to the proper scale and made a few loop cuts to make holes for windows and to allow light source to enter the room.

我用墙结构将模型分层,制作了一个合适的UV延展。
接着进一步渲染了一些细节,以便更接近真实的效果——在墙壁边缘增加了一个轮廓编辑器。
I separated floors from walls to make a proper UV unwrapping.
Then I made a few more details in order to have more realistic close-ups – I added a Bevel modifier to wall’s edges.

屋顶天花板渲染出一些空洞,可以设置照明灯。
And made holes in ceiling for lamps.

Windows/窗户
所有墙体建好后,我开始用Window Generator v3工具来制作窗户。
这是一个非常有用的工具。有了它就能制作许多精细的高质量的窗户,从室内外都能看到。有许多方式可以调整窗户,直到你满意。
After modelling all the walls, I made windows using the Window Generator v3 add-on.
It’s a very useful tool I use a lot. You can easily make windows with good amount of details needed to visualise both interior and exterior scenes. As You can see below there are many ways to adjust the window to your needs.

我将窗户渲染得窄而高:
I made my windows very narrow and high:

Stairs/楼梯

楼梯的渲染以一个基础立方体开始,将其延伸到真实的尺寸。
然后我使用了一些修正器,为了使楼梯看上去更自然,我添加了轮廓修饰器。这样楼梯看上去更真实——轮廓修饰器软化并修饰边缘。
我使用Array Modifier复制了第一个阶梯。
I started from a basic cube, which I stretched out in order to match the real scale.
And than I used some modifiers. To make stairs look natural I added Bevel Modifier. This allowed me to achieve more realistic look – Bevel modifier softens the edges and gives them some additional loop cuts.
To duplicate the first stair I used the Array Modifier.

Handrail/扶手

开始制作扶手的时候有一点困难,现在想想,其实这一步是很简单的。
这一步我以三个圆形开始,每一个圆形有六个顶点。然后把它们合并成一个对象。
我制作了NurbsPath,并将其修正、拉伸。
It was a bit tricky when I made it for the first time but now I think that this is rather simple.
I started here with 3 circles. Each of them had 6 vertices (to make a small vertex count). And merged them down to one object. (TIP : make sure that the origin point is in the middle of the object).
I made NurbsPath and straightened and stretched it out.

我为我的绳索对象添加了编辑器。
螺旋编辑器使我可以旋转绳索。
I added Modifiers to my rope object.
Screw Modifier which allowed me to rotate my rope mesh.

Array Modifier作为一个拟合曲线类型,可以让我将绳索沿着轨迹做拉伸操作。
Array Modifier – as a “Fit Curve” type – allowed me to stretch my rope along the path.

在曲线编辑器里将路径设置为样条轨迹。
Curve Modifier – to set the NurbsPath as a path along which rope will follow.

任意分支曲面修改器可以使绳索看上去更光滑。
Optional Subdivision Surface Modifier – if you want to make rope smoother.

基本的网孔结构完成后,我将每一条绳索分开,这样每一个节点的连接点不同,避免重复。
After making basic mesh I played with every rope separately so that each node was connected differently to avoid repetition.

Furnishing/家具

家具渲染非常简单。在渲染开始我就知道我会在场景中置入Patricia Urquiola的Tropicalia扶手椅。我确实喜欢这位设计师的设计,现在正好有机会用到她的作品。
In terms of furnishing it was a rather simple project. As soon as I decided to make colourful handrail I knew that I would like to put into the scene Patricia Urquiola’s Tropicalia armchairs. I really like her designs and here was a good opportunity to use it.

一开始我建立了一个金属框架模型:使用Nurbs Curve创建一半扶手椅框架。我用一个全半径的形式把它填满,并给它取了一个深度,这样椅子看起来就有了中空管的形状。
At first I modelled a metal frame: started with a Nurbs Curve to create a half of armchair’s frame. I filled it with a full radius form and gave a depth to it to obtain the shape of a hollow tube.

然后我使用镜面修正器完成对称的剩余结构部分。
Than I used Mirror Modifier to get a symmetrical other half of the frame.


我用同样的方式创建了椅子后背和座位的填充材料,不同之处是平滑的线代替了圆线。
I used a similar method to create material inserts – strings for back and for seat of the chair, with the difference that instead of a round cross-section strings here strings are flat.

当我完成线条模型后,我将所有这些线条移到椅子结构框架中,组合在一起。这可以让我通过适当比例的编辑将座椅的凸面形状呈现出来。
When I finished to model stripes I converted all of them into mesh (curve to mesh) and joined them to one object. It allowed me to shape the convexity of the seat using proportional editing.

实物节点用网柱表现出来。
涂漆是通过将基本的立方体拉伸至两米多高制作完成的。
照明灯的模型来自Evermotion的第十周年收藏。
这样就得到了非常棒的模型。
Concrete pot was made using cylinder mesh.
Paintings was made from basic cube stretched to a height of more than two meters.
Models of lamps are from Evermotion’s 10th anniversary collection.
Great models by the way!

Vertical Garden/垂直花园
这里的所有草地模型都来自BlenderGuru’s Grass Essentials Pack。
All models of grass used in this piece were from BlenderGuru’s Grass Essentials Pack.

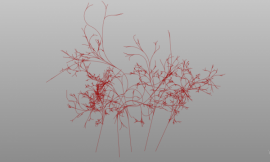
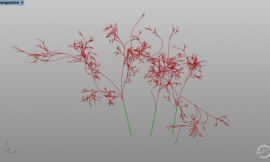
我选择了5种草和杂草,将它们分散排列在墙上。然后我制作了一个简单的平面,又将其分解几次。这个平面就是设置粒子系统的基础。
I choose 5 species of grass and grass weeds to decompose them on the wall and then I made a simple plane and subdivided it few times. This plane was my base to set a particle systems.

在这一平面上我制作了5个分散的粒子系统。你看到的下图就是第一个粒子系统。其他的都是在这个基础上改变长度和发射数值。这样我可以在这个平面填充上所有的缝隙。
I made 5 separate Particle Systems on this one plane. What you can see below is first particle system. All the rest was based on it with some tweaks in length and emission number. This allowed me to fill all the gaps in my plane.

这就是最后的草墙效果图。
Final grass wall looked like this.

材质
创建更多优质材质的最好方式就是使用节点编辑器。
将Cycles作为渲染引擎后,你可以在Blender窗口的右边的属性面板中添加一些新的材质。
Materials
The best way to create more advanced materials is by using Node Editor.
After setting up Cycles as your render engine you can add new material in Properties panel on the right side of Blender window.

如果你通过材质属性面板新按钮添加新的材质,将会在节点编辑窗口中看到节点树。
在材质属性面板中你可以预览你的材质。
If you will add new material using New button in Materials properties panel you will see node tree in the Node editor window.
In the Material Properties panel you can preview your materials.

你可以添加新的着色器并进行调节。你须通过节点编辑器里的添加按钮操作来选择你真正想要的,这样你的材质看上去更真实。
You can add new shaders and tweak them. You have to simply use Add button in Node editor to choose what you really want and to make your materials more realistic.

下图你可以看到漫射和光滑着色器混合生成的基础材质。
Below You can see the basic material made by mix of diffuse and glossy shaders.

Cycles中有一些基本着色器:漫射着色器、光滑着色器、玻璃着色器、自发光着色器等。但是你可以根据需要将不同种着色器进行组合或使用更复杂的着色器。
垂直花园渲染图的材质确实没什么新奇的。我经常使用漫射渲染和碰撞渲染,漫射方式能显现出基本的色彩。我用这种材质创建出水泥地板和楼梯。
来自CGTextures的纹理。
There are few basic shaders in Cycles: Diffuse, Glossy, Glass, Emission and so on but you can adjust them to your needs by using different combinations and by using more complex nodes.
My materials for Vertical garden are really nothing fancy… I always use diffuse map – which shows basic color – and map of bumps (it could be done from simple diffuse map but with higher contrast level just like in the example below in my concrete material). I used this material to create concrete floor and stairs.
Textures are from CGTextures.

墙壁材质除了漫反射渲染和镜面渲染,我还用Gimp制作了一个标准渲染。如果你想知道怎样使用Gimp制作标准图,可以去YouTube教程上观看。
For wall material besides of diffuse and specular map I also made a normal map using Gimp. If you want to know how to make your own normal map using Gimp you can follow any YouTube tutorial like this for example.

其他所有的材质都很容易创建。它们主要是将漫反射着色器和光滑着色器结合起来制作的,所以这里天鹅绒绳索着色器也用到了。
All other materials are easier to create. They were based primarily on combining diffuse and glossy shader, in the case of the rope velvet shader was also used.
灯光
在垂直花园场景中我用到了三个光源。
HDR map/HDR渲染图
我需要旋转使其和水平线匹配。渲染图本身来自Blender Guru。
Lighting
In Vertical Garden scene I’ve used 3 light sources.
I had to rotate it in order to match the horizon. The map itself is from Blender Guru.

Emission planes in windows/窗户的反射面

Sun/太阳光线
图中并不需要太多的光线。
Although as I realised later, sun wasn’t needed that much.

提示:如果你使用Cycles 渲染器和室内场景,重要的一点就是——我的经验告诉我将场景以某些方式展示出来,它能很快降低噪音,允许灯光进入并反射到室内。环境会更明亮、更安静。
TIP : Important thing if you are working with Cycles Renderer and interior scene – My experience shows it is much better to open your scene in some way (for example put one of the walls invisible to the camera on the layer which will not be rendered) it speeds up noise reduction and allows light to come and bounce in the interior. Visualisation will be little brighter and noiseless.
渲染设置
下图是基本的渲染设置。
Render Settings
My basic render settings are below.

每一个相机渲染场景设置在1000的频率。为了减少萤火虫的数量,我使用了直接和间接Clamp,将其设置为5。所有的设置都是基本设置。
The scene was rendered with about 1000 samples for each camera view. For decreasing the amount of fireflies I used Clamp Direct and Indirect set to 5. All other settings were rather common.
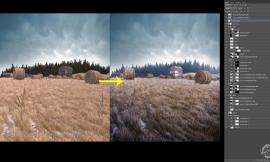
后期制作
我喜欢微调渲染图,比如说我没必要用太多Photoshop的地方,我就会进行调整。
后期制作包括以下方面:
• 1层 –原图
• 2层–漫反射光
• 3层–添加一些色差来校正镜头
• 4层–色彩校正
• 5层–用Warm Photo Filter插件增加暖色调
• 6层–曝光处理
• 7层–模糊虚化处理
以上就是我对这个渲染图做的所有操作。
Post Production
I like to fine-tune my renderings to such a level where I do not have to use too much of Photoshop.
So my post production is limited to such things as:
• 1 layer – Original picture.
• 2 layer – Diffuse Glow.
• 3 layer – Lens correction to add some chromatic aberration.
• 4 layer – Color Correction.
• 5 layer – Warm Photo Filter.
• 6 layer – Exposure.
• 7 layer – Vignette.
And it’s all what I’ve done with this pictures.

谢谢大家!
And that’s it!
出处:本文译自www.ronenbekerman.com/,转载请注明出处。
|
|