Plan Oblique Illustration: Part 1
我一直在尝试用一些老校总平面轴测渲染图。这是我在学校学到的三种立体手绘草稿图中的一个。这种类型的渲染图好处在于,它们可以用作3轴成比例的图纸。这是可能的,因为平面(X 和 Y 轴)没有被扭曲,但是平行于投影平面。Z轴也画的是真实的长度,可以测量出来。SketchUp不能直接在程序中生成这一视图,但是通过一些小技巧、一个小的几何知识,和 Photoshop,重新创建图是可以的。在图的顶层重新平铺纹理和色彩能产生一些真实感的独特的图。
第一部分会描述怎样产生真实的轴测视角。稍后的博文将会告诉你添加颜色和材质的方法。
1)首先,画一个正方形平面,通过挤压操作来创建一个长方体。然后选中长方体的全部平面,并将他们成组,这样它可以作为一个整体,方便旋转。
I have been experimenting with some old-school plan oblique illustrations. This was one of the first 3-dimensional views I learned to draft by hand in school. What is great about these types of illustrations is that they can be used as scaled measured drawings in 3 axes. This is possible because the plan (x and y axis) is not distorted but is parallel to the viewing plane. The z axis is also drawn to true length meaning this can be measured as well. Sketchup cannot generate this view directly within the program. However, with a few tricks, a little geometry know-how, and Photoshop, it is possible to recreate the drawing. Overlaying textures and colors on top of this view can produce some really unique imagery that can set your stuff apart.
This first part will describe how to generate a true plan oblique view. Later posts will describe the methods I used to add color and texture.
1) First, create a square surface and then extrude it a little to create a cube. Then select all of the cube surfaces and create a group so that everything can be rotated easily.
2)接下来,把长方体沿着 Z 轴旋转 45 度。长方体的平面将会用作设置视图角度。实际上,这个长方体和模型要成45度,这一步操作将在后面有重要的意义。
2) Next, rotate the cubes 45 degrees around the z axis. The surface of the cube will be used to set the view. Essentially, you want the cube at this step to be at a 45 degree angle to your model. This will make more sense later on.
3)把长方体只沿着X轴旋转,这样正面就面对45 度角。
3) Rotate the cube up along the x axis so that the front face is slanted at a 45 degree angle as shown below.
4)我需要把透视图改为平行投影。为了完成这一操作,到“相机>平行投影”里进行设置。
4) I need to switch from perspective to parallel projection. To do this, go to “Camera>Parallel Projection”.
5)相机改为平行投影之后,现在我要把视线与长方体的平面对齐,非常简单,双击已经成组的长方体,选择正面,然后右键选择“对齐视线”。
5) With the camera set to parallel projection, I now want to align the view to the surface of the cube created earlier. Simply double click to enter the cube group, select the front surface, right-click and choose “align view”.
6)进入“视图-动画-添加场景”,来保存图。
6) Go to “View>Animation>Add Scene” to save this view.
7)现在我需要导出模型为2D图片,然后在Photoshop中进行操作。选择“文件>导出>2D 图形”。我一般保存的图片格式为JPEG 格式, 4500像素。
7) I now need to export the model as a 2D image to continue the process in Photoshop. Choose “File>Export>2D Graphic”. I typically save the image as a JPEG at a width of 4500 pixels.
8)在 Photoshop 中打开刚才保存的 JPEG 格式的图片。右键背景图层,然后选择“复制”这个图层。
8) Open the exported JPEG in Photoshop. Right-click on the background layer and “Duplicate” the layer.
9)我将要拉伸这张图片,所以我需要增加画布的尺寸,可以允许更大的图片,并且避免内容超出页面。进入“图像>画布大小”。在出现的对话框中,增加高度为原来的一倍。我把 25 变为 50,然而,你的图片可能会不一样。而且没有必要增加宽度。
9) I will be stretching this image, so I need to increase the canvas size to make room for the larger image and avoid having the line work go off of the page. Go to “Image>Canvas Size”. In the dialogue box, increase the height to about double of what was originally there. I went from 25 to 50, however, your image may be different. It is not necessary to increase the width.
10) 在图层面板中,选择复制图层,进入顶部的“编辑>转换>尺寸”。
10) In the layer palette, select the duplicated layer. Then go to “Edit>Transform>Scale” at the top.
11)在顶部“H”的旁边,把数字100%,改为141.42135%。现在图片应该几乎是完美的平面轴测图,你要是问为什么是141.42135这个数字呢?如果你观察一个等腰直角三角形,边的比例为 1:1:√2 ,2 的平方根等于1.41421356。把它变为百分比,你会得到 141.42135%。
11) At the top next to the “H”, change the number from 100% to 141.42135%. The image should now be an almost perfect plan oblique drawing. Why 141.42135 you ask? If you look at an isosceles right triange, the ratio of the sides are 1 : 1 : √2. The square root of 2 equals 1.41421356. Turn that into a percentage, you get 141.42135%.
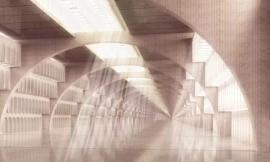
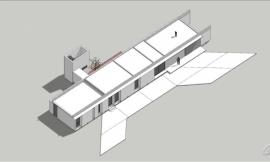
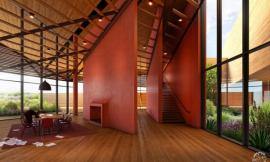
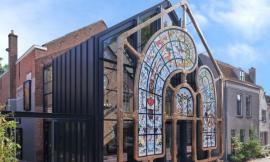
下图是最终的平面轴测图
Below, the final plan oblique image.
需要注意的一件事是,上图仍然没有任何特殊尺寸。但是通过引进一个AutoCAD 或Revit程序中平面图的尺寸视图,然后将平面视图调整为PS中引进的平面大小。图片的后处理部分,包括添加颜色和纹理,稍后会与大家一起分享。
One thing to note is that the above image is still not to any particular scale. However, this can be achieved by exporting a scaled image of the floor plan from a program such as AutoCAD or Revit, then scaling the plan oblique image to match the exported plan in Photoshop. Check back later for the final post processing of this image involving adding color and texture.
出处:本文译自visualizingarchitecture.com/,转载请注明出处。
|
|
专于设计,筑就未来
无论您身在何方;无论您作品规模大小;无论您是否已在设计等相关领域小有名气;无论您是否已成功求学、步入职业设计师队伍;只要你有想法、有创意、有能力,专筑网都愿为您提供一个展示自己的舞台
投稿邮箱:submit@iarch.cn 如何向专筑投稿?