Making of Los Faiques Dwelling
由专筑网刘庆新,杨帆编译
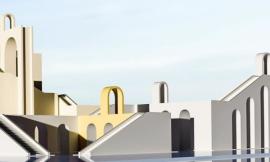
Pixelpark的“Los Faiques住宅”渲染图是受DURAN & HERMISA arquitectos asociados事务所设计建造的真实的Los Faiques住宅启发而制作的,并获得了“2014年第四周最佳效果图”称号。在制作过程中,我们用到了CG模型网和细节的刻画。我们花了大量的时间和精力渲染结构周边的植物模型,在材料的渲染上也是如此,特别是,你发现的那些不完美也耗费了很多心血。这篇文章描述了他们的创作过程,用3dsmax、GrowFX、 V-Ray和一点后期制作创造出了高质量的、逼真的视觉效果图。
Pixelpark‘s ‘Los Faiques Dwelling’ visuals, inspired by the real ‘Los Faiques Dwelling’ designed by DURAN & HERMISA arquitectos asociados, awarded them Best Visualization of the Week NO. 04/2014 for a remarkable CG remake and level of details they went into during the process. Great care and time was taken in the modeling of the foliage that surrounds the structures as well as the materials… specifically, the imperfections you find over time. Follow this article as they describe the process of creating these highly photorealistic visuals using 3dsmax, GrowFX, V-Ray and just a bit of postwork. Enjoy!
作者:Pixelpark
Pixelpark是意大利一个工作室里进行2D和3D的电脑制图者。能用真实元素在CG或部分综合体中创建效果图和电影。
Author: Pixelpark
Pixelpark is an Italian studio working within 2D and 3D computer graphic, realizing images and movies created entirely in CG or partially integrated with real elements.
简介/INTRODUCTION
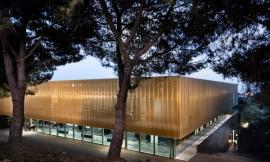
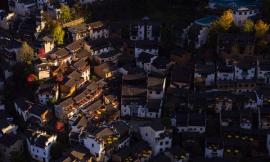
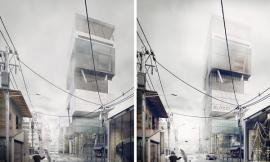
在开始这个制作项目之前,我们搜寻了很多建筑图,将它们复制到CG中。没过多久我们就在Archdaily上发现了DURAN&HERMISA arquitectos asociados设计的Los Faiques住宅。
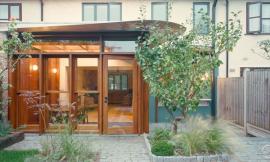
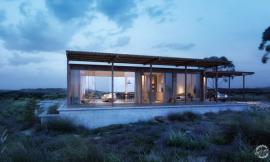
我们受简单的建筑理念和与自然环境(将其作为前景的一部分)的融合启发,也受调色板和摄影师Sebastián Crespo拍摄的照片的整体色调影响。我们非常喜欢深蓝色的天空与从建筑中透出来的明亮的橘黄色的灯光形成的对比。
Before we started to execute this project, we went about searching a great architectural reference to replicate in CG. It did not take long before we stumbled upon the Los Faiques Dwellings by DURAN&HERMISA arquitectos asociados Archdaily.
We were impressed by the simple architectural concept of the house and its integration with the natural environment (as part of the foreground), as well as by the color palette and the general mood of the photos taken by Photographer – Sebastián Crespo. We absolutely loved the contrast between the dark blur skies and the bright orange artificial lights showcased in them.
建模/MODELING
首先,在创建一个逼真的渲染的每一步(建模、纹理、灯光和后期制作),我们始终谨记一件事——生活中,“完美”不存在!所以当试图获得高品质的渲染图的同时,我们常常逼迫自己添加一些细节,添加一些不完美和瑕疵——生活的痕迹。
可能这些元素的存在不会马上显现出来,但是缺少了任何一种都会让我们觉得呈现在面前的渲染图不真实。
First of all, and in every step of the creation of a photorealistic render (modeling, texturing, lighting and post-production), we keep clear in our mind one thing – in life, “perfection” doesn’t exist! So when trying to achieve the highest photorealism possible, we always force ourselves to add details, imperfections and mess – The Dirt and Chaos of life.
Maybe the presence of these elements is not immediately revealed, but surely their absence is something that make our brain immediately think of the image in front of us as FAKE.
建筑/BUILDING
我们使用AutoCAD来完成建模过程,参照Archdaily上的相关制图来创建一个简单的平面图和立面图。
We started the modeling process using AutoCAD (Yes… AutoCAD), creating a simple plan and an elevation based on the references drawings we found on Archdaily.
这一步非常重要,要建立正确的建筑尺寸。然后我们将其引进3ds Max中,只是作为一个参考指导。我们用简单的多边形模式来建立整个模型。我们设置了相机,提炼了基础模型,直到我们最后满意为止。
在每一个物体的细节上面我们也花费了好多时间,试图不进行置换贴图操作来建模。一旦我们完成建筑模型,所有其他物体都被添加进来,我们无需使用饰片类或完美的几何排列图形,从而呈现一种很自然的不完美,也添加了小的运动和循环来达到同样的效果。
Neil Blevins的Soulburn草图非常有用。
This step is very important to establish the correct dimensions of the building. Then we imported it inside 3ds Max, just as a reference guide, and we built the whole model using simple polygonal modeling. We worked on the setup of cameras and we refined the basic model until we were satisfied with the final result.
We did take the time to work the small details of all objects, trying to model everything we could without having to use displacement via the materials. Once we finished the building, all the other objects were added without using snaps or perfectly geometrical arrays, to achieve some natural imperfections. Little movements and/or rotations were also added to reach the same goal.
The Soulburn scripts by Neil Blevins were very useful for this purpose.
树木/TREES
我们想创建非常真实的树木,因为其中许多树木是位于前景中,它们的制作中需要许多细节,比如在树皮上刻画一些粗糙感、制作折断的枝干和没有树叶的细树枝等。
我们使用GrowFX插件生成树。进行多次尝试后,我们发现在GrowFX中的一棵基础的树上面仅仅做一点简单的改变并不能达到预期效果。要想达到满意的效果,一些细节刻画和耗时的操作还是有必要的。
We wanted to create very realistic trees, because many of them were in the foreground of the views we intended to make and they needed lots of details such as convincing roughness on the bark, cut trunks, thin branches without leaves, etc…
We used the GrowFX plugins to generate trees. We did lots of tests, and we soon discovered that simply changing some seed values inside GrowFX on a base tree was not enough to get something believable. A detailed and time-consuming activity has been necessary to reach a satisfying result.
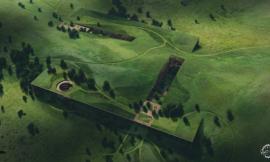
最后我们创建了24种不同树的模型(被放置在近景和房子周围),试图模仿参考图片中自然状态的杂乱,比如树干的数量、树枝的大概形状等。然后我们很自然地将这些主要树木放置在房子周围,而背景中散落的远处的树木则使用MultiScatter插件生成。我们需要大量散落的树木来扩展地形,以具有说服力的方式将背景树填充到贴图中。
In the end we modeled 24 different trees (to be placed in the foreground, around the house) trying to mimic the natural chaos we found in the reference images, such as number of trunks, global shape of branches, etc. We then manually placed these “main” trees around the house, while the faraway ones were scattered in the background using MultiScatter. We needed to extend the terrain mesh with lots of scattered trees to fill the pics with background trees in a convincing way.
因为我们用到了树木的数量,我们必须将它们放到V-Ray中进行分散放置。但是用这种方式我们不能在上面使用置换修正。所以,为了获得树皮的高质量的崎岖不平的效果,我们直接在GrowFX里创建,树干、树枝和树皮纹理都使用高细分网格分布样式。
Because of the number of trees we used, we have been obliged to convert them into V-Ray proxies to be scattered around, but in this way we were not able to use displacement modifier on them. So… to achieve good bark’s bumpiness we created it directly inside GrowFX, using high-tessellation meshes for trunks and branches and a bark texture to displace them.
草/GRASS
看了参考图后,我们意识到需要生成两种不同类型的草。一种很常见,另一种在大自然中很稀少,且草丛中留有缝隙。
对于常见的草,我们建立了标准草叶的两种不同模型,然后用MultiScatter将它们分散开。对于稀缺的草,我们用几种不同的草丛建模,赋予了许多变化和噪度。之后将它们按照单束的整体大小分类,通过三种不同的MultisSatters将它们分散开,用噪音贴图控制分布。
最后,我们决定也创建一些更高的草,并使其自然地分布在树的周围和其他具体地点(比如地板的边缘),给人的感觉就像是一些没有锄净的野草,如参照图中所示。
Looking at the reference images we realized we had to generate two different type of grass. One that is pretty regular and another one more patchy in nature, with gaps and holes among grass wisps.
For the regular grass, we modeled two different meshes of standard grass blades, and then we scattered them around using MultiScatter. For the patchy grass, we modeled several different grass wisps, with lots of variations and noisiness. We then grouped them based on the overall dimension of single wisps, and we scattered them using 3 different MultisSatters with a noise map controlling the distribution.
In the end, we decide to create also some rather tall grass wisps to be manually distributed around some trees trunks and other specific points (such as floor edges), to give the feeling of uncut savage grass, as we saw in some of the reference pictures.
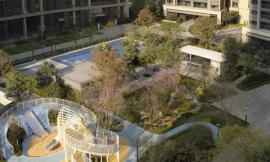
地面/GROUND
为了给地面模型设置合适的高度,我们使用从参考图提取的等位曲线。将它们复制到AutoCAD中,然后将曲线输入到3ds Max中,将它们放置在相匹配的高度。
To model the ground with the correct heights we used the level curves drawn in the reference drawing. We replicated them inside AutoCAD, then we imported the splines inside 3ds Max and we placed them at the correct elevation.
这时我们使用地形合成物体创建一个基础网孔结构。为了使最后网孔呈现出更好的地形特征,我们创建了一个高度棋盘格式的平面图,使用scriptspot找到的Geometry Projection Script将其投射到基础地形上。
At this point we used the terrain compound object to create a base mesh. In order to have a better topology of the final mesh we created a high-tessellated plane and we projected it onto the base terrain using the Geometry Projection Script found on scriptspot.
最后,我们增加了更多的棋盘形格式(只是在房子周围地面),还用绘制变形工具做了一些改进。为了产生更真实的效果,我们也创建了一系列其他物体,如小石子、树叶、枯树枝、枯草,将它们也散落在地面,填补没有草的区域。
Finally, we added some more tessellation (only for the ground around the house) and we did some refinements using the paint deformation tool. To have a more realistic effect, we also created a bunch of other objects, such as little stones, leaves, dry branches, roots, and we scattered them as well on the ground, to enrich parts without grass.
纹理/材质/TEXTURE / MATERIALS
所有材质都是在相同的基本材质合成的基础上创建的,包括散射、反射、折射和凹凸贴图。几种单材质用各种方式混合在一起,基本过程是相同的,没有特别的技巧和秘密。这个过程非常耗费时间,我们需要保持耐心,并且小心地处理细节部分。
特别需要指出的是,我们要注意反射参数,比如IOR。否则就不可能得到想要的真实感。可悲的是,早期阶段我们就必须要用高参数的材质,用高细节化的HDR进行渲染,从表面反射获得合适的图象,当然也包括一个微调的过程。这就意味着每一次单独的测试都需要很长的渲染时间,但是这是避免最后效果图出错的唯一方式。
切记“细节和瑕疵”。几乎90%我们的材质看上去比较脏。为了获得这个效果我们使用两种方法。第一种方法是使用大家都熟知的V-Ray Dirt Map,创建合适半径参数的材质。第二种方法是使用V-Ray Distance Map,以未渲染的物体为基础,我们可以更多得来掌控在哪里和怎样创建这些看得见的污点效果。
我们用这种方法在木棍和金属圆柱底部的密封处创建污迹。
All materials are based on the same combination of base textures that includes diffuse, reflection, refraction and bump (normal bump or displace if necessary). Than the single materials are combined and mixed in various ways, but the base of the process is always the same and there aren’t particular tricks or secrets. It is a time consuming part of the process, and we try to be patient and to take care of the details.
In particular, we pay attention to reflection parameters, such as IOR, otherwise it would be impossible to achieve the desired photorealism. Sadly, we have to work since the early stage with high parameters for materials (subdivisions) and render with a high detailed HDR to be reflected by surfaces to get proper images as part of the fine tuning process. This implies very long render times for each single test, but this is the only way to avoid bad surprises in the final images.
Bearing in mind “details and imperfections”, nearly 90% of our materials have a dirty look. To achieve this result we use two methods. The first one is using the well known V-Ray Dirt Map with suitable texture for the radius parameters. The second is using the V-Ray Distance Map. With the latter, based on non renderable objects, we have more control on where and how the dirt effect will be visible.
We used this method for the dirt between the wooden staves or for the sealant at the base of the metallic columns.
草/植物/GRASS / FOLIAGE
关于此对象,重要的是用带有合适贴图的双面材质。网上有许多这方面的参考图,特别是Peter Guthrie的Leaf Material教程上。另一件需要谨记的事情就是,自然是千变万化的,从来不会重复,所以我们经常需要创建许多变化的相同材质,来应用到相似的物体上,以此来消除CG一致性。
在这个案例中,我们创建了一个多分枝材质的树,有七种树枝和2种树叶。树模型通过不同的ID材质随意生成。我们把这种方法用到了所有树的相同材质上,用自动生成的方式创造了这种变化。
For this kind of objects it’s very important to use 2 sided materials with the proper maps. There’s a lot of reference around the web concerning this aspect, especially the brilliant tutorial by Peter Guthrie – Leaf Material. Another thing to keep in mind is that nature is extremely varied and it never repeats itself, so we always try to create lots of variations of the same material, to apply to similar objects in order to eliminate the CG uniformity.
In this case we created a single multi-sub material for the trees, with 7 types of bark and 2 types of leaves. Trees models have been created with different ID material, randomly generated; in this way we applied the same material to all the trees, creating variations among them in a pretty automated way.
照明/LIGHTING
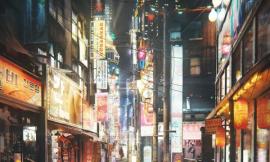
参考图的一个主要可借鉴方面就是准确的色调和照明,人工照明和自然照明之间有着强烈的对比。所以我们做了很大努力来试图获得这个场景中相似的参照图效果。
One of the main driving aspects of the reference images was precisely the general mood and illumination, with strong tone contrast between artificial and natural lights. So we worked a lot trying to obtain images as similar as possible to the references focusing on this point of view.
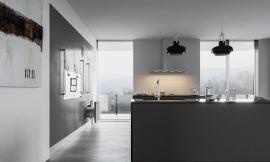
人工照明/ARTIFICIAL LIGHTS
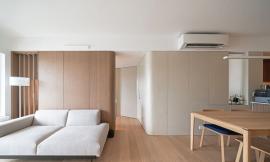
所有的人工照明都通过球面或区域V-Ray Lights来制作完成的。我们将所有的天花板区域分成组(客厅、餐桌、室外走廊),在接下来的后期制作阶段控制各自的功能。处理人工照明源时,我们发现很重要的一点是将颜色设置为真实的色光尺度。这看上去很普通,但是白平衡是一个很重要的方面,人脑会连续地完成这一步。然而,在人工照明下看一幅图时,经常会惊讶地发现呈现出橘黄色,而不是白色。所以依据客观数据很重要。
All the artificial lights are sphere or area V-Ray Lights. We subdivided all the ceiling spots in groups (living room, kitchen table, outdoor porch) to manage the separate contributions during the following post production phase. Dealing with artificial light sources we found very important to set the color referring to a realistic temperature/color light scale (also when it looks very “far” from white). It could seem very ordinary, but white balance is a very important aspect, and human brain does it continuously. Nevertheless, looking at a pictures taken under artificial lights, it’s always surprising how much yellow-orange are objects that we have in mind as being white! So it is important to rely on objective data.
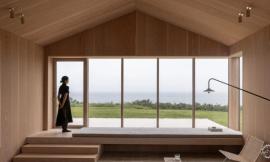
自然照明/NATURAL LIGHT
关于自然照明,开始我们使用HDR,这是为获得逼真效果采取的最简单和最有效的方式。但是进行一次尝试后我们不得不改变想法,因为数不清的叶子要全部使用双面材质,渲染太费时间了,简直不能接受。所以我们不得不回到V-Ray Sun + Sky combination,这个虽然要考虑很多方面,但是渲染起来简单一些。
例如,每一个镜头我们必须设置正确的天空和太阳参数,我们必须选择一个正确的天空图用于每一个镜头,并将其放置在一个或更多的平面中,在近景和每一个可能的反射中能直接看到。在后期制作中我们不能达到这一点,因为在背景树的树叶上阿尔法通道会出现很多问题。
For natural light, we started with a HDR, the simplest and most effective way to get a photorealistic result. After the first tests however we had to change our minds, because of the unacceptable render times due to the billions of leaves with 2 sided materials applied. So we had to go back to V-Ray Sun + Sky combination, which is also simpler to render even though there are more aspects to take into account.
For example, we had to set the correct parameters of the sky and the sun (when needed) for every different shot, we had to choose a right picture of the sky for every shot and place that on one or more planes, directly visible in the foreground but also in every possible reflection. We couldn’t manage this aspect during post production, because there would have been lot of problems with alpha channel on the leaves of the background trees.
渲染/RENDERING
完整的场景总计约800万多边形。我们用来渲染的电脑像素为1980×1280,CPU为Intel i7-3770K 3.50GHz,显卡为NVidia GeForce GTX 570,RAM为16GB。我们用到了V-Ray 2.40.3插件。最后的渲染用了8到19个小时完成了,当然具体时间由每一个场景的复杂性决定。
我们发现的一件有用且省时的事情就是在后期制作中微调所有的图像。因为这个我们节省了很多渲染元素通道。我们将最后的渲染图以OpenEXR文件输出。这样在单个文件中就节省了很多通道,这在后期制作阶段非常有用。
The complete scene counted about 8,000,000 polygons. We rendered the images in at 1980×1280 pixels on a workstation with an Intel i7-3770K 3.50GHz CPU, NVidia GeForce GTX 570 graphic card and 16GB RAM. V-Ray 2.40.3 was used, and final renderings took from 8 to 19 hours to complete, depending on the complexity of each view.
One thing we found very useful and time-saving is to do all the fine tuning of the image in post production. For this reason we saved a lot of channels by the render elements. We chose to output the final renderings as OpenEXR files. This allowed us to save as many channels as we wanted in a single file, and this was pretty useful in the post production stage.
后期处理/POST PRODUCTION
所有的后期处理都是在Adobe After Effects进行的。我们基本上使用了我们输出的所有元素来微调图像的不同部分。
其中一个最有用的通道是V-Ray 灯光选择元素。它们给每束光创建了一个黑白遮罩,可以允许我们增加或减少亮度,并给每束光源单独纠正颜色。这对于我们来说相当重要,对每一个最终图像可以再次创建我们想要的基调。
我们也使用ID材质通道很快地隔离了一些分组对象,比如草、地面、树干和树叶,在我们需要的地方很准确地做一些色彩校正。
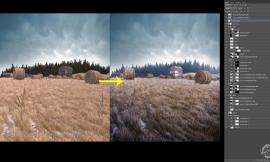
我们用Z-Depth路径增加了一些雾景,这确实增加了图像中场景的深度,将背景树木从近景中分离了出来。
我们使用的另一个小技巧就是使图看起来更真实,这是通过扭曲一些边缘线(比如墙或天花板边缘)来实现的。我们并没有直接在网格中进行扭曲操作。为了做到这一步,我们简单使用了带有“剧烈置换”过滤器的修正层,只将我们需要的部分进行遮罩处理。
在最后的处理上,去除了一些“虚假的CG外表”,我们给所有图像增加了一些轻微的色差,只是给光源稍微增加一点图案、发光和一些光斑效果。
All the post production was made in Adobe After Effects. We basically used all the elements we exported to fine tune all the different parts of the image.
One of the most useful channels turned out to be the V-Ray Light Select elements. They create a black and white mask of the contribution of each single light, allowing us to boost or decrease the intensity and color correct separately every single light source. This was absolutely fundamental for us to recreate the exact mood we wanted to give to each of the final images.
We also used the ID material channel to quickly isolate some groups of objects like grass, ground, trunks and leaves in order to do some color correction adjustments focused exactly where we needed them.
A Z-Depth pass was used to add some fog which really boosted the sense of depth in the images, separating the trees in the background from the foreground objects.
Another little trick we used to make the images more realistic was to distort some linear edges (such as walls or ceiling edges) that we didn’t distort directly in the meshes. To do this we simply used an adjustment layer with a “turbulent displace” filter applied, masked only where we needed.
As final touches, aimed to eliminate some “fake CG looks”, we added to all the images some slight chromatic aberration, a very subtle vignette, a few glow and some flare effects on light source.
结语/CONCLUSION
以上就是全部内容。
感谢大家花时间读这篇文章,我们希望大家能喜欢并发现其中一些感兴趣的地方。
再见!
Pixelpark
That’s all!
Thank you for your time spent reading this article, we hope you liked it and if you have found something interesting we’ll be happy to know.
See you soon!
Pixelpark
出处:本文译自ronenbekerman.com/,转载请注明出处。
|
|