查看相册 View Gallery
Making of “The White”
由专筑网韩平,刘庆新编译
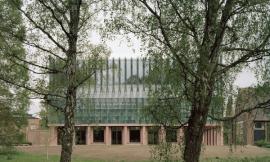
上个月A1 Plannning的Maarten Demey上传了一些“The White”的图片,这是历史名城奥斯坦德比利时海岸附近的一座造型奇特的居住建筑。这个建筑吸引了我,其渲染图看起来也很舒服。我对这个项目非常感兴趣,希望更深入了解并学习如何协调纯粹的3d渲染图与后期制作间的平衡。Maarten在该文章中与大家分享了后期制作各阶段的一些信息。一起看吧!
Maarten Demey from A1 Planning posted last month some still images of “The White”, an interesting looking residential project located at the Belgian coast near the historical center of Ostend. The architecture captured my attention and the visuals had a nice feel to them, it was interesting for me to learn more about this project and the balance between pure 3d and postwork that was done on the visuals. Maarten is kindly sharing this information with us all in this article which includes several slides of the post-process stages. Enjoy!

作者:A1 Planning
A1 Planning是比利时奥斯坦德的一家建筑事务所。自2001年成立至今,事务所已经形成一个14人的创意团队。在做了13年的效果图之后,我们想成立一个叫做“White Box(白色盒子)”的创意工作室,专门为建筑师或者房地产公司制作3D效果图和动画。
Author : A1 Planning
A1 Planning is an architectural office in Ostend, Belgium. Founded in 2001, the office now has a team of fourteen creative minds. After thirteen years of making our own visuals we’ve come up with “WhiteBox”, a creative studio that creates 3D visualizations and animations for architecture and real estate.
项目论坛流程:The White// Group Sleuyter 房地产
Project Forum Thread : The White // Group Sleuyter Real Estate
简介/Introduction
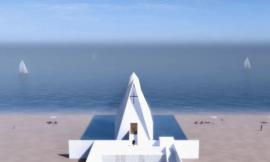
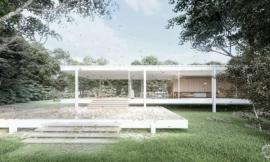
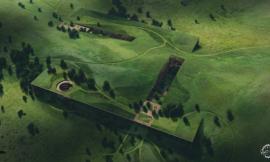
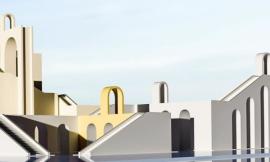
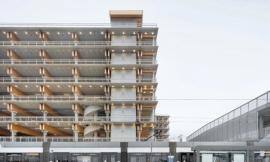
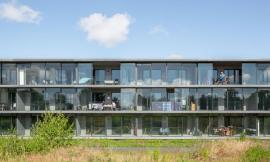
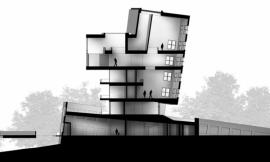
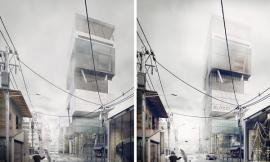
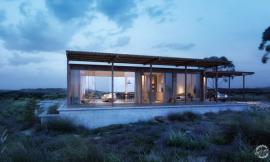
“The White”源自2009年的一个建筑竞赛。Robbrecht & Daem 建筑事务所及 A1Planning为Group Sleuyter赢得了这个比赛。建筑基地位于历史名城奥斯坦德附近的比利时海岸,共计30000平方米。A1Planning的三人小组完成了该项目的所有3D效果图的制作。
“The White” started as an architectural competition in 2009. Robbrecht & Daem Architects and A1Planning won the competition for Group Sleuyter. The plot, 30000 m2 big, is located at the Belgian coast near the historical center of Ostend. A team of three people at A1Planning made all 3D images.


灵感/Inspiration
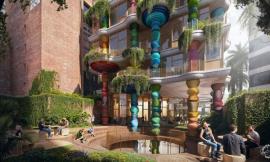
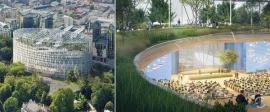
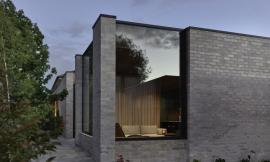
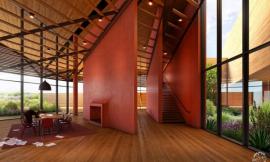
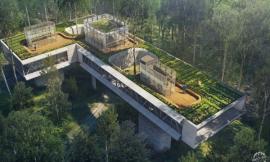
该设计的灵感来自自然。自然界中的冰山,悬崖和农田在该建筑的形状和形式上都有所体现。首先这是一个住宅项目,建筑师在户型的日照和景观朝向上进行了精心的设计。本项目中最重要的特征就是绿色元素的整合。建筑地面层为约5000平方米用作商业。建筑地下共有1250个公园空间。建筑上部塔楼为800户公寓住宅。
The design itself is inspired by nature. Icebergs, cliffs and rice fields from around the world and are reflected in the shapes and forms of the building. In the first place it’s a residential project. The architects had a lot of details for the sun and view orientation of the apartment units. One of the most important features in this project was the integration of the green element. Next to 800 apartments, the building has approximately 5000 m2 of commercial area at ground level and 1250 parking spaces below the ground.


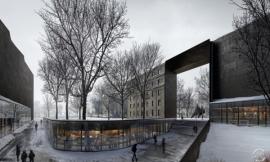
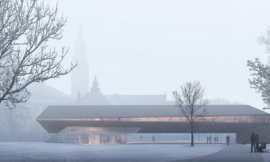
下面是我们为这次项目做的所有的渲染图。
Here are all the renders we did for this project.


方法/Approach
对于我们来说,本次设计最大的挑战就是如何在建筑图片与商业图片之间协调好平衡。基于任务的严峻性,我们决定采用有很多后期制作效果的工作流程,这样保证我们可以根据不同的场景改变图片色调和氛围。
The biggest challenge for us was to find the right balance between architectural and commercial images. Because of this difficult task, we decided to use a workflow with a lot of post-production so we were able to change the mood and atmosphere of the images accordingly.
建模/Modeling
我们利用CAD制作建筑模型。由于项目还在设计阶段,CAD可以方便地根据平面图调整组块。我们根据材质的不同,分别在不同的图层建模。利用该工作流程可以方便地在3dMax中选取建筑的不同部分。
我们还制作了一个很大的场地模型,这让人们更容易的感受建筑的尺度,也能协调建筑与环境的关系。在我们将模型导入3ds Max后,又建了许多可编辑的模型,这使整个模型清晰且运行起来更顺畅。我们在建模的时候不喜欢考虑相机视图和透视效果。最后阶段是在3ds Max中将模型分解以创建我们想要的场景。
We used AutoCad to make the architectural model. Because the project was still in a designing stage, AutoCad made it easy to adjust the different blocks and adapt the floor plans. We made our models in different layers, depending on the material. This workflow made it easier in 3ds Max to select the different parts of the building.
We also modeled a big part of the environment which made it easier to understand the scale of the project and to later integrate the building in the environment. After we imported the model into 3ds Max, we did some simple editable poly modeling to have a nice and clean model to start from.
We like to build the entire model without thinking about camera views or perspectives. In a later stage we cut up the model to make our scene workable in 3ds Max.


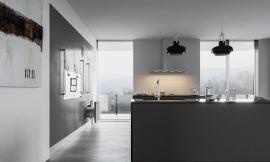
对于室内的景观和一些室外的特写镜头,我们利用地板生成脚本创建阳台铺砖和木地板。利用iToo软件的专业树木包创建特写镜头里的植物。
For the interior views, and some of the close up exterior shots, we’ve used the Floor Generator script to model the terrace tiles and parquet floors. iToo Software‘s Forest Pack Pro was used for the close-up vegetation.
植物/The Vegetation
植物是该项目中重要的特征之一,也是效果图的点睛之笔。建筑师对项目中树木的类型,灌木的形式及颜色都有清晰的设计。
首先我们得建一个包含不同种类的植物及参考对象的材料库。我们在gobotree.com和 Google 网站收集树木图片,并将它们利用了RPC渲染器和3D树木的结合软件进行分解。
Vegetation was one of the most important features of the project and key in these visuals. The architects had a clear idea of what they expected like the types of trees, bushes and colors.
The first thing we had to do was to make a library with all the different types of vegetation and references. We used a combination of rendering RPC (archivision.com) and 3D trees on a green screen, cutout trees from gobotree.com and Google images.


在近景图片中,我们利用iToo软件的专业树木打包软件中可以看到树木的整体外观,比如在植物库中的不同长度的小草和花朵。后期,我们增加了许多颜色和花朵草地照片的图层,这样看起来更生动精致。
For the close views we used iToo Software‘s Forest Pack Pro to give the general look of the vegetation, like the different lengths of grass and some flowers found in the library of Forest Pack. In post-production we added some extra layers with colors and photos of flowers and grass. This gave the vegetation more variation and detail.


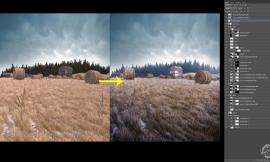
图片中休息处的植物就是经过后期处理的效果成图了。在咨询过建筑师后,我们这样处理,可以方便地调整绿色和色彩。我们首先利用图片库,增加了主要的草地、树木和灌木的图层;然后就像近景图中那样增加额外的色彩;最后,在PS用黑色的笔刷对不同的植物图层增加景深滤镜的方法,给植物增加一些阴影。
点击可以看一些列动图...
The vegetation on the rest of the images is completely done is postwork. We did this to be able to adapt the green and the colors more easily in consultation with the architects. Using the image library we first added the general layers of grass, trees and bushes. Then giving extra colors like we did in the close views and in the end we added some shadows just using a black brush in Photoshop to give some depth to the different layers of vegetation.
Click to see the GIF sequence…

灯光设置/Lighting
我们通过在HDRI贴图中设置V-Ray顶光源来增加灯光。为防止墙面和天花板上出现黑色区域,我们在窗户的前面设立了面光源。因为建筑师设计了一个大的悬挑阳台,所以这一步是非常必要的。
对于室外场景,我们在一些公寓内部增加V-Ray球光源使整体看起来更生动。我还在建筑四周分散放置了三个建筑实例,这样就会在光的色彩上产生一些变化。
For the lighting we always use a V-Ray dome lights with HDRI texture applied to them. In some of the interiors we added V-Ray plane lights in front of the windows to avoid dark areas on the walls and the ceiling. This was needed because of the big overhanging terraces.
For the exterior shots we put V-Ray sphere lights in some of the apartment units to create a lively atmosphere. We used three instances scattered around the building to have some differences in the color of the lights.
纹理/Texturing
场景中,我们将每个物体都覆上材质。经过调解位图的模糊值,纹理将变得更加精细。我们使用等比例的贴图以确保每个材质都有正确的尺寸(对于砖和地板纹理这一招很见效)。以下是我们创建的一些材质。
We assigned V-Ray materials to all of the objects in the scene. By playing with the blur value of our bitmaps the textures became more detailed. Real scale mapping was used to make sure that every material had the correct size (especially useful for brick and floor textures). Below you can see some of our created materials.


渲染设置/Render Setup
在GI面板中,我们一般使用发光贴图和灯光缓存。为了减小渲染时间,我们通常使用中等品质的设置。利用Backburner将图像在3D工作站中进行渲染,由于这些图片多用于广告牌和商业宣传册,所以将图像分辨率设为6000像素宽。每张图片的渲染时间约6到7小时。
Irradiance map and Light cache are the GI engines we always use. Medium quality settings were used to keep the render times relatively low. The images were rendered on three workstations using Backburner at a resolution of 6000 pixels wide, because they were intended to be used on billboards and in commercial brochures. The render times were around 6 to 7 hours per image.

后期制作/Post-Production
这是我们项目中最重要的部分。每个图片需利用PS处理8到10小时。我们非常注重细节,细微到增加蝴蝶这样的小细节。细节你也许不会发现,但没有的话就会感到缺些什么。这也给设计增加了亮点。
在后期制作中,我们总会利用渲染通道。以下是我们使用最多的一些:
V-Ray线框颜色——该通道使得选中渲染图一些特殊的条目简单又便捷。而且它与图层和CAD/3D studio MAX模型的色彩很匹配。
V-Ray附加纹理——我们利用地图贴图作为附加纹理使图片增加细微的景深效果。
V-Ray Raw反射——我们用该通道来保存和增强窗户及其它有光泽物体的反射效果。
下面是我们工作流程的一些动图(点击可以看到各个阶段的详情)。
This was the most important part of our process. Every image had around 8 to 10 hours of Photoshop. We put a lot of attention in details, small things like butterflies were added, because you don’t see it when they are there, but you see it when they’re not, it just gives that little extra.
We always use render passes in our postwork. These are the ones that we use most :
V-Ray WireColor – This pass makes it easy to select specific items in the render. It matches the layer and color structure of the AutoCad/ 3D studio MAX model.
V-Ray ExtraTex – We use a dirtmap as ExtraTex pass to give subtle depth to the image.
V-Ray Raw Reflection – We use this pass to preserve or strengthen the reflections in the windows and other glossy objects.
Below you can see several .gif’s of our workflow in Photoshop (click to see the stages).


这是该项目额外的录像,主要是我们的工作照片和动画。
该录像简单地展示了我们完成该项目的全过程。希望你们喜欢这篇文章,如果你有问题,尽可以在下面提出来。
通过该项目深度游的动画,大家可以亲临“The White”,感受其风采。
And here is the promotional video that was made for this project with our stills and some animations too.
This was quick summary of how we approached this project. Hope you liked reading this article and if you have questions, don’t hesitate to comment below.
For a more in-depth tour of the project with extra animations you can visit “The White”.
出处:本文译自www.ronenbekerman.com/,转载请注明出处。
|
|
【专筑网版权与免责声明】:本网站注明“来源:专筑网”的所有内容版权属专筑网所有,如需转载,请注明出处
专于设计,筑就未来
无论您身在何方;无论您作品规模大小;无论您是否已在设计等相关领域小有名气;无论您是否已成功求学、步入职业设计师队伍;只要你有想法、有创意、有能力,专筑网都愿为您提供一个展示自己的舞台
投稿邮箱:submit@iarch.cn 如何向专筑投稿?
扫描二维码即可订阅『专筑』
微信号:iarch-cn