由专筑网刘庆新,vigo编译
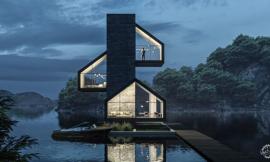
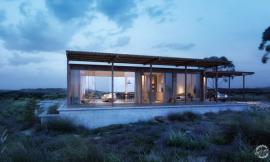
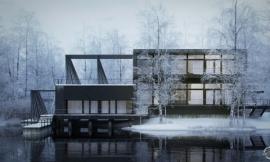
SérgioMerêces 以前发表过博文讲述他是如何创建被认可的渲染图。上次是关于Making of a Garden Office的渲染,今天他将他最近很棒的项目“禅境花园”进行了深入挖掘。下面就是从建模到后期制作的全过程。
SérgioMerêces wrote for the blog in the past, featuring how he creates his recognizable style of visuals. Last time it was a Making of a Garden Office, and today he dives into the creation of his latest magical “Zen Garden” project. From modeling to final post-production – Enjoy!
简介/Introduction
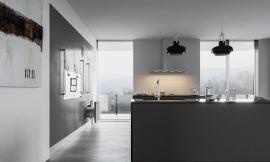
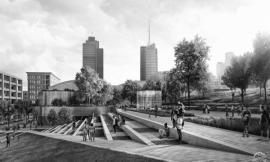
在这个教程中我将会向大家展示我是怎样由开始的抓狂状态到顺利创建完成禅境花园3D渲染,整个过程我使用了3D Studio Max工具和V-Ray渲染引擎。我还会讲到怎样在Photoshop进行后期制作来获得最好的效果。
In this tutorial I will show you how I’ve created the Zen Garden 3D image from scratch using 3D Studio Max tools and V-Rayrender engine as well as how-to do the post-production in Photoshop to achieve the best results.

在创建3D渲染中我将会用到所有重要的操作步骤。我将会以搜索最好的参考资料,并将其用到我的模型中最合适的场景作为开始。然后我会展示一些我对大致场景的建模过程。这个过程会包含我选择的纹理和材质,会包含用HDRI maps制作的灯光背景和怎样用V-Ray RT建立合适的灯光。接下来我会展示我是怎样使用3D植被场景渲染插件Forest Pack,以及iToo软件中的3D分散插件,来创建和平铺场景中的所有植被。最后,我还会使用Photoshop过滤器和一些插件展示所有的后期制作步骤,包括从未加工状态一直到渲染最后的效果图。
I will cover all the important steps in the creation of a 3d image. I will begin with searching for the best references and where I can use them as reference to model my scene assets. Then I will show you some of my modelling processes for the scene in general and assets. I’ll cover how I create my textures and materials. I’ll cover the light setup with HDRI maps and how to use V-Ray RT to setup my lighting properly. Then I will show you how I use Forest Pack, the 3d scattering plugin by iToo Software, to create and spread my vegetation all around the scene. Finally, I’ll show you all the post-production steps made starting at the raw render all the way to the final look for the image, using Photoshop filters and some plugins.
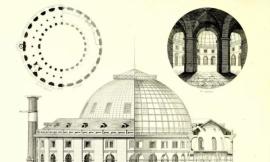
搜集相关参考资料作为开端/Starting with References for the Concept
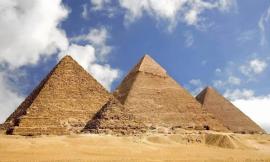
我开始所有的项目,都是先搜集我要用到的好的参考资料作为建模基础,再从中获得大概的灵感。我会在Google、flicker等网站上面找图。
I start all project by searching for good references that I use as base for modelling the assets or just to get generally inspired. For this I use Google images, flicker, etc.
3D建模
下面就是我怎样创建场景和图中主要元素的过程。
The 3D Modeling Stage
Let’s start covering how I created the scene and key elements in it…
Terrain Design and Modeling/地形设计和建模

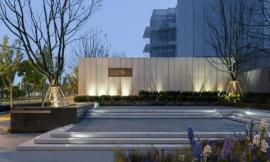
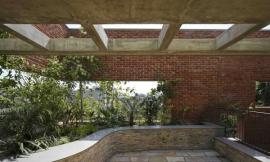
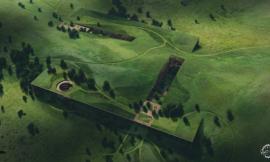
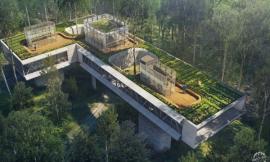
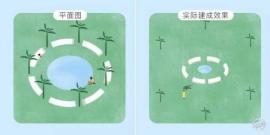
我决定创建一个秘密的禅境花园,这是一个美丽和宁静的地方。开始,我渲染了草来界定出花园的边界。我用编辑多边形组中的“线条”工具徒手画出想要的效果。然后,我选出正面,通过挤压得到标高,在边缘处应用一些斜边使其看起来很平滑。完成这一步后,我创建了地形部分并填充满沙砾。这样我就在草坪中间创建了一个标准的平面图,在编辑多边形中选择边缘,开始挤压并调整地形,使其和草坪部分保持一致。
I decided to create a secret zen garden, a beautiful and peaceful place to be in. So to begin, I created the grass parts that will delineate the perimeter of the garden. I used the “Strips” tool in the edit poly group to draw in freehand the desired look, after which I selected faces and used extrude to get the elevation and apply some bevel to the edges to give a smooth finish to it all. After this was done, I created the part of the terrain that will be filled with the gravel present in zen gardens. For that i created a normal plane in the middle of the grass part and in edit poly mode selecting the edges I began to extrude and adjust the terrain to fit with the grass parts.
The Bridge Modeling/桥梁建模


关于桥梁建模,我选择了曲线最快的方式画出整个桥梁图。当我得到了想要的设计,我单独选出了桥梁的每一部分进行挤压操作,在编辑多边形里面进行调整。完成桥梁所有部分的模型后,我开始将所有重复部分进行复制到恰当位置。最后,我复制桥梁一边的所有部分到另一边,就像是反射到另一边一样,因为它们看上去是一样的。
For the bridge modeling I opted for the fast way of using splines to draw the entire sketch of the bridge. When I get the desired design, I select each part of the bridge separated and I extrude them and convert them to edit poly. After I get all the bridge parts modeled I will copy and position all the repeated parts and set them in place. And finally, I copy all the side parts of the bridge to the other side, mirroring them as they are exactly the same.
Modeling the Stone Lamp/石灯建模


石灯建模前,要先在编辑多边形中挤压方形得到盒子模型。然后我没有运用车窗编辑器,而是通过画曲线得到想要的形状,从而完成灯中间部分的建模。接着在一个有编辑多边形的盒子图中完成下一步建模,并对一些细节进行挤压操作。灯罩的格子建模是在iToo软件中叫做克隆工具的帮助下手绘完成的,手绘的过程就像是在克隆物体一样,创建出非常好的样式。
The stone lamps started with modeling of the base with box modeling in edit poly extruding the faces. Than I model the middle part of the lamp drawing a spline to get the desired shape than I apply the lathe modifier. Next using a box with edit poly I model the next part and extrude some details. The light cover grid I modeled with the help of a great script from iToo Software called clone, this script is great to clone objects and creating this way cool patterns.
植被/Vegetation
3d Studio Max插件Grow/GrowFX Plugin for 3D Studio maxFX
我通常喜欢使用一个强大功能的插件叫做GrowFX for 3d Studio Max去创建渲染中的植被模型。这个插件的优点是能集成到3dsmax中,这样就更容易操作,也能很快对模型修改。
I usually like to use a great plugin called GrowFX for 3d Studio Max to create my vegetation models. This one have the advantage of being integrated into 3dsmax so it is much more easy to manage and do fast modification of models.

来自xoio事务所的Lasse用Exlevel’s GrowFX plugin for 3ds Max作为工具创建了3D树叶渲染图,并分享了她们的工作经验。这篇文章将会对GrowFX做一个介绍,你可以更好地了解使用这个工具的理念,帮你找到正确的方法创建你自己的3D模型。
Lasse, from studio xoio is sharing their experience working with Exlevel’s GrowFX plugin for 3ds Max as a tool for creating custom 3d Foliage models. This article will offer you an introduction of GrowFX so that you can better understand the concept of using it and set you on the right path for creating your own growth 3d models.
SpeedTreeCherry Tree/用维树木建模软件SpeedTree渲染樱桃树

有时候在我的项目中我需要建立具体一种树的模型,我经常使用SpeedTree软件,因为它提供了一系列工具,可以对植物快速、准确地建模。开始我创建一个树干作为基础,然后叠加了另一个主枝干图层,使树的主干发生一些变化。然后我将添加两个小树枝图层,来添加一些樱花。
为了得到几种不同的树,在SpeedTree软件上点任意键,在已设置的背景中会自动生成不同种类的树图。
In some cases I need to model a specific vegetation species to use in my projects and for that I usually use the SpeedTree Software that offers a great set of tools to model vegetation quickly and precisely. I Began to create a base trunk. Then I added another layer of main brunches to give some variations for the main spine of the tree. Then I will add 2 more layers for the small branches to fill them with the cherry tree flowers.
To get different variations of the tree, SpeedTree have a random button that will help to auto generate different results based on the settings we set.
Types of Vegetation/植被类型

关于场景中其他类型的树,我使用以前做好的模型比如VIZPARK植被模型、Forest Pack grass presets和Evermotion tree中的一种来完成。一些模型需要材质上做一些改进,获得最好的最终渲染图。
For other types of vegetation in the scene I used some packs of pre-made models such asVIZPARK vegetation models, Forest Pack grass presets and one type of Evermotion tree. Some models needed improvements on the materials to get the best results for the final render.
Scatter with Forest Pack/用Forest Pack进行散布操作

为了分散和创建所有的植被和岩石生态系统,我一直用Forest Pack插件中的3dsmax。这是一个很强大的工具,能获得大量的模型,让你的场景看起来很完美!
拥有很大控制力的Forest Pack插件给了我所有的力量在整个场景中分散我的模型。在这个项目中我使用它平铺草地、树木和岩石。插件使用起来很简单,做出来的效果非常好。例如,为了获得草坪上的草和禅意花园中的沙砾,我使用嵌入Forest Pack预置来操作,我会在图中展示这个背景。
To scatter and create all the vegetation and rocks ecosystems I always use the Forest Pack plngin for 3dsmax. This is a great tool to manage huge amount of models and keep your scene well behaved in terms of performance!
Forest Pack comes with great controls giving me all the power I need to scatter my models all over the scene. For this project I used it for spreading around the Grass, Trees and Rocks. The usage of the plugin is quite simple and you get great results. For example, for the lawn grass and the gravel of the zen garden I used the built-in Forest Pack presets that comes with it and I show the settings in the image.
Lighting/灯光

这个场景中我使用一个简单的带有HDRI map的 V-Ray半球灯。我选择的HDRI map是noemotion.net网站上提供的一个免费的。
For this scene I use a simple V-Ray dome light with an HDRI map applied into it. The HDRI map that I choose was one of the free ones kindly provided by noemotion.net.

我在场景中放置一个简单的V-Ray半球灯,并加入HDRI。然后,打开V-Ray RT渲染并及时调整了V-Ra y照相机和HDRI map的所有参数,得到整个场景灯光想要的效果。
I placed in the scene a simple V-Ray Dome Light object and added the HDRI into it. Then, I lunched the V-Ray RT rendering and in real time I adjusted all the parameters of the V-Ray camera and HDRI map to achieve the desired look of the entire scene light.
纹理–Unwrap UVW’s的应用和材质
对于物体的细节纹理创建,我喜欢制作一个全面的UVW Unwrap制图。这允许我在场景纹理中绘画所有需要的细节,甚至在一个独特的纹理图中进行烤光和其他操作。3D Studio max有一个强大的UVW Unwrap工具,允许我很快、很容易展开一个物体。毛皮拉伸器工具大多数情况下能很好地展开物体,你只需要稍微做一点改变得到最后的绘图结果。
Texturing –Unwrap UVW’s and Materials
For texturing the object details I like to do a complete UVW Unwrap mapping. This will allow me to paint all the desired details in the textures of the scene objects and even to bake light and other things in a unique texture map! 3D Studio max has a great UVW Unwrap tool that allow me to unwrap an object quickly and easy. Pelt tool in most of the cases work really well to unwrap your objects and you just need to tweak a bit to archive the final mapping result.

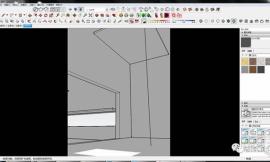
我在场景中进行UVW mapping操作,这一步我会展示给你们我是怎样使用UVW Unwrap在一个具体的物体上进行我的绘图操作。我把灯塔分成几部分,所以我选择灯的基座部分应用UVW Unwrap修正器,接着,我使用“点对点接缝”工具,选择边缘,将物体分成两部分。这种情况下,我用毛皮工具得到一个很快、很干净的展开图。其他部分我用同样的过程得到所有UVW的组织结构。
I do all UVW mapping in my scene and in this step I will show you how I use UVW Unwrap to do my mapping on a specific object. I separated the lantern object into parts, so I select the base of the lamp and I apply the UVW Unwrap modifier and next I choose the tool “point-to-point seam” and I select the edges that will separated the object in 2 parts and in this way I can apply the pelt tool and get a fast and clean unwrapped mapping. For the other parts I use the same process to get all the UVW’s setup.
Searching for Textures to be used in the Project/搜集项目所用的纹理

要制作正确的、好的纹理并不容易!我经常在cgtextures.com,extremetextures.com, texturelib.com, freestocktextures.com和openfootage.net几个网站上搜索。如果我找不到我就会去vizpark.com, cg-source.com 和arroway-textures.com网站上买材质。所有的材质要获得好的效果你需要高质量的并且合适的纹理作为基础。
Getting the right and great textures is not always easy! I usually searchat cgtextures.com,extremetextures.com, texturelib.com, freestocktextures.com and openfootage.net and if I fail to find what I need there I go to sites that sell textures like vizpark.com, cg-source.com andarroway-textures.com. Remember that to get great results you need high quality and fitting textures as a base for all your materials.
Texturing/纹理

带着独特的UVW maps的所有场景物体准备好后,我用展开工具在一个单一的纹理绘图中创建了所有细节的纹理。我喜欢用Maxon中的Bodypaint Software来创建。我可以直接在3D物体上绘制,其过程就像是用Photoshop一样。为了绘画和应用效果,我把我要渲染的物体从FBX文件中分离出来,放到Bodypaint中。
首先,我需要设置材质尺寸和需要的通道。我设置的小物体的尺寸是1024×1024,但是近景或较大的物体我设置的尺寸是4048×4048。这将会允许我在大尺寸的物体上突出细节部分。关于材质路径,我使用颜色、映像、碰撞和镜面反射。
接下来,我创建了一个新的图层,开始用两种材质渲染我的3D模型。一种用在石头基座上,另一种用在我在这片区域创建的苔藓面上。
Having all my scene objects with a unique UVW maps that I created with the unwrap tool allows me to texture all details in a single texture map. For that I love to use the Bodypaint Software from Maxon. With this application I can paint directly in on the 3d object with a Photoshop-like process. To paint and apply effects I export my objects into separated FBX file and import them into Bodypaint.
First I need to set my material texture size and the channels needed. For size I use 1024×1024 for small objects, but foreground or large objects I set to 4048×4048. This will allow me great details in large scale. For the material channels I use Color, Reflection, Bump and Specular.
Next, I create a new layer and I begin to paint over my 3d model using two textures… One for the stone base and another for the moss effect that I will paint in the areas that I want with a new layer.
Materials/材质

关于场景材质我使用的是基础的VRayMtl 材质。在这个例子中我将会向你们展示我是怎样创建岩石材质的。我在传播路径中设置一个构图着色器。这样我就可以混合多种材质种类,将它们用定制的alpha参数来实现。关于这个岩石材质我又选择了两种材质,一种作为岩石材质,另一种是苔藓材质。然后我建立一个alpha通道,用noise shader将两种材质混合。
这确实是一个快速的方法创建场景中程序上的材质。
For the scene materials I use the base VRayMtl material. In this example I will show you how I create the rocks material. I set a composition shader into the diffuse channel. With this composition shader I can mix multiple textures types and mix them with custom alpha maps. For this rock material I choose 2 textures again… one for the stone base and another for the moss. Then I setup an alpha channel to mix both using a noise shader.
This is a really fast way to create procedural textures to use in your scenes.
Render Settings/背景渲染

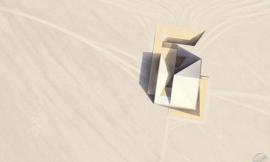
我们要在这里建立我们3D渲染的输出图的质量。在我所有的项目中,我喜欢将渲染图的最大尺寸设置为4000x像素。关于V-Ray设置,我创建了两个预置,一个是快速渲染,能得到好的效果。另一个就需要花时间进行渲染,当然这最终会得到更好的效果,但是有时因为项目要时间限制,我们就需要选择快速渲染。
这个项目中我使用的是最好的选择,因为我有时间进行渲染,你可以看一下图中的渲染背景。
This is where we will setup our output image quality for our 3d renders. In all my projects I like to render my images with an output size of 4000x pixels as a minimum. For the V-Ray settings I create 2 presets… One for quick renders, but where I can get good results and the other one for projects that I have the time to spend with render, of course this will let you much better results in the end but sometimes with extreme tiny deadlines for the projects we need to have a faster render option.
For this project I use the best option because I have the required time to spend with the Render, you can check the render settings in the image.
Render Passes/渲染路径

这便是你即将为后期制作做准备的渲染设置。对于所有的ps或者after effects后期处理来说,我一般有4个渲染层。VrayRenderID作为一个层,可以处理整个场景,并且可以轻松的选择后期需要在ps里处理的画面部分。VrayExtra Tex是用来设置场景的AO渲染层。而最后是VrayRawLight和VrayReflection。这是最重要的部分,但有时我们还需要VrayZDepth,VrayRefraction等工具。这决定于你后期处理的风格。有很多种方式可以达到效果。
Here is where you will setup all the output render passes needed later for the post-production process. There are 4 really important passes for me to manage all my post-production in Photoshop or After Effects. The VrayRenderID is a pass that masks the entire scene and where we can select quickly the parts in the image to mask in Photoshop. VrayExtraTex is where you setup your AO pass for the scene. And finally the VrayRawLight and VrayReflection. These are the most important ones but in some cases we need more such as the VrayZDepth, VrayRefraction, etc. This will depend on your own style of postwork I guess. There is more than one way to go about this.
后期处理工具和插件/Post-Production Tools and Plugins
我们可以使用Photoshop和After effects来完成后期处理。在我的流程里,我会使用Magic Bullet Photolooks,NikColletion和Red giant Knoll Light Factory。这些工具都可以依照Ps的图层进行调整,让你的后期处理达成预期。
We can find great plugins that will let us improve our images post-production in Photoshop or After Effects. In my pipeline I use a few like Magic Bullet Photolooks, Nik Collection and Red giant Knoll Light Factory. These tools with along with Photoshop adjustment layers give all the power to get the post-production you aim for.
Importing and setup of the Render Passes/渲染通道的输入和设置

在我处理后期之前,我需要向psd文件导入并且管理渲染层。Ps有文件夹和颜色来帮助我们管理,因此首先,我们从文件家里打开美丽的渲染层。在我处理的图层的同时都创建的文件夹,这样可以更好的去管理。
Before I begin to work on the post-production, it is important to import and organize all the render passes into a single PSD file. Photoshop has the folders and colors to help with this organization process of the project, so first I open the beauty pass image and than with the Place option located in the File menu I bring into the PSD all the other render passes. I create all the folders where I will put my layers while I’m working and this way all gets organized nicely.
Fix some minor Errors/修正一些小瑕疵

在渲染之后,我们能发现一些错误,因为这些问题只会在渲染后显示出来。最好的处理方式就是进行局部渲染,然后通过PS来覆盖掉之前错误的部分。记得更新所有的渲染层。
Sometimes after the render is done we find errors that we missed before because this is only visible in the final render resolution! The best way to go about fixing such things is to do a render region in the zone that contains the errors and after you get them rendered you bring them into Photoshop and compose them on-top of the raw render image before you begin all the post-production. Be sure you also get the relevant passes done as you will need these to updated.
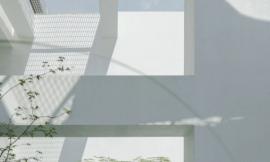
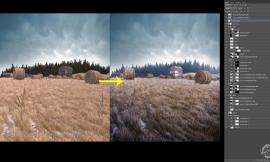
Applying the Initial Adjustments/应用原始调整

在这个阶段,我努力使我的渲染成为我需要的样子。我应用了些基本的色彩校正来使调整图层,曲线以及色阶之间达到平衡。之后我在Vray Z-Depth 的图层上制作了一些基本的特效蒙版,例如雾,光照。在这里我建立一个新的图层蒙版,采用透明度为50%的笔刷涂抹雾化效果。
At this stage I work aiming to achieve the desired look for the image. I begin to apply some basic color corrections to gain better balance in the image with the adjustment layers, curves and levels. Than I apply some basic effects such as the fog and sunlight with the help of the V-Ray Z-Depth Pass, where I use it as a selection mask based on the depth in the image. This way I create a new layer masked with it and paint the fog with a normal brush with opacity set to 50%.
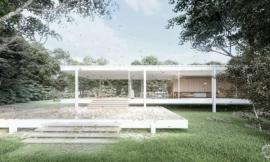
Final Color Grading/最后的色彩分级

这是教程中最重要的部分。这也是达到我们最终效果的重要步奏。
在完成所有这些基础设置之后,我最后调节了色彩分级。我先采用了图层调整(用曲线或者色彩调整,选择色彩),在此之后我们将图片合并,并导入Magic Bullet Photolooks然后进行最后的色彩分级。
This is the most important step in the tutorial. This is where we get the final look of the image!
Having all the initial steps done, I advance to work on the final color grading for the image. For This I will use first adjustment layers (Curves, Color Adjustment, Selective color), after these steps I will flatten the image to bring the image into Magic Bullet Photolooks and there I will apply the final adjustments.
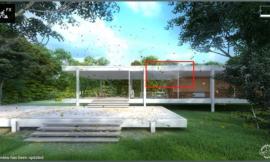
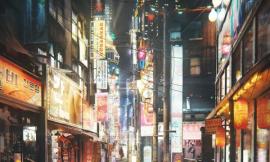
Apply 2D Elements/应用二维元素
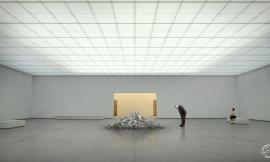
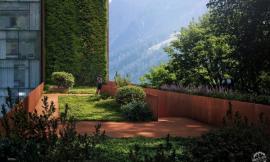
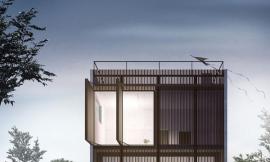
我通常应用二维元素来合成三维图片。这些二维元素通常是人、动物,在这个案例中,是女人和天空中飞翔的鸽子。
I usually apply a few 2d elements to get a better composition in the 3d image. The 2d elements that I use are people and animals, in this case of the Zen Garden image for the women and the 2 flying doves.
我希望这篇文章对你有用。
I hope you found this article useful.
出处:本文译自www.ronenbekerman.com/,转载请注明出处。
|
|