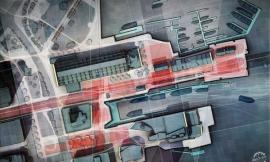
来自专筑编辑刘庆新的报道。这个邮件和其他许多邮件一样,都是让我解释在场地分析图中的对角线填充。在Photoshop 中我知道有两种方法可以创建如上图的对角线填充。两种方法的工作流程都相对快速,且易于实现。
This post is also a follow up from many emails asking me to explain the diagonal line hatching used the site analysis diagrams. There are two methods in Photoshop that I know of that can create the diagonal line hatch seen in the image above. Both options use a relatively fast workflow and are easy to execute.
方法A:叠加 Google 图像
A1. 这个方法需要从网上找到一个填充样式。在这种情况下,我在谷歌上搜“对角线”就会找到可以用的几种图。这些图没必要多大,因为我可以复制很多次其纹理,以此来创造我需要的更大的纹理。
如果你需要将一张小图复制很多次,按住“Alt”键,用“移动”工具将图象拖进来。这样就会很快复制图层了。一旦将所有层排列在一起就生成了一个大图,通过选择在调色板里的所有单独图层,在其中一个图层上右击,然后选择“合并图层”,就可以将他们合并成一个图层。
OPTION A: Google Image Overlay
A1. This option involves simply going online and finding a hatch pattern. In this case, I Google searched “diagonal lines” and found several images that would work. The images do not need to be large because I can copy the texture many times to create a much larger texture for what I need.
If you do need to copy a small image many times, hold down the “Alt” key (“Option” on Mac) and drag the image using the “Move” tool. This quickly duplicates the layer. Once you have all of the layers aligned forming a larger image, they can be merged into one layer by selecting all of the individual layers in the layers palette, right click on one of the layers, and choose “Merge Layers”.
A2. 接下来,需要移动白色背景框。这通过选择新的图层就很容易实现,然后将图层混合模式改为“正片叠加”。
A2. Next, the white background needs to be removed. This is easily done by selecting the new hatch layer, then choosing “Multiply” in the layer blend mode drop down in the layers palette.
方法B:创建一个自定义样式。
与上网查找相比,这种方法通常能产生更干净的图。需要注意的是,许多PS图案是可以在网上找到的,比如,我们就可以在网上找到Brusheezy被导入到Photoshop中。
B1. 我想要制作我的自定义图案。首先,我需要在Photoshop里通过“文件>新建”创建一个新文档。新文档要求是12×12像素,但是这个尺寸以你的需要而定。而且,我们需要再检查一遍,确保背景内容被设置成“透明”。
OPTION B: Create a Custom Pattern
A second option to create a hatch is to define a custom pattern which can offer much more flexibility. This method will often generate cleaner line work than what can be found on the web. One other thing to note is that many PS patterns can be found online through websites like Brusheezy which can be imported into Photoshop.
B1. I want to create my own custom pattern. To do this, I first need to create a new document in Photoshop by going to “File>New”. I set up the new document to be 12×12 pixels, however this size can change depending on your needs. Also, double check to make sure the background contents is set to “Transparent”.
B2. 接下来,选择“矩形选框工具”,选出一个选区横穿整个文档。我的选区有两像素宽。矩形选框工具需要精确到一像素,这样才能容易确定多少像素被选择了。选择左侧的“油漆桶工具”,然后选择黑色来填充选区。
B2. Next, select the “Rectangular Marquee Tool” and make a selection crossing the entire document. I made my selection 2 pixels high. The Rectangular Marquee Tool should snap to each pixel making it easy to determine how many pixels are being selected.
Choose the “Paint Bucket Tool” on the left and also select a black paint color. Then, fill the selection.
B3. 图案完成了,现在需要把图案存到Photoshop里。选择“编辑>定义图案”。在对话框里,给该图案命名,然后点击“OK”。
B3. The pattern is ready, so now it needs to be saved into Photoshop as a pattern. Choose “Edit>Define Pattern”. In the dialogue box, give the pattern a descriptive name and choose “OK”.
B4. 将图案运用到渲染图里,首先创建一个新的图层,将其移到涂层调色板的最上方。然后,选择“油漆桶工具”,在油漆桶工具的顶部,确保在下拉菜单里选择“图案”,将透明度设为100%。
在图案右侧的下拉菜单中,有另一个下拉菜单,在这里,所有储存的图案会以缩图形式呈现。选择上述步骤中创建的图案。这些选项设定好后,使用油漆桶工具填充页面,确保填充的是顶部的新建图层。
B4. To apply the pattern to the illustration, first create a new layer and move it to the top of the layers palette. Then, select the “Paint Bucket Tool”. In the paint bucket options at the top, be sure to select “Pattern” in the drop down and set the Opacity to 100%.
To the right of the pattern drop down, there is another drop down which will show a thumbnail of all of the saved patterns. Choose the pattern created in the steps above.
With these options set, use the paint bucket to fill the page making sure it is on the new layer.
B5. 因为这个图案是运用到它自己的图层上,可以将其旋转45度来创建对角线。选择“编辑>变换>旋转”,当旋转45度的时候要记得按住Shift键。
B5. Since this pattern was applied on its own layer, it can be rotated 45 degrees to create diagonal lines. Choose “Edit>Transform>Rotate” and hold down “Shift” when rotating to snap to 45 degrees.
用蒙版来填充具体元素
填充图案是在它们自己的图层上栅格化的,这就意味着用橡皮擦工具可以将填充抹去。但是,运用蒙版将会在下面的路径中编辑图层,如果需要改变的话,需要再次编辑图案。
填充图案是在它们自己的图层上栅格化的,这意味着是用橡皮工具就可以很容易的将填充图案擦除。但是使用蒙版的话,之后如果有了改动,图案可以再次编辑。
Use Masks to Hatch Specific Elements
The hatch patterns are rasterized on their own layer meaning the hatch can simply be erased using the eraser tool. However, applying a mask will allow for editing later on down the road if changes need to be made.
1. 运用蒙版
为了运用蒙版,选择填充图层,选择图层面板底部的“添加蒙版”图标。
1. Apply Mask
To apply a mask, select the hatch layer and choose the “Add a Mask” icon at the bottom of the layers palette.
2. 制作选区
接下来,用“多边形套索工具”来选择分析图中需要被填充图案填充的区域。
2. Make Selections
Next, use the “Polygonal Lasso Tool” to select the areas of the illustration that will be filled with the hatch pattern.
3. 反向选区
如果我想要的选区恰好是我要擦除的部分,那么我可以使用反向选区的方法。选择顶部的“选择>反向”。
3. Inverse the Selection
I want the selection to be what I want erased, therefore I am going to inverse the selection. Choose “Select>Inverse” at the top.
4. 填充蒙版
最后,选择“油漆桶工具”,检查一下,确定透明度是100%,下拉菜单中设置的是“前景色”。
蒙版通过灰度来确定图案哪部分需要出现或隐藏。黑色将图案擦除,白色将图案显现出来。我不想让选区中的图案显现,就选择了黑色。
再次确保图层面板中图案旁边的白色盒子的蒙版层被选中。使用油漆桶工具,将选区填充为黑色。这样可以让选区内的填充图案被“擦除”。如果需要改动的话,白色可以让填充图案重新出现。
4. Fill the Mask
Finally, choose the “Paint Bucket Tool”, check that the opacity is set to 100%, and also that the drop down is set to “Foreground”.
The mask works by using gray tones to determine what parts of the image will appear or not appear. Black paint erases the image. White paint will reveal the image. I don’t want the hatch to appear in the part of the image that is selected, therefore I want to choose black paint.
Double check that the layer mask is selected which is the white box next to the layer image in the layers palette. Using the paint bucket tool, fill the selection with black paint. This will “erase” away the hatch pattern where the selection was made. White paint can be used to bring back the hatch pattern later if changes are needed.
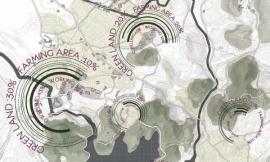
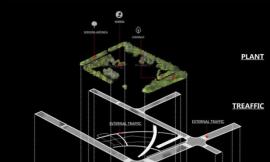
请看上图,最后的结果就是用图案和蒙版给图案增加更多一些纹理,以此来帮助定义分析图中的重点区域。
Below, the final result using patterns and masks to give a little more texture to the image and help define important areas of the diagram.
出处:本文译自visualizingarchitecture.com/,转载请注明出处。
|
|