/ Alex Hogrefe第1张图片")
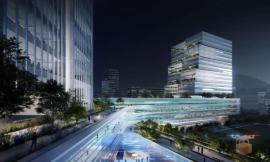
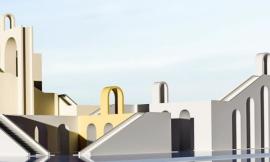
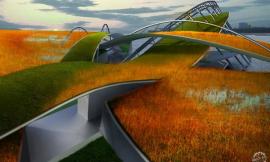
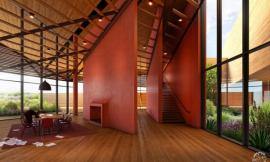
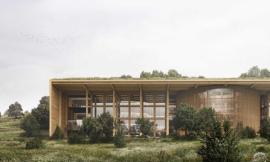
来自专筑编辑陈欣涛,许航的报道。自从我在几个月以前重新对这个模型进行建模之后,我就一直想要为这个Cranbrook项目做一张X光效果图。在制作的时候,我遇到了一个麻烦,这个图面并不能像我之前展示的那样,很好的适配x-ray风格问题的原因在于其结构体系与建筑形态以及坡地之间的复杂关系。如果过多的几何形态冲击人们的眼球,那么读者就会逐步丧失对于空间的理解。所以之后,我研究如何沿着建筑的长方向来切割不同的横断面,并将它们组合在一张透视图之中。我希望试试看,我是不是可以创造一幅图面,它可以实现对于整体形式和内部每个剖面空间的双重解读。通过它,读者可以清楚地知道内部在特定时刻所发生的活动,还能同时探究外部形态和内部空间的紧密关系。
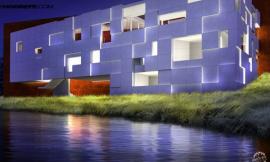
这张效果图是由下面七张不同的渲染图合成的。第一张渲染图在photoshop中作为底图,用来表现设计的整体外部形态轮廓。第二张渲染图剥去了部分的表皮来表现背后的结构部分。然后,我用佐罗刀生成了另外5个剖面。为了充分保持对于材质与颜色的控制,我渲染的所有物件都是白模,然后用photoshop来添加所有的材质和颜色。你可以访问这个链接(http://visualizingarchitecture.com/sketchup-to-kerkythea-clay-rendering/)来温故一下如何渲染白模。
Ever since I rebuilt this model a few months back, I have been wanting to generate an x-ray image of the Cranbrook project. I was having trouble getting the image to read properly because the design doesn’t lend itself well to the x-ray style that I have shown in the past. The problem was the complexity of the structure in relation to the building form and ramping system. There was so much geometry competing for attention that the spatial understanding was getting lost. I then explored cutting several transverse sections along the length of the building to combine them into one perspective view. I wanted to see if I could create an image that could achieve a dual reading of the overall form combined with a clear reading of each individual section. This allows for a clear understanding of what is happening inside at specific moments throughout the design while also explaining the relationship of the outside form with the interior spaces.
This illustration is made up of seven different renderings shown below. The first rendering acts as the base for the Photoshop file showing the entire exterior envelope of the design. The second rendering peels away part of the envelope revealing the structure behind. I then generated five section cuts using the ZORRO 2 plugin. To maintain certain control of the textures and color, I rendered everything as a clay model and then applied all of the textures and colors in Photoshop. You can revisit the clay model rendering tutorial HERE.
上图是我在Kerkythea中制作的外部体量的渲染图/Above, a clay model rendering of the exterior envelope using Kerkythea.
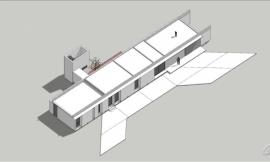
上图是一个隐去外表皮,展现结构部分的白模/Above, a clay model rendering of the structure with parts of the envelope peeled away.
上图是我用佐罗刀插件Zorro 2 plugin制作,并用kerkythea渲染的5个剖面/Above, five rendered section cuts using the Zorro 2 plugin to generate the cuts and using Kerkythea to render them.
当上述的七个渲染图都已经制作完毕,我开始将他们进行合成。我将每一个剖面切分,并将切割处的大约20英尺处的所有东西移除。然后用图层蒙版将剖面图和大的建筑外部场景进行拼贴。
With all seven renderings, I began piecing them together. I took each section slice and removed anything that was about 20 ft. away from the cut. I then used layer masks to blend the section into the large exterior building rendering.
当把这些白模的渲染图都拼贴完成,我开始给它们进行着色。这将花费我不少时间,我小心地给地面和墙体附上材质。我知道我需要在这个图面中展现大量的颜色,但我同时又要保持它的景深。这意味着需要使用一些color overlays的方法来获得整个图面色调的微妙的变化。
Once the clay model renderings were blended together, I began layering in color. I took my time with this step, slowly adding textures to the ground and walls. I knew I wanted a lot of color in this image, but I wanted it to have depth. This meant using several color overlays to achieve lots of subtle changes in tones throughout the image.
我大约利用了15种不同的色彩叠加来获得最终的效果。我同样给着色的地方添加了一下斑点。在最终的图纸里,你能看到阴影部分的蓝色要比其他地方强一些,同理,黄色在亮面也强烈了一点。一些光晕,光线和雾的效果给整个图面增加了景深,并帮助读者把注意力集中在设计的部分。
I probably used 15 different color overlays to create the final look. I was also splotchy with where I added the color. You can see in the final image that the blues are stronger in the shadows, the yellows are stronger in the light areas, and the reds are stronger in the transitional areas. Some Vignetting, light, and fog provided depth to the image and encourages more eye movement around the illustration.
因为这种类型的图纸需要七张不同的渲染图,所以,步骤比通常要多一些。但是,一旦进入了Photoshop环节,将每一个东西整合到一起就变得非常的快捷。同样,我也意识到在增加图面的可读性方面还有巨大的提升空间。在靠近剖切的一些地方,建筑的外轮廓也被逐渐模糊。最后,我决定剖面的表达强度需要提高一个层级,这也意味着牺牲清晰的建筑轮廓。或许会有一种更好的方法能够达到突出剖面的效果,我将在未来继续探索。
Since this type of illustration requires seven different renderings, the setup takes a little longer than normal. However, once in Photoshop, piecing everything together goes relatively quick. I still think there is more room to clarify the reading of the image. The building envelope gets lost among the sections in a few areas. Ultimately, I decided that the sections should be hierarchically stronger which meant sacrificing the clarity of the building form. There may be a better way to pull this off which I will continue to explore in the future.
出处:本文译自visualizingarchitecture.com/,转载请注明出处。
|
|
专于设计,筑就未来
无论您身在何方;无论您作品规模大小;无论您是否已在设计等相关领域小有名气;无论您是否已成功求学、步入职业设计师队伍;只要你有想法、有创意、有能力,专筑网都愿为您提供一个展示自己的舞台
投稿邮箱:submit@iarch.cn 如何向专筑投稿?
/ Alex Hogrefe第2张图片")
/ Alex Hogrefe第3张图片")
/ Alex Hogrefe第4张图片")
/ Alex Hogrefe第5张图片")
/ Alex Hogrefe第6张图片")
/ Alex Hogrefe第7张图片")
/ Alex Hogrefe第8张图片")