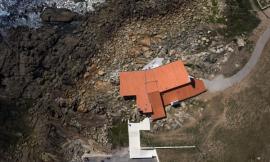
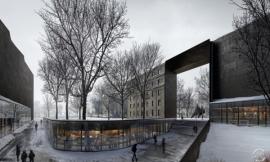
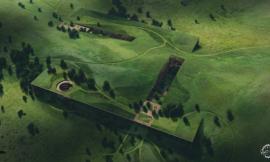
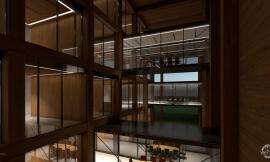
| 并不是每个人都有能力去渲染一个打了一堆光的复杂的模型。我就是其中之一。出于电脑硬件的原因我并不愿意在给我的模型打光上面花费更多的时间。起初,自己打光的方法是非常沉闷的。但是,一旦一开始发现你在模型中添加光源和模型所花费的渲染如此多灯光的时间是多么的惊人。你就知道,在photoshop软件中处理这一切是多么的顺利成章。关于如何不花费大量的时间而生产出一个干净的、写实的表现,我发展了一套具有典型意义的工作流程。我现在将以我几个月以前发表的一张雪景为例来开始我的教程。这个模型非常大而且有非常多的窗户需要渲染。下面的步骤就是我展示如何利用ps来给这些窗户打光。
Not everyone has the capabilities to render huge models with a ton of lights. I am one of those people where more times than not I have to manually add light to my illustrations because I don’t have the computing power. At first, this method can seem tedious. But, when you think about the time that it takes to insert lights into a model and then the time that it takes to render so many lights, knowing how to do this in Photoshop can be a great resource to have as a backup. There is a typical workflow I use that consistently yields clean, realistic results without much effort. I am using the urban snow scene that I posted a few months back as the base case for this tutorial. The model was large, and there were way too many windows to try to render. The steps I used to Photoshop the light are outlined below.
| |
|
1. SAVE THEREFLECTIONS
保留反射对于上面展示的场景,我所渲染的周边的建筑带有很强的反射。这要求我将这个反射单独拷贝出来并建立自己的图层,在后面的叠加操作中使用.为了将它们复制成自己的图层,我们选择polygonal tool(多边形工具),然后选择出窗户中我所打算打光的玻璃的部。右击选取,选择Layer via Copy (通过拷贝的图层)
For scenes like the one above, I rendered the glass of the surrounding buildings with a strong reflection. This allows me to copy the reflections to their own layer and use them later on as an overlay. To copy them to their own layer, select the “polygonal tool”, then select the glass of the windows you intend to light. Right-click on the selection and choose “Layer via Copy”.
| |

|
2. PAINT IN THE BASE LIGHT 绘制基础光线
然后,我创建一个新的名为“glass light”(玻璃打光)的图层。然后我选择了窗户中玻璃的部分。为了加快速度,我们可以按住ctrl键单击我们之前创建的反射图层(而不用再次利用多边形工具来选择所有的玻璃)。玻璃选区被建立了以后,就可以将笔刷的不透明度调到15%左右开始绘制。将笔刷从下至上慢慢拖动来确保灯光从窗户的底部慢慢晕染到窗户的上檐。
Next, I created a new layer called “glass light”. Again, I selected the glass part of the window. To speed things up, you can ctrl+click the reflections layer in the previous step instead of using the polygonal tool to reselect all of the glass. With the glass selected, choose the “Brush” tool, select a soft yellow paint color, select a “Soft Round” brush, and lower the opacity of the brush to around 15%. Begin painting color with most of the light at the bottom of the window fading away as you move towards the top of the window.
| |


|
3.HIGHLIGHTS 高光
这一步往往容易因为不被重视而遭人忽略。事实上,这恰恰是创造成功的光线的效果中决定性的一步!如果没有高光,那么光线看上去就是扁平的。那么,首先,我们要创建一个新的图层并将它的混合模式调成“Overlay”(覆盖)。只选择出面向窗户的,可能被从玻璃中穿透的光线所打亮的面。一个比较好的方法是找到与玻璃成90度夹角的面块。在这个选区被建立了以后,选择“Brush”笔刷工具,选择一个比较柔和的黄色来绘制,同时将笔刷的图案设置成“Soft Round”,并将透明度调整为35%.一看是画这个晕染的时候,会觉得这个光太弱了,这个时候,我们就可以通过复制这个正在绘制的图层来增强其效果.
This is one of those steps that is easy to forget or to treat as not important. In reality, it is the most crucial step in creating successful lighting. Without it, the light looks flat. Begin by creating a new layer and setting the blend mode to “Overlay”. Select only the surfaces facing the window that would be hit by the light coming through the glass. A good way to determine this is by looking for surfaces that are 90 degrees to the glass. With the selections made, choose the “Brush” tool, select a soft yellow paint, select a “Soft Round” brush, and set the opacity to around 35%. Begin painting in the highlights. If the highlights seem weak, you can amplify the results by duplicating the highlight layer.
| |


|
4. SOFT LIGHT GLOW柔和的光晕
这是另外一个微妙而又非常重要的步骤。首先,我们要创建一个新的图层,然后选择一个接近白色的画笔颜色。选择Paint(油漆桶)工具,然后选择“Soft Round”笔刷,将不透明度调到12%到15%的非常低的程度。在窗户的周围开始绘制要时刻当心不能操作过度。
Another subtle, but important step. Create a new layer and choose an off white paint color. Choose the “Paint” tool, select a “Soft Round” brush, and set the opacity really low to something like 12% to 15%. Begin painting around the window edges being careful not to overdo it.
| |


|
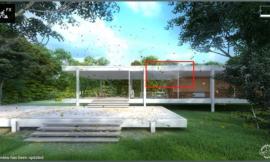
5. BRING BACK THE REFLECTIONS调回反射
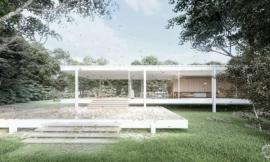
最后一步就是调回第一步操作的反射层。将这个图层移到图层列表的最上面,然后将图层混合模式调成“screen”。这将放大反射的效果,因为之前的几步操作都很有可能将反射稀释掉了。
The last step is to retrieve the reflections layer created in the first step. Bring that layer to the top of the layers pallet, and set the blend mode to “Screen”. This will amplify the reflections since they were most likely diluted from the painting in the previous steps.
| |


BEFORE

AFTER

| 本文来源于:http://visualizingarchitecture.com
编辑: 陈欣涛,李洁璇 |
|
|
|